Inside this article, we will see the concept of CakePHP 4 Google Pie Chart Integration. This article will be step by step graph integration.
Pie chart represents the information in very graphical view which provides the complete idea about data. Google charts provides several graphical view. Here, we will use google charts to add Pie chart into CakePHP 4 application.
Learn More –
- CakePHP 4 Form Validation with Example
- CakePHP 4 Google Bar Chart Integration Tutorial
- CakePHP 4 How To Add Column in Table Using Migration
- CakePHP 4 How To Add CSRF Token To Ajax Request
Let’s get started.
CakePHP 4 Installation
To create a CakePHP project, run this command into your shell or terminal. Make sure composer should be installed in your system.
$ composer create-project --prefer-dist cakephp/app:~4.0 mycakephp
Above command will creates a project with the name called mycakephp.
Create Database
To create a database, either we can create via Manual tool of PhpMyadmin or by means of a mysql command.
CREATE DATABASE mydatabase;Successfully, we have created a database.
Database Connection
Open app_local.php file from /config folder. Search for Datasources. Go to default array of it.
You can add your connection details here to connect with your database. It will be like this –
//...

'Datasources' => [
        'default' => [
            'host' => 'localhost',
            /*
             * CakePHP will use the default DB port based on the driver selected
             * MySQL on MAMP uses port 8889, MAMP users will want to uncomment
             * the following line and set the port accordingly
             */
            //'port' => 'non_standard_port_number',

            'username' => 'root',
            'password' => 'sample@123',

            'database' => 'mydatabase',
            /*
             * If not using the default 'public' schema with the PostgreSQL driver
             * set it here.
             */
            //'schema' => 'myapp',

            /*
             * You can use a DSN string to set the entire configuration
             */
            'url' => env('DATABASE_URL', null),
        ],

     //...

//...
You can pass host, username, password and database.
Successfully, you are now connected with the database.
Create Migration
Open project into terminal and run this bake console command –
$ bin/cake bake migration CreateUsersIt will create a file 20220321024457_CreateUsers.php /config/Migrations folder.
Open 20220321024457_CreateUsers.php and write this following code into it. It will create users table into database.
<?php

declare(strict_types=1);

use Migrations\AbstractMigration;

class CreateUsers extends AbstractMigration
{
    public function change()
    {
        $table = $this->table('users');

        $table->addColumn("name", "string", [
            "limit" => 150,
            "null" => false
        ]);

        $table->addColumn("email", "string", [
            "limit" => 50,
            "null" => false
        ]);

        $table->addColumn("contact_no", "string", [
            "limit" => 25,
            "null" => false
        ]);

        $table->addColumn("created_at", "timestamp", [
            "default" => "CURRENT_TIMESTAMP"
        ]);

        $table->create();
    }
}
Run Migration
Run migration to create a database table.
$ bin/cake migrations migrateImport Test Data to Table
Here, we have a simple script to insert some test values into table. Copy code and execute inside created database.
--
-- Dumping data for table `users`
--

INSERT INTO `users` (`id`, `name`, `email`, `contact_no`, `created_at`) VALUES
(1, 'Sanjay Kumar', 'sanjay@test.com', '8527419635', '2019-01-01'),
(2, 'Vijay Rohila', 'vijay@net.com', '8529632145', '2019-02-01'),
(3, 'Ashish Kumar', 'ashish@gmail.com', '8956237415', '2018-03-01'),
(4, 'Dhananjay Negi', 'dj@test.com', '9000000004', '2019-04-01'),
(5, 'Pradeep Goyal', 'pradeep@test.com', '8794563215', '2017-05-01'),
(6, 'Monu Thakur', 'monu_thakur@test.com', '8749653215', '2019-06-01'),
(7, 'Prateek', 'prateek@test.com', '7412589632', '2019-07-01'),
(8, 'Raj Kishore', 'raj_kishore@test.com', '9874563215', '2016-08-01'),
(9, 'Deepak Kumar', 'deepak@test.com', '7458963214', '2019-09-01'),
(10, 'Rajan', 'rajan@test.com', '9874563218', '2019-10-01'),
(11, 'Herry', 'herry@test.com', '8526397418', '2019-11-01'),
(12, 'Mark', 'mark@test.com', '9852631478', '2019-12-01');
After data entries, your users table should look like this.

Create Controller
Again, back to terminal and this bake console command to create controller class.
$ bin/cake bake controller Site --no-actionsIt will create a controller class SiteController.php inside /src/Controller folder. Open and write this following code into it.
<?php

declare(strict_types=1);

namespace App\Controller;

use Cake\Datasource\ConnectionManager;

class SiteController extends AppController
{
    private $db;

    public function initialize(): void
    {
        parent::initialize();

        $this->db = ConnectionManager::get("default");
    }

    public function pieChart()
    {
        $year_wise = $this->db->execute("SELECT COUNT(id) as count,YEAR(created_at) as year FROM users GROUP BY YEAR(created_at)")->fetchAll("assoc");

        $this->set(compact("year_wise"));
    }
}
Create Template File
Create a folder with controller name i.e Site inside /templates folder. Create a file pie_chart.php into /templates/Site folder.
In this template file we will create layout to display pie chart.
<!Doctype html>
<html>

<head>
    <title>CakePHP 4 Google Pie Chart Integration Tutorial</title>
    <link rel="stylesheet" href="https://maxcdn.bootstrapcdn.com/bootstrap/3.4.1/css/bootstrap.min.css">
    <script src="https://www.gstatic.com/charts/loader.js"></script>
    <script>
        google.charts.load('visualization', "1", {
            packages: ['corechart']
        });
    </script>
</head>

<body>
    <div class="row">
        <div class="col-md-12">
            <h3 style="text-align: center;">CakePHP 4 Google Pie Chart Integration Tutorial</h3>
            <div id="year_pie" style="width: 900px; height: 500px; margin: 0 auto"></div>
        </div>
    </div>
    <script>
        // Draw the pie chart for registered users year wise
        google.charts.setOnLoadCallback(yearWiseChart);

        // for year wise
        function yearWiseChart() {

            /* Define the chart to be drawn.*/
            var data = google.visualization.arrayToDataTable([
                ['Year', 'Users Count'],
                <?php
                foreach ($year_wise as $row) {
                    echo "['" . $row['year'] . "'," . $row['count'] . "],";
                }
                ?>
            ]);
            var options = {
                title: 'Year Wise Registered Users Pie Chart',
                is3D: true,
            };
            /* Instantiate and draw the chart.*/
            var chart = new google.visualization.PieChart(document.getElementById('year_pie'));
            chart.draw(data, options);
        }
    </script>
</body>

</html>
Create Route
Open routes.php file from /config folder. Add this route into it.
//...

$routes->connect(
    '/pie-chart',
    ['controller' => 'Site', 'action' => 'pieChart']
);

//...
Application Testing
To execute start development server.
$ bin/cake serverURL: http://localhost:8765/pie-chart
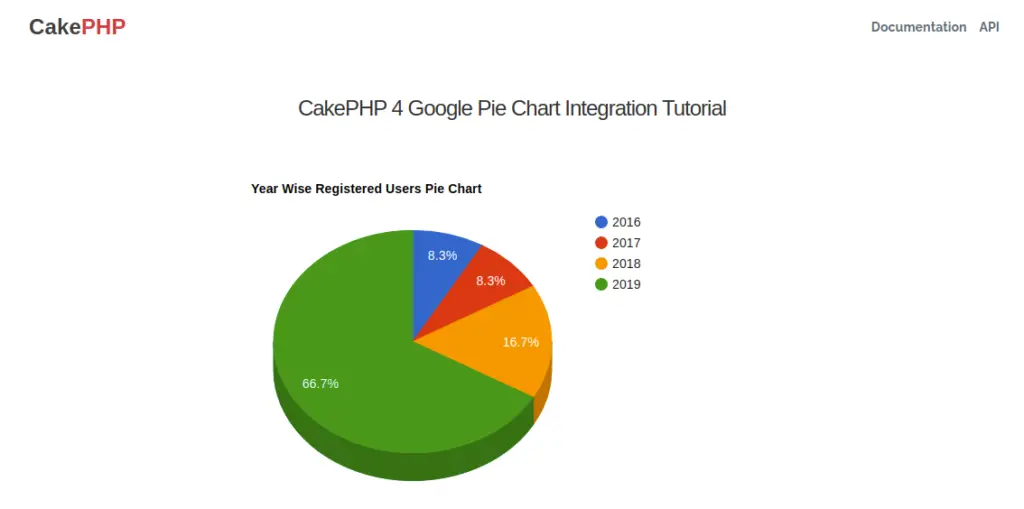
We hope this article helped you to learn CakePHP 4 Google Pie Chart Integration Tutorial in a very detailed way.
If you liked this article, then please subscribe to our YouTube Channel for PHP & it’s framework, WordPress, Node Js video tutorials. You can also find us on Twitter and Facebook.
Read more