Toastr is a lightweight, user-friendly notification library for displaying success, error, warning, or info messages in a web application. In this blog, we’ll walk you through the steps to integrate Toastr into a Laravel 11 project.
We’ll cover how to install and configure Toastr, customize the notifications, and trigger them in different scenarios, such as after form submissions or AJAX requests. This guide will help enhance user experience by providing real-time feedback in your Laravel 11 applications.
Let’s get started.
Laravel Installation
Open terminal and run this command to create a laravel project.
composer create-project laravel/laravel myblogIt will create a project folder with name myblog inside your local system.
To start the development server of laravel –
php artisan serveURL: http://127.0.0.1:8000
Assuming laravel already installed inside your system.
Notification Controller Settings
Run this command to create a notification controller class,
php artisan make:controller NotificationControllerIt will create a file named NotificationController.php inside /app/Http/Controllers folder.
Open file and write this complete code into it,
<?php

namespace App\Http\Controllers;

use Illuminate\Http\Request;

class NotificationController extends Controller
{
    public function index()
    {
        return view('notification');
    }

    public function notification($type)
    {
        switch ($type) {
            case 'success':
                return back()->with("success", "This is a Success Message");
                break;

            case 'info':
                return back()->with("info", "This is an information Message");
                break;

            case 'warning':
                return back()->with("warning", "This is a warning Message");
                break;

            case 'error':
                return back()->with("error", "This is an error Message");
                break;

            default:
                // code...
                break;
        }
    }
}
Blade Template Setup
Create a file notification.blade.php inside resources/views folder.
Open file and write this complete code into it,
<!DOCTYPE html>
<html>
<head>
<meta charset="utf-8">
<meta name="viewport" content="width=device-width, initial-scale=1">
<title>Laravel 11 Toastr Notification</title>
<link href="https://cdn.jsdelivr.net/npm/bootstrap@5.0.2/dist/css/bootstrap.min.css" rel="stylesheet">
<script src="https://cdnjs.cloudflare.com/ajax/libs/jquery/3.7.1/jquery.min.js"></script>
<script src="https://cdnjs.cloudflare.com/ajax/libs/toastr.js/2.1.4/toastr.min.js"></script>
<link rel="stylesheet" href="https://cdnjs.cloudflare.com/ajax/libs/toastr.js/2.1.4/toastr.css" />
</head>
<body>
<div class="container">
<div class="card mt-5">
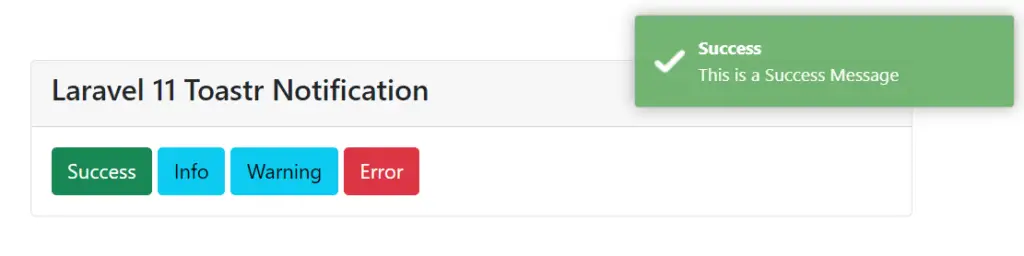
<div class="card-header"><h4>Laravel 11 Toastr Notification</h4></div>
<div class="card-body">
<a href="{{ route('notification', 'success') }}" class="btn btn-success">Success</a>
<a href="{{ route('notification', 'info') }}" class="btn btn-info">Info</a>
<a href="{{ route('notification', 'warning') }}" class="btn btn-info">Warning</a>
<a href="{{ route('notification', 'error') }}" class="btn btn-danger">Error</a>
</div>
</div>
</div>
<script type="text/javascript">
@session("success")
toastr.success("{{ $value }}", "Success");
@endsession
@session("info")
toastr.info("{{ $value }}", "Info");
@endsession
@session("warning")
toastr.warning("{{ $value }}", "Warning");
@endsession
@session("error")
toastr.error("{{ $value }}", "Error");
@endsession
</script>
</body>
</html>Add Route
Open routes/web.php and add this route into it,
//..
use App\Http\Controllers\NotificationController;

Route::get('notification', [NotificationController::class, 'index']);
Route::get('notification/{type}', [NotificationController::class, 'notification'])->name("notification");

//..
Application Testing
Run this command into project terminal to start development server,
php artisan serveURL: http://127.0.0.1:8000/notification
That’s it.
We hope this article helped you to learn about How To Use Toastr jQuery Notification in Laravel 11 in a very detailed way.
If you liked this article, then please subscribe to our YouTube Channel for PHP & it’s framework, WordPress, Node Js video tutorials. You can also find us on Twitter and Facebook.
Read more