
Inside this article we will see the complete concept of CakePHP 4 CRUD Using Ajax. We will create this application from scratch. Also already have the article CakePHP 4 CRUD Tutorial.
In this CRUD tutorial using Ajax we will see following operations –
- List
- Create
- Edit
- Delete
Additionally we will cover the implementation of CSRF in CakePHP 4, request processing, flash message settings and many more.
Let’s get started.
CakePHP 4 Installation
To create a CakePHP project, run this command into your shell or terminal. Make sure composer should be installed in your system.
$ composer create-project --prefer-dist cakephp/app:~4.0 mycakephp
Above command will creates a project with the name called mycakephp.
Application Database & It’s Configuration
We need to create a database. Database table is going to store form data. We have created a database in PhpMyAdmin with the name of cakephp4_crud. You can choose your own custom name of database.
Either you can use Manual tool of MySQL or you can create via MySQL command.
CREATE DATABASE cakephp4_crud;
So, now we have a database. We need to create a table to store data. Let’s create a table with the name of tbl_students. This table again we can create via Manual interface of creating table or we can run a command to create it.
Create Table tbl_students –
CREATE TABLE IF NOT EXISTStbl_students(idint(10) unsigned NOT NULL AUTO_INCREMENT,namevarchar(120) COLLATE utf8_unicode_ci NOT NULL,phone_novarchar(30) COLLATE utf8_unicode_ci NOT NULL, PRIMARY KEY (id) ) ENGINE=InnoDB DEFAULT CHARSET=utf8 COLLATE=utf8_unicode_ci;
In table tbl_students we have columns as id, name, email & phone_no.
After creating database and table, now we need to configure and connect database with CakePHP 4 application.
Go to Project setup >> config (directory) >> app_local.php (file). Open this file to connect database.
'Datasources' => [
    'default' => [
      'host' => 'localhost',
      /*
               * CakePHP will use the default DB port based on the driver selected
               * MySQL on MAMP uses port 8889, MAMP users will want to uncomment
               * the following line and set the port accordingly
               */
      //'port' => 'non_standard_port_number',

      'username' => 'root',
      'password' => 'root',

      'database' => 'cakephp4_crud',
      /**
               * If not using the default 'public' schema with the PostgreSQL driver
               * set it here.
               */
      //'schema' => 'myapp',

      /**
               * You can use a DSN string to set the entire configuration
               */
      'url' => env('DATABASE_URL', null),
    ],
  ]
Successfully, we have now configured database connection with CakePHP 4 application.
Settings Application Routes
We need to create now application routes from where we can control the database operations like Create, Read, Update & Delete operations.
Go to Project Setup >> config (directory) >> routes.php (file). Open this file. We need to add CRUD routes in this file.
$routes->scope('/', function (RouteBuilder $builder) {

    // Student Routes
    $builder->connect('/add-student', ['controller' => 'Students', 'action' => 'addStudent']);
    $builder->connect('/edit-student/:id', ['controller' => 'Students', 'action' => 'editStudent'], ["pass" => ["id"]]);
    $builder->connect('/list-students', ['controller' => 'Students', 'action' => 'listStudents']);

    // Ajax Routes
    $builder->connect('/ajax-add-student', ['controller' => 'Ajax', 'action' => 'ajaxAddStudent']);
    $builder->connect('/ajax-edit-student', ['controller' => 'Ajax', 'action' => 'ajaxEditStudent']);
    $builder->connect('/ajax-delete-student', ['controller' => 'Ajax', 'action' => 'ajaxDeleteStudent']);

});
Inside this routes configuration, we can see we have created routes for rendering layouts and ajax routes for request processing. Next, we need to create Controllers. Because all the actions what we have defined these are from Students & Ajax Controller.
Application Models & Entity Settings
We need to configure Model & Entity. Model contains the information of Table where we will do crud operations. Entity define the columns for value assignment.
To create a model –
Go to Project Setup >> src (directory) >> Model (directory) >> Table (directory).
Inside Table directory, create a file StudentsTable.php. Inside this file copy and paste this given code.
<?php

namespace App\Model\Table;

use Cake\ORM\Table;

class StudentsTable extends Table
{
    public function initialize(array $config): void
    {
        $this->setTable("tbl_students");
    }
}
Next, we need to set Entity for Table definition about value assignments.
To Create an Entity –
Go to Project Setup >> src (directory) >> Model (directory) >> Entity (directory).
Inside Table directory, create a file Student.php. Inside this file copy and paste this given code.
<?php

namespace App\Model\Entity;

use Cake\ORM\Entity;

class Student extends Entity
{
    protected $_accessible = [
        "name" => true,
        "email" => true,
        "phone_no" => true
    ];
}
Create Controller & CRUD Methods
Controller is the file which controls the application flow.
Here we will create two controller files. Inside StudentsController.php file we will create methods for rendering layouts of add page, edit page, list page.
Second file i.e AjaxController.php which handles the create, read, delete & update functional part.
To Create Controllers –
Go to Project Setup >> src (directory) >> Controller (directory)
Create first controller i.e /src/Controller/StudentsController.php
<?php

namespace App\Controller;

use App\Controller\AppController;

class StudentsController extends AppController
{
    public function initialize(): void
    {
        parent::initialize();

        $this->loadModel("Students");
        // Created app.php file inside /templates/layout/app.php
        $this->viewBuilder()->setLayout("app");
    }

    public function addStudent()
    {
        $this->set("title", "Add Stduent");
    }

    public function listStudents()
    {
        $students = $this->Students->find()->toList();
        $this->set("title", "List Student");
        $this->set(compact("students"));
    }

    public function editStudent($id = null)
    {
        $student = $this->Students->get($id, [
            'contain' => [],
        ]);
        $this->set(compact('student'));
        $this->set("title", "Edit Student");
    }
}
Inside above code we can see addStudent, editStudent, listStudents are the methods which handles to render the layout for create, edit and list pages. Keep in mind we have declared Model & Entity before creating this controller.
$this->loadModel(“Students”); This is loading Students model to controller.
Next, we need to create controller for processing our Ajax requests.
Create /src/Controller/AjaxController.php file.
<?php

namespace App\Controller;

use App\Controller\AppController;

class AjaxController extends AppController
{
    public function initialize(): void
    {
        parent::initialize();

        $this->loadModel("Students");
    }

    public function ajaxAddStudent(){

        if ($this->request->is('ajax')) {

            $student = $this->Students->newEmptyEntity();

            $student = $this->Students->patchEntity($student, $this->request->getData());
            if ($this->Students->save($student)) {

                $this->Flash->success(__('Student has been created'));

                echo json_encode(array(
                    "status" => 1,
                    "message" => "Student has been created"
                ));

                exit;
            }

            $this->Flash->error(__('Failed to save student data'));

            echo json_encode(array(
                "status" => 0,
                "message" => "Failed to create"
            ));

            exit;
        }
    }

    public function ajaxEditStudent(){

        if ($this->request->is('ajax')) {

            $student = $this->Students->get($this->request->getData("student_id"), [
                'contain' => [],
            ]);

            $student = $this->Students->patchEntity($student, $this->request->getData());

            if ($this->Students->save($student)) {

                $this->Flash->success(__('Student has been updated'));

                echo json_encode(array(
                    "status" => 1,
                    "message" => "Student has been updated"
                ));

                exit;
            }

            $this->Flash->error(__('Failed to update student data'));

            echo json_encode(array(
                "status" => 0,
                "message" => "Failed to update student data"
            ));

            exit;
        }
    }

    public function ajaxDeleteStudent()
    {
        if ($this->request->is('ajax')) {

            $student = $this->Students->get($this->request->getData("student_id"));

            if ($this->Students->delete($student)) {

                $this->Flash->success(__('The student has been deleted.'));

                echo json_encode(array(
                    "status" => 1,
                    "message" => "The student has been deleted."
                ));

                exit;

            } else {
                $this->Flash->error(__('The student could not be deleted. Please, try again.'));

                echo json_encode(array(
                    "status" => 0,
                    "message" => "The student could not be deleted. Please, try again."
                ));

                exit;
            }
        }
    }
}- $this->request->is(‘ajax’) for checking it’s a ajax request processing.
- $this->Flash->success() Flash message for success
- $this->Flash->error() Flash message for error
- Before using Flash Messages, make sure $this->loadComponent(‘Flash’); should be loaded into AppController.php (which is at /src/Controller)
- ajaxAddStudent() method is for create and save form data
- ajaxEditStudent() method updating information to table using id.
- ajaxDeleteStudent() is for delete operation
Create Parent Layout
Create a file inside /templates/layout directory with the name app.php.
This app.php file will be a parent layout file for add, edit and list page. Open app.php and write this code.
Open /templates/layout/app.php
<!DOCTYPE html>
<html lang="en">
<head>
  <title>CakePHP 4 CRUD Using Ajax</title>
  <meta charset="utf-8">
  <meta name="viewport" content="width=device-width, initial-scale=1">
  <link rel="stylesheet" href="https://maxcdn.bootstrapcdn.com/bootstrap/3.4.1/css/bootstrap.min.css">
  <script src="https://ajax.googleapis.com/ajax/libs/jquery/3.5.1/jquery.min.js"></script>
  <script src="https://maxcdn.bootstrapcdn.com/bootstrap/3.4.1/js/bootstrap.min.js"></script>

  <?php echo $this->Html->meta('csrfToken', $this->request->getAttribute('csrfToken')); ?>
  <script>
     var csrfToken = $('meta[name="csrfToken"]').attr('content');
  </script>

</head>
<body>

<div class="container" style="margin-top:50px">
            <?= $this->Flash->render() ?>
            <?= $this->fetch('content') ?>
</div>

<?php echo $this->Html->script('custom'); ?>
</body>
</html>- $this->Html->meta(‘csrfToken’, $this->request->getAttribute(‘csrfToken’)) Creating a csrf meta tag with token value into content
- var csrfToken = $(‘meta[name=”csrfToken”]’).attr(‘content’); Reading token value from meta and storing into js variable.
- $this->Html->script(‘custom’); Defined for custom js file. So create a file custom.js in /webroot/js directory. In few seconds we will add code of ajax and events into it.
Creating View for Methods
For crud methods like for add, edit, list we want the application view files. To create view files we will create a folder inside /templates directory.
Folder name – /templates/Students. Students is the name of the controller. We will keep all views inside this folder. Let’s create views for CRUD methods –
- addStudent – add_student.php
- editStudent – edit_student.php
- listStudents – list_students.php
These all views will be created inside /templates/Students/* directory.
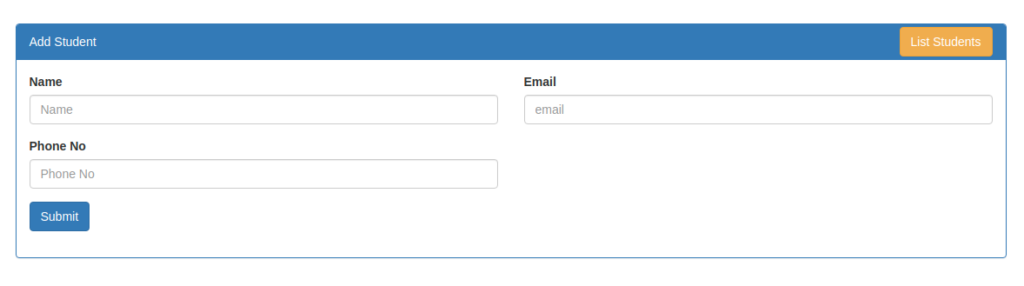
<div class="panel panel-primary">
  <div class="panel-heading">
    Add Student
    <?php
    echo $this->Html->link(
        'List Students',
        '/list-students',
        ['class' => 'btn btn-warning pull-right', 'style' => 'margin-top:-7px']
    );
    ?>
  </div>
  <div class="panel-body">
  <form action="javascript:void(0)" id="frm-add-student" method="post">
    <div class="row custom-padding">
        <div class="col-sm-6">
            <!-- text input -->
            <div class="form-group">
                <label>Name</label>
                <input type="text" required class="form-control" placeholder="Name" name="name">
            </div>
        </div>
        <div class="col-sm-6">
            <!-- text input -->
            <div class="form-group">
                <label>Email</label>
                <input type="email" required class="form-control" placeholder="email" name="email">
            </div>
        </div>
        </div>
        <div class="row custom-padding">
        <div class="col-sm-6">
            <!-- text input -->
            <div class="form-group">
                <label>Phone No</label>
                <input type="text" required class="form-control" placeholder="Phone No" name="phone_no">
            </div>
        </div>
        </div>
        <div class="row custom-padding">
        <div class="col-sm-6">
            <!-- Select multiple-->
            <div class="form-group">
                <button class="btn btn-primary">Submit</button>
            </div>
        </div>
        </div>
    </form>
  </div>
</div>
List view file –
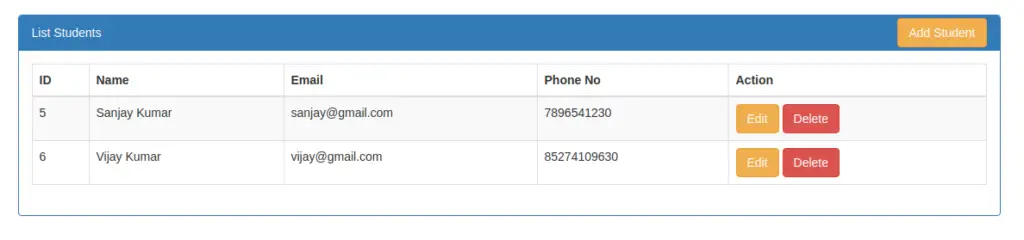
<div class="panel panel-primary">
  <div class="panel-heading">
    List Students
    <?php
    echo $this->Html->link(
      'Add Student',
      '/add-student',
      ['class' => 'btn btn-warning pull-right', 'style' => 'margin-top:-7px']
    );
    ?>
  </div>
  <div class="panel-body">

    <table id="tbl-students-list" class="table table-bordered table-striped">
      <thead>
        <tr>
          <th>ID</th>
          <th>Name</th>
          <th>Email</th>
          <th>Phone No</th>
          <th>Action</th>
        </tr>
      </thead>
      <tbody>
        <?php
        if (count($students) > 0) {
          foreach ($students as $index => $data) {
        ?>
            <tr>
              <td><?= $data->id ?></td>
              <td><?= $data->name ?></td>
              <td><?= $data->email ?></td>
              <td><?= $data->phone_no ?></td>
              <td>
                <a href="<?= $this->Url->build('/edit-student/' . $data->id, ['fullBase' => true]) ?>" class="btn btn-warning">Edit</a>

                <a href="javascript:void(0)" class="btn btn-danger btn-delete-student" data-id="<?= $data->id ?>">Delete</a>
              </td>
            </tr>
        <?php
          }
        }
        ?>
      </tbody>
    </table>
  </div>
</div>
Edit view file –
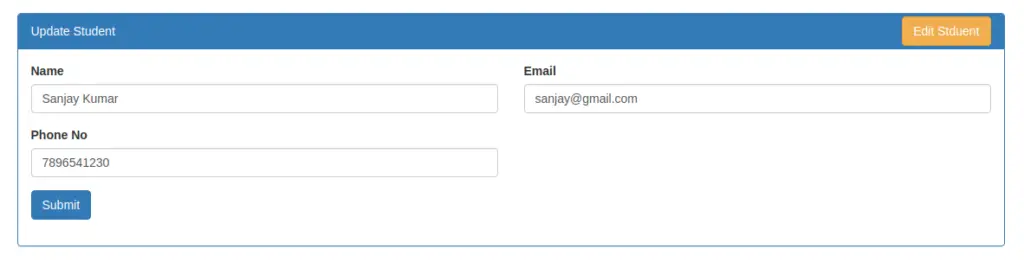
<div class="panel panel-primary">
    <div class="panel-heading">
        Update Student
        <?php
        echo $this->Html->link(
            'Edit Stduent',
            '/list-students',
            ['class' => 'btn btn-warning pull-right', 'style' => 'margin-top:-7px']
        );
        ?>
    </div>
    <div class="panel-body">
        <form action="javascript:void(0)" id="frm-edit-student" method="post">

            <input type="hidden" name="student_id" value="<?= $student->id ?>">

            <div class="row custom-padding">
                <div class="col-sm-6">
                    <!-- text input -->
                    <div class="form-group">
                        <label>Name</label>
                        <input type="text" value="<?= $student->name ?>" required class="form-control" placeholder="Name" name="name">
                    </div>
                </div>
                <div class="col-sm-6">
                    <!-- text input -->
                    <div class="form-group">
                        <label>Email</label>
                        <input type="email" value="<?= $student->email ?>" required class="form-control" placeholder="email" name="email">
                    </div>
                </div>
            </div>
            <div class="row custom-padding">
                <div class="col-sm-6">
                    <!-- text input -->
                    <div class="form-group">
                        <label>Phone No</label>
                        <input type="text" value="<?= $student->phone_no ?>" required class="form-control" placeholder="Phone No" name="phone_no">
                    </div>
                </div>
            </div>


            <div class="row custom-padding">
                <div class="col-sm-6">
                    <!-- Select multiple-->
                    <div class="form-group">
                        <button class="btn btn-primary">Submit</button>
                    </div>
                </div>
            </div>
        </form>

    </div>
</div>
Successfully, we have created layouts for create, edit, and list page.
Adding Ajax Code into Application
As you have seen, we have attached custom.js into parent layout file. So open custom.js from /webroot/js directory.
This file will handle all click events of forms and buttons of layouts.
$(function(){
    // file for custom js code

    // Ajax csrf token setup
    $.ajaxSetup({
        headers: {
            'X-CSRF-TOKEN': csrfToken // this is defined in app.php as a js variable
        }
    });

    // ajax request to save student
    $("#frm-add-student").on("submit", function(){

        var postdata = $("#frm-add-student").serialize();
        $.ajax({
            url: "/ajax-add-student",
            data: postdata,
            type: "JSON",
            method: "post",
            success:function(response){

                window.location.href = '/list-students'
            }
        });
    });

    // ajax request to update student
    $(document).on("submit", "#frm-edit-student", function(){

        var postdata = $("#frm-edit-student").serialize();

        $.ajax({
            url: "/ajax-edit-student",
            data: postdata,
            type: "JSON",
            method: "post",
            success:function(response){

                window.location.href = '/list-students'
            }
        });
    });

    // ajax request to delete student
    $(document).on("click", ".btn-delete-student", function(){

        if(confirm("Are you sure want to delete ?")){

            var postdata = "student_id=" + $(this).attr("data-id");
            $.ajax({
                url: "/ajax-delete-student",
                data: postdata,
                type: "JSON",
                method: "post",
                success:function(response){

                    window.location.href = '/list-students'
                }
            });
        }
    });
});
Customizing Flash Layout Template
To render success message of flash we used $this->Flash->success() and for error message $this->Flash->error(). Behind the scene these methods uses template layouts for success as well as for error. Flash is nothing, it’s a CakePHP component.
Template layouts for Flash messages
- For success which is by $this->Flash->success(), uses /templates/element/flash/success.php
- For error which is by $this->Flash->error(), uses /templates/element/flash/error.php
Open success.php
<?php
/**
 * @var \App\View\AppView $this
 * @var array $params
 * @var string $message
 */
if (!isset($params['escape']) || $params['escape'] !== false) {
    $message = h($message);
}
?>
<div class="alert alert-success" onclick="this.classList.add('hidden')"><?= $message ?></div>
Inside this layout we have only added bootstrap alert classes i.e alert alert-success instead of default classes of cakephp.
<?php
/**
 * @var \App\View\AppView $this
 * @var array $params
 * @var string $message
 */
if (!isset($params['escape']) || $params['escape'] !== false) {
    $message = h($message);
}
?>
<div class="alert alert-danger" onclick="this.classList.add('hidden');"><?= $message ?></div>
Application Testing
Open project into terminal and start development server using this.
$ bin/cake server -p 8765
Add Student Page URL: http://localhost:8765/add-student
Edit Student Page URL: http://localhost:8765/edit-student/2
List Student Page URL: http://localhost:8765/list-students
We hope this article helped you to learn about CakePHP 4 CRUD Using Ajax Requests Tutorial in a very detailed way.
If you liked this article, then please subscribe to our YouTube Channel for PHP & it’s framework, WordPress, Node Js video tutorials. You can also find us on Twitter and Facebook.
Read more
Sanjay Sir you are great,
Thanks @Farrukh
Dear Sanjay Sir Can you provide me source code .
You can use the code sections step by step given inside blog content.
Hmm! I don’t really get it. What is the point of sending ajax request if you redirect the page:
window.location.href = ‘/list-students’
Hi, this window.location.href will be executed once you will get response from server. Before it will not touch this line.