Laravel already provides many in packages for authentication and it’s scaffolding. Few of them are like laravel/ui, breeze, jetstream etc.
Inside this article we will see the concept of creating custom login and registration in laravel 8. This will be the super easy article to understand. Inside custom login and registration process, if you which you can add more fields in any of the form. You can control the overall flow of login and registration process of user.
It covers each section in a very clear way. We need few routes, a controller, view auth scaffolding files. That’s all.
Let’s get started.
Laravel Installation
We will create laravel project using composer. So, please make sure your system should have composer installed. If not, may be this article will help you to Install composer in system.
Here is the command to create a laravel project-
composer create-project --prefer-dist laravel/laravel blog
To start the development server of Laravel –
php artisan serve
URL: http://127.0.0.1:8000
Assuming laravel already installed inside your system.
Create Database & Connect
To create a database, either we can create via Manual tool of PhpMyadmin or by means of a mysql command.
CREATE DATABASE laravel_app;
To connect database with application, Open .env file from application root. Search for DB_ and update your details.
DB_CONNECTION=mysql
DB_HOST=127.0.0.1
DB_PORT=3306
DB_DATABASE=laravel_app
DB_USERNAME=root
DB_PASSWORD=root
Migrate Migration
When we install laravel we will have 3 default migrations inside /database/migrations folder. From these migration we have one migration for users table.
Open project into terminal and run this artisan command.
$ php artisan migrate
It will create 3 tables inside database.
Create Controller
Back to terminal and run this artisan command to create controller.
$ php artisan make:controller AuthController
It will create AuthController.php file inside /app/Http/Controllers folder.
Open AuthController.php and write this complete code into it.
<?php

namespace App\Http\Controllers;

use App\Http\Controllers\Controller;
use Illuminate\Http\Request;
use Illuminate\Support\Facades\Auth;
use Session;
use App\Models\User;
use Hash;

class AuthController extends Controller
{
    /**
     * Write code on Method
     *
     * @return response()
     */
    public function index()
    {
        return view('auth.login');
    }

    /**
     * Write code on Method
     *
     * @return response()
     */
    public function registration()
    {
        return view('auth.register');
    }

    /**
     * Write code on Method
     *
     * @return response()
     */
    public function postLogin(Request $request)
    {
        $request->validate([
            'email' => 'required',
            'password' => 'required',
        ]);

        $credentials = $request->only('email', 'password');

        if (Auth::attempt($credentials)) {

            return redirect()->intended('dashboard')
                        ->withSuccess('You have Successfully logged in');
        }

        return redirect("login")->withSuccess('Sorry! You have entered invalid credentials');
    }

    /**
     * Write code on Method
     *
     * @return response()
     */
    public function postRegistration(Request $request)
    {
        $request->validate([
            'name' => 'required',
            'email' => 'required|email|unique:users',
            'password' => 'required|min:6',
        ]);

        $data = $request->all();
        $check = $this->create($data);

        return redirect("login")->withSuccess('Great! please login.');
    }

    /**
     * Write code on Method
     *
     * @return response()
     */
    public function dashboard()
    {
        if(Auth::check()){
            return view('dashboard');
        }

        return redirect("login")->withSuccess('Opps! You do not have access');
    }

    /**
     * Write code on Method
     *
     * @return response()
     */
    public function create(array $data)
    {
      return User::create([
        'name' => $data['name'],
        'email' => $data['email'],
        'password' => Hash::make($data['password'])
      ]);
    }

    /**
     * Write code on Method
     *
     * @return response()
     */
    public function logout() {
        Session::flush();
        Auth::logout();

        return Redirect('login');
    }
}
Inside this controller file we have all the methods and their post submission handlers which handles all functions like login, registration, dashboard, logout.
Add Routes
Open web.php file from /routes folder. Add these routes into it.
# Add this to header
use App\Http\Controllers\AuthController;

//...

Route::get('login', [AuthController::class, 'index'])->name('login');
Route::post('submit-login', [AuthController::class, 'postLogin'])->name('login.post');
Route::get('registration', [AuthController::class, 'registration'])->name('register');
Route::post('submit-registration', [AuthController::class, 'postRegistration'])->name('register.post');
Route::get('dashboard', [AuthController::class, 'dashboard']);
Route::get('logout', [AuthController::class, 'logout'])->name('logout');
Create Blade Layout Files
Next, we need to create a layout file and then associated view files. So, we need these files –
- Parent Layout File – /resources/views/layouts/layout.blade.php
- Login View – /resources/views/auth/login.blade.php
- Registration View – /resources/views/auth/register.blade.php
- Dashboard View – /resources/views/dashboard.blade.php
Need to create two folders inside /resources/views – layouts and auth
Parent Layout View
Create a file layout.blade.php inside /resources/views/layouts folder.
Open layout.blade.php and write this complete code into it.
<!DOCTYPE html>
<html>
<head>
    <title>Custom Login And Registration in Laravel 8</title>
    <link rel="stylesheet" href="https://stackpath.bootstrapcdn.com/bootstrap/4.1.3/css/bootstrap.min.css">
    <style type="text/css">
        @import url(https://fonts.googleapis.com/css?family=Raleway:300,400,600);

        body{
            margin: 0;
            font-size: .9rem;
            font-weight: 400;
            line-height: 1.6;
            color: #212529;
            text-align: left;
            background-color: #f5f8fa;
        }
        .navbar-laravel
        {
            box-shadow: 0 2px 4px rgba(0,0,0,.04);
        }
        .navbar-brand , .nav-link, .my-form, .login-form
        {
            font-family: Raleway, sans-serif;
        }
        .my-form
        {
            padding-top: 1.5rem;
            padding-bottom: 1.5rem;
        }
        .my-form .row
        {
            margin-left: 0;
            margin-right: 0;
        }
        .login-form
        {
            padding-top: 1.5rem;
            padding-bottom: 1.5rem;
        }
        .login-form .row
        {
            margin-left: 0;
            margin-right: 0;
        }
    </style>
</head>
<body>

<nav class="navbar navbar-expand-lg navbar-light navbar-laravel">
    <div class="container">
        <a class="navbar-brand" href="#">My Tutor Blog</a>
        <button class="navbar-toggler" type="button" data-toggle="collapse" data-target="#navbarSupportedContent" aria-controls="navbarSupportedContent" aria-expanded="false" aria-label="Toggle navigation">
            <span class="navbar-toggler-icon"></span>
        </button>

        <div class="collapse navbar-collapse" id="navbarSupportedContent">
            <ul class="navbar-nav ml-auto">
                @guest
                    <li class="nav-item">
                        <a class="nav-link" href="{{ route('login') }}">Login</a>
                    </li>
                    <li class="nav-item">
                        <a class="nav-link" href="{{ route('register') }}">Register</a>
                    </li>
                @else
                    <li class="nav-item">
                        <a class="nav-link" href="{{ route('logout') }}">Logout</a>
                    </li>
                @endguest
            </ul>

        </div>
    </div>
</nav>

@yield('content')

</body>
</html>
Login View
Create a file login.blade.php inside /resources/views/auth folder.
Open login.blade.php and write this complete code into it.
@extends('layouts.layout')

@section('content')
<div class="login-form">
  <div class="container">
      <div class="row justify-content-center">
          <div class="col-md-8">
              <div class="card">
                  <div class="card-header">Login</div>
                  <div class="card-body">

                    @if (Session::get('success'))
                        <div class="alert alert-success" role="alert">
                            {{ Session::get('success') }}
                        </div>
                    @endif

                      <form action="{{ route('login.post') }}" method="POST">
                          @csrf
                          <div class="form-group row">
                              <label for="email_address" class="col-md-4 col-form-label text-md-right">Email Address</label>
                              <div class="col-md-6">
                                  <input type="text" id="email_address" class="form-control" name="email" required />
                                  @if ($errors->has('email'))
                                      <span class="text-danger">{{ $errors->first('email') }}</span>
                                  @endif
                              </div>
                          </div>

                          <div class="form-group row">
                              <label for="password" class="col-md-4 col-form-label text-md-right">Password</label>
                              <div class="col-md-6">
                                  <input type="password" id="password" class="form-control" name="password" required />
                                  @if ($errors->has('password'))
                                      <span class="text-danger">{{ $errors->first('password') }}</span>
                                  @endif
                              </div>
                          </div>

                          <div class="form-group row">
                              <div class="col-md-6 offset-md-4">
                                  <div class="checkbox">
                                      <label>
                                          <input type="checkbox" name="remember"> Remember Me
                                      </label>
                                  </div>
                              </div>
                          </div>

                          <div class="col-md-6 offset-md-4">
                              <button type="submit" class="btn btn-primary">
                                  Login
                              </button>
                          </div>
                      </form>

                  </div>
              </div>
          </div>
      </div>
  </div>
</div>
@endsection
Register View
Create a file register.blade.php inside /resources/views/auth folder.
Open register.blade.php and write this complete code into it.
@extends('layouts.layout')

@section('content')
<div class="register-form">
  <div class="container">
      <div class="row justify-content-center">
          <div class="col-md-8">
              <div class="card">
                  <div class="card-header">Register</div>
                  <div class="card-body">

                      <form action="{{ route('register.post') }}" method="POST">
                          @csrf
                          <div class="form-group row">
                              <label for="name" class="col-md-4 col-form-label text-md-right">Name</label>
                              <div class="col-md-6">
                                  <input type="text" id="name" class="form-control" name="name" required />
                                  @if ($errors->has('name'))
                                      <span class="text-danger">{{ $errors->first('name') }}</span>
                                  @endif
                              </div>
                          </div>

                          <div class="form-group row">
                              <label for="email_address" class="col-md-4 col-form-label text-md-right">Email Address</label>
                              <div class="col-md-6">
                                  <input type="text" id="email_address" class="form-control" name="email" required />
                                  @if ($errors->has('email'))
                                      <span class="text-danger">{{ $errors->first('email') }}</span>
                                  @endif
                              </div>
                          </div>

                          <div class="form-group row">
                              <label for="password" class="col-md-4 col-form-label text-md-right">Password</label>
                              <div class="col-md-6">
                                  <input type="password" id="password" class="form-control" name="password" required />
                                  @if ($errors->has('password'))
                                      <span class="text-danger">{{ $errors->first('password') }}</span>
                                  @endif
                              </div>
                          </div>

                          <div class="form-group row">
                              <div class="col-md-6 offset-md-4">
                                  <div class="checkbox">
                                      <label>
                                          <input type="checkbox" name="remember"> Remember Me
                                      </label>
                                  </div>
                              </div>
                          </div>

                          <div class="col-md-6 offset-md-4">
                              <button type="submit" class="btn btn-primary">
                                  Register
                              </button>
                          </div>
                      </form>

                  </div>
              </div>
          </div>
      </div>
  </div>
</div>
@endsection
Dashboard View
Create a file dashboard.blade.php inside /resources/views folder.
Open dashboard.blade.php and write this complete code into it.
@extends('layouts.layout')

@section('content')
<div class="container">
    <div class="row justify-content-center">
        <div class="col-md-8">
            <div class="card">
                <div class="card-header">{{ __('My Tutor Blog - Dashboard') }}</div>

                <div class="card-body">
                    @if (Session::get('success'))
                        <div class="alert alert-success" role="alert">
                            {{ Session::get('success') }}
                        </div>
                    @endif

                    <h3>Welcome</h3>
                </div>
            </div>
        </div>
    </div>
</div>
@endsection
That’s all for all layouts and their views.
Application Testing
Run this command into project terminal to start development server,
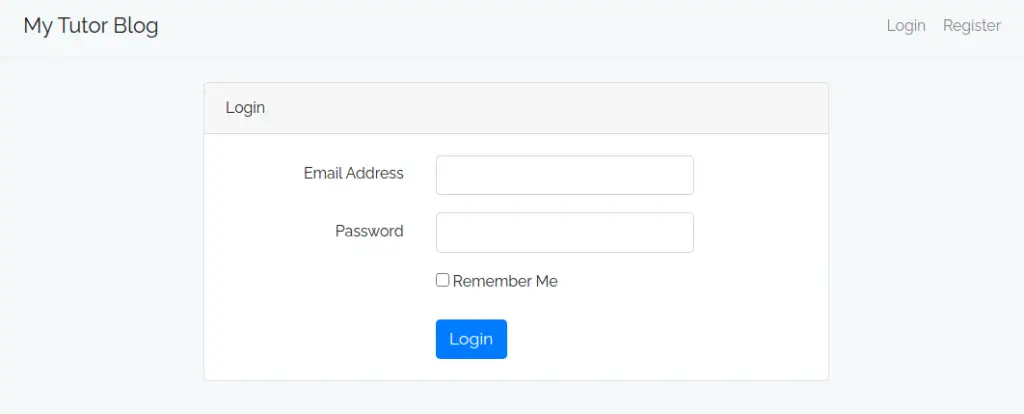
php artisan serveLogin
URL – http://127.0.0.1:8000/login

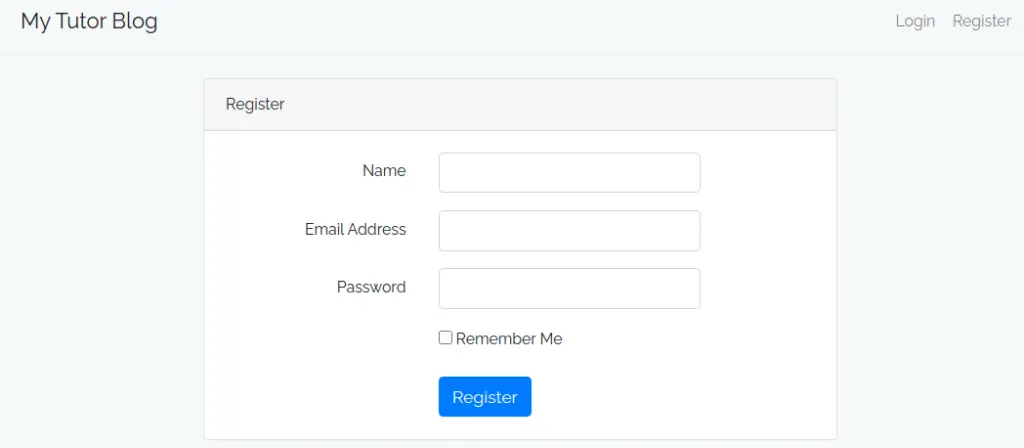
Register
URL – http://127.0.0.1:8000/registration

When we fill data and save,

Next, when we login the user detail. We will go to dashboard page.

We hope this article helped you to Work with Custom Login And Registration in Laravel 8 in a very detailed way.
If you liked this article, then please subscribe to our YouTube Channel for PHP & it’s framework, WordPress, Node Js video tutorials. You can also find us on Twitter and Facebook.
