
Ajax (Asynchronous JavaScript and XML) has emerged as a critical tool for developing interactive and responsive web applications in the ever-changing web development ecosystem.
Setting up Ajax requests in Laravel 10 allows for smooth communication between your frontend and backend, allowing for real-time updates and increased user experiences without the need for full page reloads.
Read More: Namelix: The AI-Powered Business Name Generator Tool
In this article, we will walk you through the process of configuring Ajax requests in Laravel 10. We’ll look at how to use JavaScript and jQuery to create asynchronous requests to your backend, deliver data, and handle responses in real time.
Let’s get started.
Laravel Installation
Open terminal and run this command to create a laravel project.
composer create-project laravel/laravel myblogIt will create a project folder with name myblog inside your local system.
To start the development server of laravel –
php artisan serveURL: http://127.0.0.1:8000
Assuming laravel already installed inside your system.
Settings Up Controller
Open project into terminal and type this command to create controller file.
$ php artisan make:controller AjaxControllerThis command will create a file i.e AjaxController.php inside /app/Http/Controllers folder.
Open this file and write this complete code into it.
<?php

namespace App\Http\Controllers;

use Illuminate\Http\Request;

class AjaxController extends Controller
{
    public function myPost()
    {
        return view('my-post');
    }

    public function submitPost(Request $request)
    {
        // We are collecting all data submitting via Ajax
        $input = $request->all();

        // Sending json response to client
        return response()->json([
            "status" => true,
            "data" => $input
        ]);
    }
}
Inside this above code, you have added a method which is processing ajax data. You can even use this data to insert into database table.
Read More: Increase Sales Overnight with the Unstoppable Merchant Cash Advance Blursoft!
Next,
Create Blade Template
Go inside /resources/views folder. Create a file called my-post.blade.php
Open up the file and write this complete code into it.
<!DOCTYPE html>
<html lang="en">

<head>
    <title>Laravel 10 How To Setup Ajax Request Tutorial - Online Web Tutor</title>
    <meta charset="utf-8">
    <meta name="viewport" content="width=device-width, initial-scale=1">
    <link rel="stylesheet" href="https://maxcdn.bootstrapcdn.com/bootstrap/4.5.2/css/bootstrap.min.css">
    <script src="https://ajax.googleapis.com/ajax/libs/jquery/3.5.1/jquery.min.js"></script>
    <script src="https://cdnjs.cloudflare.com/ajax/libs/popper.js/1.16.0/umd/popper.min.js"></script>
    <script src="https://maxcdn.bootstrapcdn.com/bootstrap/4.5.2/js/bootstrap.min.js"></script>
    <meta name="csrf-token" content="{{ csrf_token() }}" />
    <style>
    #frm-create-post label.error {
        color: red;
    }
    </style>
</head>

<body>

    <div class="container" style="margin-top: 50px;">
        <h4 style="text-align: center;">Laravel 10 How To Setup Ajax Request Tutorial - Online Web Tutor</h4>
        <form action="javascript:void(0)" id="frm-create-post" method="post">
            <div class="form-group">
                <label for="name">Name:</label>
                <input type="text" class="form-control" required id="name" name="name" placeholder="Enter name">
            </div>
            <div class="form-group">
                <label for="description">Description:</label>
                <textarea class="form-control" id="description" required name="description"
                    placeholder="Enter description"></textarea>
            </div>
            <div class="form-group">
                <label for="status">Status:</label>
                <select class="form-control" id="status" name="status">
                    <option value="1">Active</option>
                    <option value="0">Inactive</option>
                </select>
            </div>

            <button type="submit" class="btn btn-primary" id="submit-post">Submit</button>
        </form>
    </div>

    <script src="https://cdnjs.cloudflare.com/ajax/libs/jquery-validate/1.19.2/jquery.validate.min.js"></script>

    <script type="text/javascript">
        $.ajaxSetup({
            headers: {
                'X-CSRF-TOKEN': $('meta[name="csrf-token"]').attr('content')
            }
        });

        $("#frm-create-post").validate({

            submitHandler: function() {

                var name = $("#name").val();
                var description = $("#description").val();
                var status = $("#status").val();

                // processing ajax request
                $.ajax({
                    url: "{{ route('postSubmit') }}",
                    type: 'POST',
                    dataType: "json",
                    data: {
                        name: name,
                        description: description,
                        status: status
                    },
                    success: function(data) {
                        // log response into console
                        console.log(data);
                    }
                });
            }
        });
    </script>
</body>

</html>
Add Route
Open web.php file from /routes folder. Add these routes into it.
//...
use App\Http\Controllers\AjaxController;

Route::get('add-post', [AjaxController::class, 'myPost']);
Route::post('submit-post', [AjaxController::class, 'submitPost'])->name('postSubmit');
Application Testing
Run this command into project terminal to start development server,
php artisan serveURL: http://localhost:8000/add-post
With Client side validation – jQuery Validate
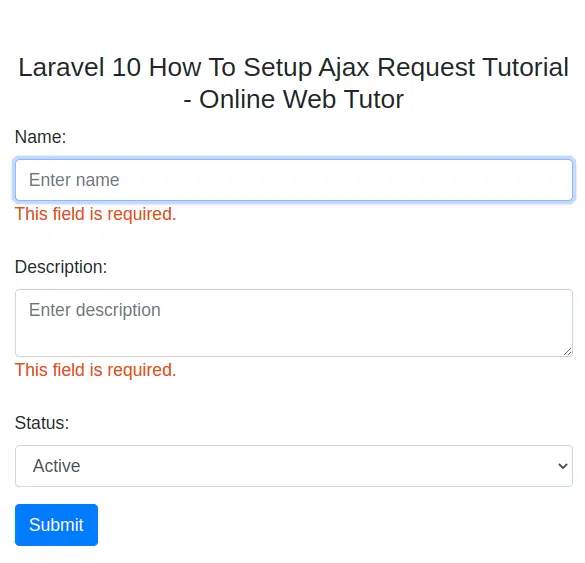
Read More: How To Work with Laravel 10 Route Groups Tutorial
Submitting Data and getting response to Console

We hope this article helped you to learn about Laravel 10 How To Setup Ajax Request Tutorial in a very detailed way.
If you liked this article, then please subscribe to our YouTube Channel for PHP & it’s framework, WordPress, Node Js video tutorials. You can also find us on Twitter and Facebook.
Read more