Inside this article we will see the concept i.e Laravel 9 Create Multi Language Website Using Google Translator. Article contains the classified information about creating a multi language website in laravel.
There are several ways to create a web application in laravel with multi language function. Here, we will see the concept using Google Translator. You can add and create web application with all language which google translator provides. Very few simple steps we need to do while working with Google Translator package of laravel.
Google Translator provides almost all global languages in it’s list. Here, we will see 4 languages (English, French, Spanish & Arabic) inside laravel application. This article is not laravel version specific. You can use it with other laravel versions.
Learn More –
- Laravel 9 How To Use Ternary Operator in Blade Templates
- Laravel 9 Image Upload with Tailwind CSS Tutorial
- Laravel 9 How To Check Current Password Using Hash Tutorial
- Laravel 9 How to Convert Collection To JSON Tutorial
Let’s get started.
Laravel Installation
Open terminal and run this command to create a laravel project.
composer create-project laravel/laravel myblogIt will create a project folder with name myblog inside your local system.
To start the development server of laravel –
php artisan serveURL: http://127.0.0.1:8000
Assuming laravel already installed inside your system.
Google Translator Package Installation
Open project terminal and run this command to install Google Translator Package. This package will help use to work with google-translator-language working functions.
$ composer require stichoza/google-translate-phpYou will see installation like this:
Google Translator Package Configuration
Next,
We need to configure this “google translator package” with application.
Open app.php file from /config folder. Search for “aliases” and add this line into it.
//...

'aliases' => Facade::defaultAliases()->merge([
    // 'ExampleClass' => App\Example\ExampleClass::class,
    'GoogleTranslate' => Stichoza\GoogleTranslate\GoogleTranslate::class
])->toArray(),

//...
Create Controller
We need to create a controller file. Again, back to project terminal and run this command.
$ php artisan make:controller LangControllerIt will create LangController.php file inside /app/Http/Controllers folder.
Open LangController.php and write this following code into it.
<?php

namespace App\Http\Controllers;

use Illuminate\Http\Request;
use Illuminate\Support\Facades\App;

class LangController extends Controller
{
    /**
     * Display a listing of the resource.
     *
     * @return \Illuminate\Http\Response
     */
    public function index()
    {
        return view('lang');
    }

    /**
     * Display a listing of the resource.
     *
     * @return \Illuminate\Http\Response
     */
    public function change(Request $request)
    {
        App::setLocale($request->lang);

        session()->put('locale', $request->lang);

        return redirect()->back();
    }
}
Create Blade Layout File
Go to /resources/views folder and create a file with name lang.blade.php
Open lang.blade.php and write this complete code into it.
<!DOCTYPE html>
<html lang="en">

<head>
    <meta charset="UTF-8">
    <meta name="viewport" content="width=device-width, initial-scale=1.0">
    <title>Laravel 9 How To Create Multi Language Website Tutorial</title>
    <link rel="stylesheet" href="https://cdn.jsdelivr.net/npm/bootstrap@4.6.1/dist/css/bootstrap.min.css">
    <script src="https://cdnjs.cloudflare.com/ajax/libs/jquery/3.5.1/jquery.min.js"></script>
</head>

<body>
    <div class="container mt-5">
        <div class="row">
            <div class="col-md-12">
                <div class="card w-75 m-auto">
                    <div class="card-header text-center bg-primary text-white">
                        <h4 style="font-size: 17px;">Laravel 9 How To Create Multi Language Website Tutorial</h4>
                    </div>
                    <div class="card-body">
                        <div class="row">
                            <div class="col-md-4">
                                <strong>Select Language: </strong>
                            </div>
                            <div class="col-md-4">
                                <select class="form-select changeLang">
                                    <option value="en" {{ session()->get('locale') == 'en' ? 'selected' : '' }}>
                                        English
                                    </option>
                                    <option value="fr" {{ session()->get('locale') == 'fr' ? 'selected' : '' }}>
                                        France
                                    </option>
                                    <option value="es" {{ session()->get('locale') == 'es' ? 'selected' : '' }}>
                                        Spanish
                                    </option>
                                    <option value="ar" {{ session()->get('locale') == 'ar' ? 'selected' : '' }}>
                                        Arabic
                                    </option>
                                </select>
                            </div>
                        </div>

                        <div style="margin-top: 20px;">
                            <p>{{ GoogleTranslate::trans('Welcome to Online Web Tutor', app()->getLocale()) }}</p>
                            <p>{{ GoogleTranslate::trans('Hello Tutorial, The Best Platform to learn PHP Concepts', app()->getLocale()) }}
                            </p>
                        </div>
                    </div>
                </div>
            </div>
        </div>
    </div>

    <script type="text/javascript">
        var url = "{{ route('changeLang') }}";

        $(".changeLang").change(function() {
            window.location.href = url + "?lang=" + $(this).val();
        });

    </script>

</body>

</html>
Add Route
Open web.php from /routes folder and add these route into it.
//...
use App\Http\Controllers\LangController;

//...

Route::get('lang/home', [LangController::class, 'index']);
Route::get('lang/change', [LangController::class, 'change'])->name('changeLang');
Create Language Middleware
Next,
Back to project terminal and run this command to create middlware.
$ php artisan make:middleware LanguageManagerIt will create a file LanguageManager.php inside /app/Http/Middleware folder. Open file and write this code into it.
<?php

namespace App\Http\Middleware;

use Closure;
use Illuminate\Http\Request;
use Illuminate\Support\Facades\App;

class LanguageManager
{
    /**
     * Handle an incoming request.
     *
     * @param  \Illuminate\Http\Request  $request
     * @param  \Closure(\Illuminate\Http\Request): (\Illuminate\Http\Response|\Illuminate\Http\RedirectResponse)  $next
     * @return \Illuminate\Http\Response|\Illuminate\Http\RedirectResponse
     */
    public function handle(Request $request, Closure $next)
    {
        if (session()->has('locale')) {

            App::setLocale(session()->get('locale'));
        }

        return $next($request);
    }
}
Register Language Middleware
Open Kernel.php file from /app/Http folder. Add LanguageManager to “$middlewareGroups” and inside “web”.
/**
* The application's route middleware groups.
*
* @var array<string, array<int, class-string|string>>
*/
protected $middlewareGroups = [
    'web' => [
        //...

        \App\Http\Middleware\LanguageManager::class,
    ],

    'api' => [
        //...
    ],
];
Application Testing
Run this command into project terminal to start development server,
php artisan serveURL: http://127.0.0.1:8000/lang/home
Messages in English

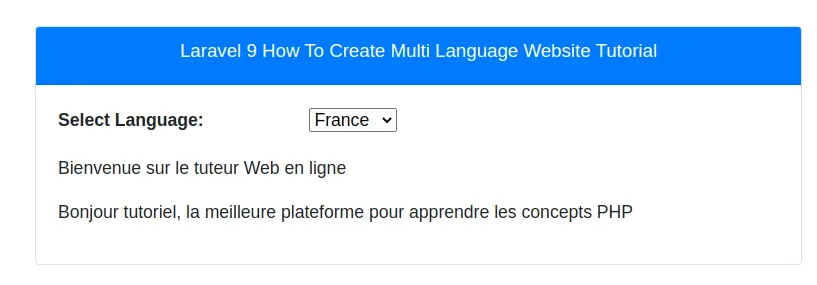
Messages in French
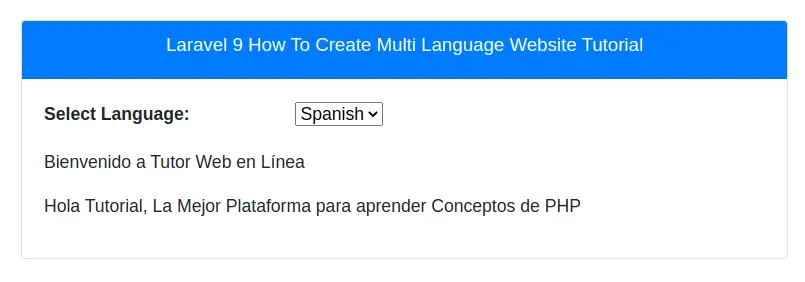
Messages in Spanish
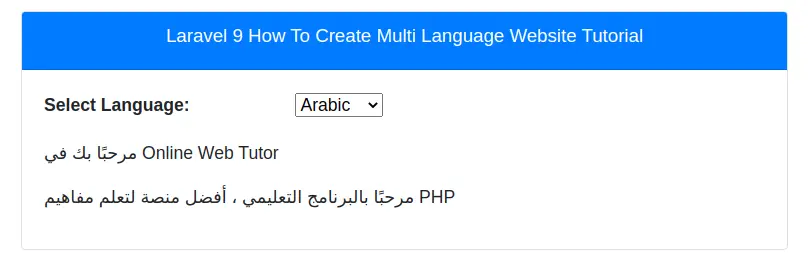
Messages in Arabic
If you want to add more google translator languages as per you need, you can see the complete language and it’s code guide here.
We hope this article helped you to Learn Laravel 9 Create Multi Language Website Using Google Translator Tutorial in a very detailed way.
If you liked this article, then please subscribe to our YouTube Channel for PHP & it’s framework, WordPress, Node Js video tutorials. You can also find us on Twitter and Facebook.
Read more