In web application, submitting form data is very common. So here inside this article we will see Laravel 9 How to work with Ajax Post Request. This tutorial is in very easy steps.
Tutorial guides to submit form data using Ajax Post request in Laravel 9. We will create few files like few routes, a view file and some ajax handing methods to controller to complete this basic task.
Also we will implement Client side form validation using jquery validate plugin. Also if you want to implement server side validation, then also we can use Laravel Form validation.
Learn More –
- Concept of Route Group in Laravel 9 Tutorial
- Laravel 9 One to One Eloquent Relationship Tutorial
- Laravel 9 Redirect Route with Query String Parameters
- Laravel 9 REST API Development Using JWT Authentication
Let’s get started.
Laravel Installation
Open terminal and run this command to create a laravel project.
composer create-project laravel/laravel myblogIt will create a project folder with name myblog inside your local system.
To start the development server of laravel –
php artisan serveURL: http://127.0.0.1:8000
Assuming laravel already installed inside your system.
Create Controller
Open project into terminal and type this command to create controller file.
$ php artisan make:controller AjaxControllerThis command will create a file i.e AjaxController.php inside /app/Http/Controllers folder.
Open this file and write this complete code into it.
<?php

namespace App\Http\Controllers;

use Illuminate\Http\Request;
// If work with model to save data to database
// Load model here like
// use App\Models\Post;

class AjaxController extends Controller
{
    /**
     * Create a new controller instance.
     *
     * @return void
     */
    public function myPost()
    {
        return view('my-post');
    }

    /**
     * Create a new controller instance.
     *
     * @return void
     */
    public function submitPost(Request $request)
    {
        // We are collecting all data submitting via Ajax
        $input = $request->all();

        /*
          $post = new Post;
          $post->name = $input['name'];
          $post->description = $input['description'];
          $post->status = $input['status'];
          $post->save();
        */

        // Sending json response to client
        return response()->json([
            "status" => true,
            "data" => $input
        ]);
    }
}
Inside this above code, we have added a method which is processing ajax data. Also you can see in the comment section we have used Model concept and saved data into method as well.
Create Blade Template
Next,
Go inside /resources/views folder. Create a file called my-post.blade.php.
Open up the file and write this complete code into it.
<!DOCTYPE html>
<html lang="en">

<head>
    <title>Laravel 9 Ajax Post Request Tutorial - Online Web Tutor</title>
    <meta charset="utf-8">
    <meta name="viewport" content="width=device-width, initial-scale=1">
    <link rel="stylesheet" href="https://maxcdn.bootstrapcdn.com/bootstrap/4.5.2/css/bootstrap.min.css">
    <script src="https://ajax.googleapis.com/ajax/libs/jquery/3.5.1/jquery.min.js"></script>
    <script src="https://cdnjs.cloudflare.com/ajax/libs/popper.js/1.16.0/umd/popper.min.js"></script>
    <script src="https://maxcdn.bootstrapcdn.com/bootstrap/4.5.2/js/bootstrap.min.js"></script>
    <meta name="csrf-token" content="{{ csrf_token() }}" />
    <style>
        #frm-create-post label.error{
            color:red;
        }
    </style>
</head>

<body>

    <div class="container" style="margin-top: 50px;">
        <h4 style="text-align: center;">Laravel 9 Ajax Post Request Tutorial - Online Web Tutor</h4>
        <form action="javascript:void(0)" id="frm-create-post" method="post">
            <div class="form-group">
                <label for="name">Name:</label>
                <input type="text" class="form-control" required id="name" name="name" placeholder="Enter name">
            </div>
            <div class="form-group">
                <label for="description">Description:</label>
                <textarea class="form-control" id="description" required name="description"
                    placeholder="Enter description"></textarea>
            </div>
            <div class="form-group">
                <label for="status">Status:</label>
                <select class="form-control" id="status" name="status">
                    <option value="1">Active</option>
                    <option value="0">Inactive</option>
                </select>
            </div>

            <button type="submit" class="btn btn-primary" id="submit-post">Submit</button>
        </form>
    </div>

    <script src="https://cdnjs.cloudflare.com/ajax/libs/jquery-validate/1.19.2/jquery.validate.min.js"></script>

    <script type="text/javascript">
    $.ajaxSetup({
        headers: {
            'X-CSRF-TOKEN': $('meta[name="csrf-token"]').attr('content')
        }
    });

    $("#frm-create-post").validate({

        submitHandler: function() {

            var name = $("#name").val();
            var description = $("#description").val();
            var status = $("#status").val();

            // processing ajax request
            $.ajax({
                url: "{{ route('postSubmit') }}",
                type: 'POST',
                dataType: "json",
                data: {
                    name: name,
                    description: description,
                    status: status
                },
                success: function(data) {
                    // log response into console
                    console.log(data);
                }
            });
        }
    });
    </script>
</body>

</html>
Add Route
Open web.php file from /routes folder. Add these routes into it.
//...
use App\Http\Controllers\AjaxController;

Route::get('add-post', [AjaxController::class, 'myPost']);
Route::post('submit-post', [AjaxController::class, 'submitPost'])->name('postSubmit');
Application Testing
Run this command into project terminal to start development server,
php artisan serveURL – http://localhost:8000/add-post
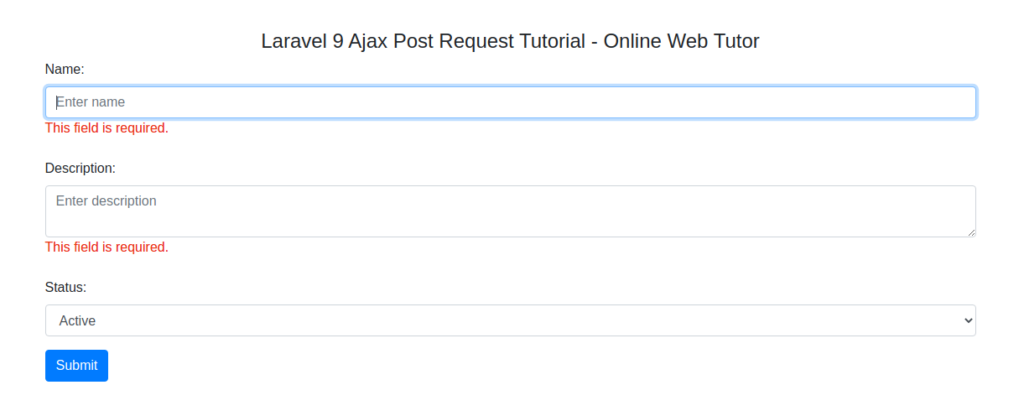
With Client side validation – jQuery Validate
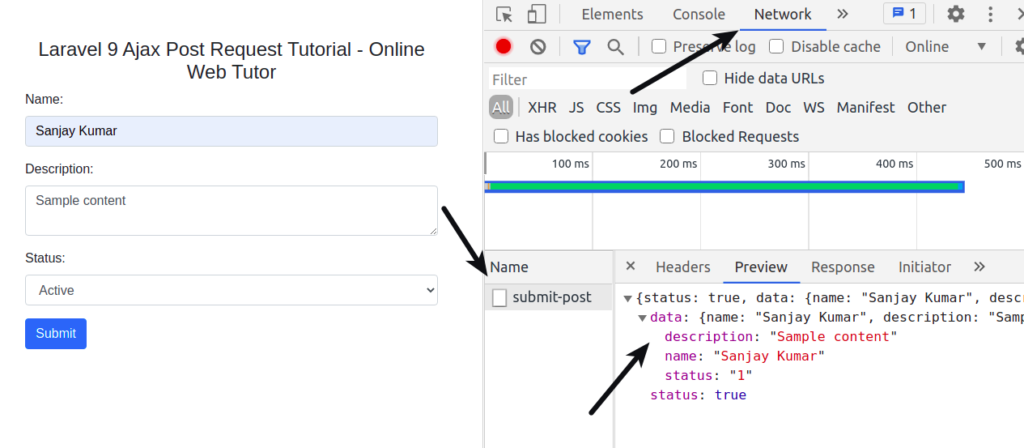
Submitting Data and getting response to Console
We hope this article helped you to learn about Laravel 9 How To Work with Ajax Post Request in a very detailed way.
If you liked this article, then please subscribe to our YouTube Channel for PHP & it’s framework, WordPress, Node Js video tutorials. You can also find us on Twitter and Facebook.
Read more