Laravel eloquent relationship is a very important feature which connects one or more tables in a chain. This is the substitute of joins in laravel.
Laravel provides these following relationships –
- One To One
- One To Many
- Many to Many
- One To Many (Inverse) / Belongs To
- Has One Through
- Has Many Through
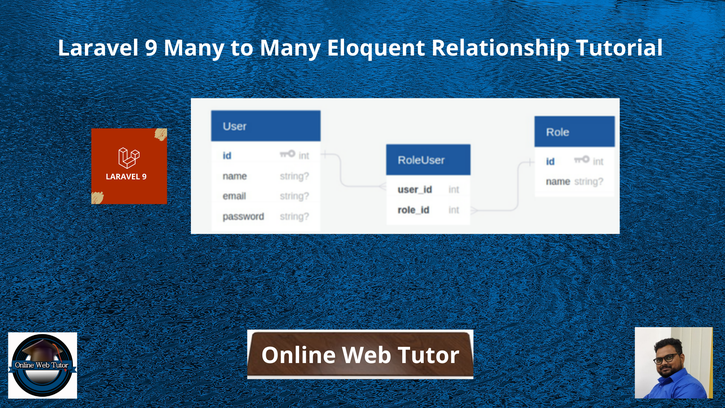
Eloquent relationships are defined as methods on your Eloquent model classes. Inside this article we will see the concept of laravel 9 Many to Many Eloquent relationship as well as we will implement inverse of many to many relationship i.e belongsToMany.
This article will give you the detailed concept of about implementation of many to many relationship in laravel.
For this tutorial we will consider a users table, roles table and role_user table. This means a single user have multiple roles and a role have multiple users. Means many to many relationship.
Learn More –
- How To Install Laravel 9 on Ubuntu Step by Step Tutorial
- Laravel 9 Call MySQL Stored Procedure Tutorial
- Laravel 9 Google reCaptcha v3 Tutorial with Validation
Let’s get started.
Laravel Installation
Open terminal and run this command to create a laravel project.
composer create-project laravel/laravel myblogIt will create a project folder with name myblog inside your local system.
To start the development server of laravel –
php artisan serveURL: http://127.0.0.1:8000
Assuming laravel already installed inside your system.
Create Database & Connect
To create a database, either we can create via Manual tool of PhpMyadmin or by means of a mysql command.
CREATE DATABASE laravel_app;
To connect database with application, Open .env file from application root. Search for DB_ and update your details.
DB_CONNECTION=mysql
DB_HOST=127.0.0.1
DB_PORT=3306
DB_DATABASE=laravel_app
DB_USERNAME=root
DB_PASSWORD=root
Create Migrations
We need few migration files –
- User migration to store user data
- Role migration to store roles
- Role User Migration to store user id and role id
Open project into terminal and run these artisan commands.
$ php artisan make:migration CreateRolesTable

$ php artisan make:migration CreateRoleUserTable
It will create two migration files 2022_04_14_015502_create_roles_table.php and 2022_04_14_015803_create_role_user_table.php at location /database/migrations.
Already we have 2014_10_12_000000_create_users_table.php migration available by default which is for users table.
Open xxx_create_roles_table.php and write this complete code into it.
<?php

use Illuminate\Database\Migrations\Migration;
use Illuminate\Database\Schema\Blueprint;
use Illuminate\Support\Facades\Schema;

return new class extends Migration
{
    /**
     * Run the migrations.
     *
     * @return void
     */
    public function up()
    {
        Schema::create('roles', function (Blueprint $table) {
            $table->id();
            $table->string('name', 25);
        });
    }

    /**
     * Reverse the migrations.
     *
     * @return void
     */
    public function down()
    {
        Schema::dropIfExists('roles');
    }
};
Open xxx_create_role_user_table.php and write this complete code into it.
<?php

use Illuminate\Database\Migrations\Migration;
use Illuminate\Database\Schema\Blueprint;
use Illuminate\Support\Facades\Schema;

return new class extends Migration
{
    /**
     * Run the migrations.
     *
     * @return void
     */
    public function up()
    {
        Schema::create('role_user', function (Blueprint $table) {
            $table->foreignId('user_id')->constrained('users');
            $table->foreignId('role_id')->constrained('roles');
        });
    }

    /**
     * Reverse the migrations.
     *
     * @return void
     */
    public function down()
    {
        Schema::dropIfExists('role_user');
    }
};
Also If we open users migration, we should like this.
<?php

use Illuminate\Database\Migrations\Migration;
use Illuminate\Database\Schema\Blueprint;
use Illuminate\Support\Facades\Schema;

return new class extends Migration
{
    /**
     * Run the migrations.
     *
     * @return void
     */
    public function up()
    {
        Schema::create('users', function (Blueprint $table) {
            $table->id();
            $table->string('name');
            $table->string('email')->unique();
            $table->timestamp('email_verified_at')->nullable();
            $table->string('password');
            $table->rememberToken();
            $table->timestamps();
        });
    }

    /**
     * Reverse the migrations.
     *
     * @return void
     */
    public function down()
    {
        Schema::dropIfExists('users');
    }
};
Run Migrations
Next, we need to migrate migrations.
$ php artisan migrateThis command will create tables inside database.
Create Model
Next, we need to create two models and also we need User model which already exists. Back to terminal and run these artisan commands.
$ php artisan make:model Role

$ php artisan make:model RoleUser
These commands will create two files Role.php & RoleUser.php at /app/Models folder.
Open Role.php and write this complete code into it.
<?php

namespace App\Models;

use Illuminate\Database\Eloquent\Factories\HasFactory;
use Illuminate\Database\Eloquent\Model;
use App\Models\User;

class Role extends Model
{
    use HasFactory;

    protected $fillable = ["name"];

    public $timestamps = false;

    /**
     * The users that belong to the role.
     */
    public function users(): MorphToMany
    {
        return $this->belongsToMany(User::class, 'role_user');
    }
}
Open RoleUser.php and write this complete code into it.
<?php

namespace App\Models;

use Illuminate\Database\Eloquent\Factories\HasFactory;
use Illuminate\Database\Eloquent\Model;

class RoleUser extends Model
{
    use HasFactory;

    protected $table = "role_user";

    protected $fillable = ["user_id", "role_id"];

    public $timestamps = false;
}
Also If we open User model from /app/Models folder, copy and paste this complete code into it.
<?php

namespace App\Models;

use Illuminate\Contracts\Auth\MustVerifyEmail;
use Illuminate\Database\Eloquent\Factories\HasFactory;
use Illuminate\Foundation\Auth\User as Authenticatable;
use Illuminate\Notifications\Notifiable;
use Laravel\Sanctum\HasApiTokens;
use App\Models\Role;

class User extends Authenticatable
{
    use HasApiTokens, HasFactory, Notifiable;

    /**
     * The attributes that are mass assignable.
     *
     * @var array<int, string>
     */
    protected $fillable = [
        'name',
        'email',
        'password',
    ];

    /**
     * The attributes that should be hidden for serialization.
     *
     * @var array<int, string>
     */
    protected $hidden = [
        'password',
        'remember_token',
    ];

    /**
     * The attributes that should be cast.
     *
     * @var array<string, string>
     */
    protected $casts = [
        'email_verified_at' => 'datetime',
    ];

    /**
     * The roles that belong to the user.
     */
    public function roles()
    {
        return $this->belongsToMany(Role::class, 'role_user');
        // "role_user" is table name
        // OR if we have model RoleUser, then we can use class
        // instead of table name role_user
        //return $this->belongsToMany(Role::class, RoleUser::class);
    }
}
- $this->belongsToMany(Role::class, ‘role_user’); It indicates many to many relationship use role_user table
- If we want to use class instead of table name in the above method, use like this $this->belongsToMany(Role::class, RoleUser::class);
Sample Data Insertion
Open mysql and run these queries to insert dummy data into posts and comments table.
Data for Users Table
--
-- Dumping data for table `users`
--

INSERT INTO `users` (`id`, `name`, `email`, `email_verified_at`, `password`, `remember_token`, `created_at`, `updated_at`) VALUES
(1, 'Emilie Mante', 'kwiegand@example.com', '2021-04-02 23:13:37', '$2y$10$92IXUNpkjO0rOQ5byMi.Ye4oKoEa3Ro9llC/.og/at2.uheWG/igi', 'Y3FP2DroH6', '2021-04-02 23:13:37', '2021-04-02 23:13:37'),
(2, 'Reyna Stroman II', 'schuster.carlos@example.com', '2021-04-02 23:13:37', '$2y$10$92IXUNpkjO0rOQ5byMi.Ye4oKoEa3Ro9llC/.og/at2.uheWG/igi', '8tDlUix4oY', '2021-04-02 23:13:37', '2021-04-02 23:13:37'),
(3, 'Prof. Lauriane Yost I', 'greta69@example.com', '2021-04-02 23:13:37', '$2y$10$92IXUNpkjO0rOQ5byMi.Ye4oKoEa3Ro9llC/.og/at2.uheWG/igi', 'z6nEz8FkN6', '2021-04-02 23:13:37', '2021-04-02 23:13:37'),
(4, 'Zelma Yundt', 'ricardo.cartwright@example.com', '2021-04-02 23:13:37', '$2y$10$92IXUNpkjO0rOQ5byMi.Ye4oKoEa3Ro9llC/.og/at2.uheWG/igi', 'RsOsNYIogy', '2021-04-02 23:13:37', '2021-04-02 23:13:37'),
(5, 'Hayley Lebsack', 'elna.tillman@example.com', '2021-04-02 23:13:37', '$2y$10$92IXUNpkjO0rOQ5byMi.Ye4oKoEa3Ro9llC/.og/at2.uheWG/igi', '203SAe79eI', '2021-04-02 23:13:37', '2021-04-02 23:13:37');
Data for Roles Table
--
-- Dumping data for table `roles`
--

INSERT INTO `roles` (`id`, `name`) VALUES
(1, 'Admin'),
(2, 'Editor'),
(3, 'Author'),
(4, 'Blogger');
Data for Role User Table
INSERT INTO `role_user` (`id`, `user_id`, `role_id`) VALUES
(1, 1, 1),
(2, 1, 3),
(3, 1, 4),
(4, 2, 3),
(5, 2, 4),
(6, 3, 3),
(7, 4, 2);
Controller Usage
Open any controller say DataController.php file from /app/Http/Controllers folder.
Here, we have created two methods in which we used model methods as a property.
<?php

namespace App\Http\Controllers;

use Illuminate\Http\Request;
use App\Models\User;
use App\Models\Role;

class DataController extends Controller
{
    // To get all roles of a user
    public function getRoles($user_id)
    {
        return User::find($user_id)->roles;
    }

    // To get all users by role
    public function getUsers($role_id)
    {
        return Role::find($role_id)->users;
    }
}- $roles = User::find($user_id)->roles; It will find all roles on the basis of user id. Many to Many
- $users = Role::find($role_id)->users; It will find all users by role id. Inverse of Many to Many / Belongs To
Create Routes
Open web.php from /routes folder and add these routes into it.
//...

use App\Http\Controllers\DataController;

Route::get('get-users/{id}', [DataController::class, 'getUsers']);
Route::get('get-roles/{id}', [DataController::class, 'getRoles']);

//...
Application Testing
Run this command into project terminal to start development server,
php artisan serveURLs
Get Users by role id – http://127.0.0.1:8000/get-users/1

Get Roles by user id– http://127.0.0.1:8000/get-roles/1
We hope this article helped you to learn Laravel 9 Many to Many Eloquent Relationship Tutorial in a very detailed way.
If you liked this article, then please subscribe to our YouTube Channel for PHP & it’s framework, WordPress, Node Js video tutorials. You can also find us on Twitter and Facebook.
Read more