View Cells allow us to insert HTML that is generated outside of controller. It simply calls the specified class and method, which must return a string of valid HTML.
Inside this article we will see the complete concept to use View Cells in CodeIgniter 4. It will be an interesting article to learn.
Learn More –
- Read and Write Files in CodeIgniter 4 Tutorial
- Resize Images in CodeIgniter 4 Before Uploading to Server
- REST API Development with Validation in CodeIgniter 4
- RESTful Resource Controller in CodeIgniter 4
Let’s get started.
CodeIgniter 4 Installation
To create a CodeIgniter 4 setup run this given command into your shell or terminal. Please make sure composer should be installed.
composer create-project codeigniter4/appstarter codeigniter-4Assuming you have successfully installed application into your local system.
Environment (.env) Setup
When we install CodeIgniter 4, we will have env file at root. To use the environment variables means using variables at global scope we need to do env to .env
Either we can do via renaming file as simple as that. Also we can do by terminal command.
Open project in terminal
cp env .envAbove command will create a copy of env file to .env file. Now we are ready to use environment variables.
Enable Development Mode
CodeIgniter starts up in production mode by default. You need to make it in development mode to see any error if you are working with application.
Open .env file from root.
# CI_ENVIRONMENT = production

 // Do it to

CI_ENVIRONMENT = development
Now application is in development mode.
Create Database
To create a database, either we can create via Manual tool of PhpMyadmin or by means of a mysql command.
We will use MySQL command to create database. Run this command into Sql tab of PhpMyAdmin.
CREATE DATABASE codeigniter4_app;Successfully, we have created a database.
Database Connection
Open .env file from project root.
Search for DATABASE. You should see the connection environment variables into it. Put your updated details of database connection string values.
#--------------------------------------------------------------------
# DATABASE
#--------------------------------------------------------------------

database.default.hostname = localhost
database.default.database = codeigniter4_app
database.default.username = admin
database.default.password = admin
database.default.DBDriver = MySQLi
database.default.DBPrefix =
database.default.port = 3306
Now, database successfully connected with the application.
Create Migration
Open project into terminal and run this spark command.
$ php spark make:migration CreateBooksIt has generated a file with name 2021-02-09-120132_CreateBooks.php at /app/Database/Migrations folder.
Open up the file and write this code into it.
<?php

namespace App\Database\Migrations;

use CodeIgniter\Database\Migration;

class CreateBooks extends Migration
{
	public function up()
	{
		$this->forge->addField([
            'id' => [
                'type' => 'INT',
                'constraint' => 5,
                'unsigned' => true,
                'auto_increment' => true,
            ],
            'name' => [
                'type' => 'VARCHAR',
                'constraint' => '100',
                'null' => false
            ],
            'author' => [
                'type' => 'VARCHAR',
                'constraint' => '100',
                'null' => false,
            ],
            'cost' => [
                'type' => 'INT',
                'constraint' => 100,
                'null' => false,
            ],
        'created_at datetime default current_timestamp',
        ]);
        $this->forge->addPrimaryKey('id');
        $this->forge->createTable('books');
	}

	public function down()
	{
		$this->forge->dropTable('books');
	}
}
Next, we need to migrate this created migration into database.
$ php spark migrateIt will create a database table with name “books”.
Create Seeder
Back to terminal and run this spark command.
$ php spark make:seeder BookSeederIt has generated a file with name BookSeeder.php at /app/Database/Seeds folder.
Open up the file and write this code into it.
<?php

namespace App\Database\Seeds;

use CodeIgniter\Database\Seeder;
use Faker\Factory;

class BookSeeder extends Seeder
{
	public function run()
    {
        for ($i = 0; $i < 10; $i++) { //to add 10 books. Change limit as desired
            $this->db->table('books')->insert($this->generateBooks());
        }
    }

    private function generateBooks(): array
    {
        $faker = Factory::create();
        return [
            'name' => $faker->name(),
            'author' => $faker->name(),
            'cost' => random_int(300, 800)
        ];
    }
}
Next, we need to seed test data into table
$ php spark db:seed BookSeederIt will generate and insert 10 rows of fake data into “books” table.
Add Route
Open Routes.php file from /app/Config folder.
Add this route into it.
//...

$routes->get("list-data", "Site::listdata");

//...
Create Model
Back to terminal and run this spark command.
$ php spark make:model BookIt has generated a file with name Book.php at /app/Models folder.
Open up the file and write this code into it.
<?php

namespace App\Models;

use CodeIgniter\Model;

class Book extends Model
{
	protected $DBGroup              = 'default';
	protected $table                = 'books';
	protected $primaryKey           = 'id';
	protected $useAutoIncrement     = true;
	protected $insertID             = 0;
	protected $returnType           = 'array';
	protected $useSoftDelete        = false;
	protected $protectFields        = true;
	protected $allowedFields        = [];

	// Dates
	protected $useTimestamps        = false;
	protected $dateFormat           = 'datetime';
	protected $createdField         = 'created_at';
	protected $updatedField         = 'updated_at';
	protected $deletedField         = 'deleted_at';

	// Validation
	protected $validationRules      = [];
	protected $validationMessages   = [];
	protected $skipValidation       = false;
	protected $cleanValidationRules = true;

	// Callbacks
	protected $allowCallbacks       = true;
	protected $beforeInsert         = [];
	protected $afterInsert          = [];
	protected $beforeUpdate         = [];
	protected $afterUpdate          = [];
	protected $beforeFind           = [];
	protected $afterFind            = [];
	protected $beforeDelete         = [];
	protected $afterDelete          = [];
}
Create Controller
Back to terminal and run this spark command.
$ php spark make:controller SiteIt has generated a file with name Site.php at /app/Controllers folder.
Open up the file and write this code into it.
<?php

namespace App\Controllers;

use App\Models\Book; // Loading model

class Site extends BaseController
{
    public function listdata()
    {
        $book_obj = new Book();

        $books = $book_obj->findAll();

        return view("books"); // Calling view file
    }
}
Create Library
Create a file with name BooksLibrary.php inside /app/Libraries. Add this piece of code into it.
<?php

namespace App\Libraries;

use App\Models\Book;

class BooksLibrary{

    public function loadBooks(){

        $book_obj = new Book();

        $books = $book_obj->findAll();

        return view("partials/books-template", [
            "books" => $books
        ]);
    }
}
Inside this library we have written code for followings –
- Fetch all books from database table
- Send to view file
- Return a HTML view from method with table data
Create Template Files & View Cell guide
Create a folder with name “partials” into /app/Views. Inside this folder, Create a partial file books-template.php. This file contains a section of code, say list of books for this example.
Open books-template.php file and write code.
<table class="table">
    <thead>
      <tr>
        <th>ID</th>
        <th>Name</th>
        <th>Author</th>
        <th>Cost</th>
      </tr>
    </thead>
    <tbody>
    <?php

      if(count($books) > 0){

        foreach($books as $book){
            ?>
            <tr>
                <td><?= $book['id'] ?></td>
                <td><?= $book['name'] ?></td>
                <td><?= $book['author'] ?></td>
                <td><?= $book['cost'] ?></td>
            </tr>
            <?php
        }
      }
    ?>
    </tbody>
</table>
Create another view file books.php at /app/Views
<!DOCTYPE html>
<html lang="en">
<head>
<title>Books List</title>
<meta charset="utf-8">
<meta name="viewport" content="width=device-width, initial-scale=1">
<link rel="stylesheet" href="https://maxcdn.bootstrapcdn.com/bootstrap/3.4.1/css/bootstrap.min.css">
<script src="https://ajax.googleapis.com/ajax/libs/jquery/3.5.1/jquery.min.js"></script>
<script src="https://maxcdn.bootstrapcdn.com/bootstrap/3.4.1/js/bootstrap.min.js"></script>
</head>
<body>
<div class="container">
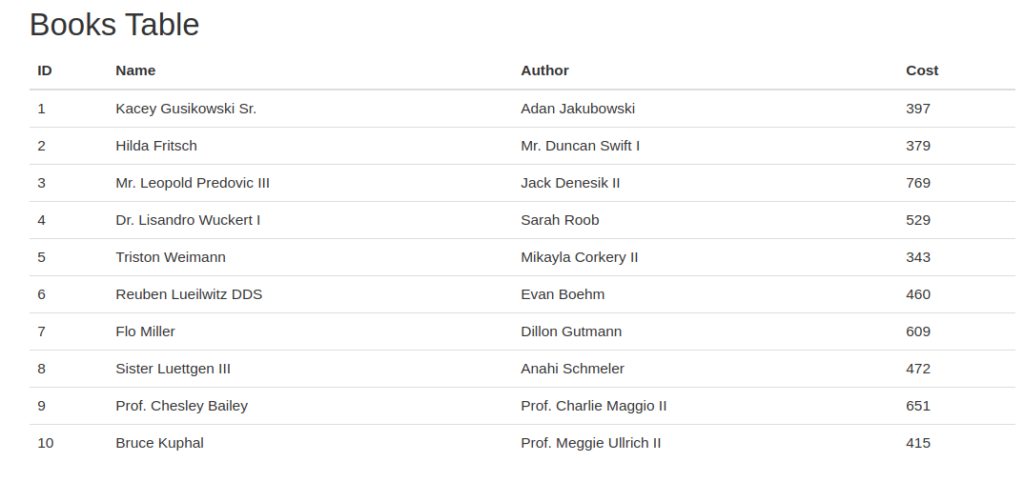
<h2>Books Table</h2>
<?= view_cell("\App\Libraries\BooksLibrary::loadBooks") ?>
</div>
</body>
</html>View cells are used to return partial templates with dynamic data. Here, we can see we have used view_cell() which returns HTML view with dynamic data.
\App\Libraries\BooksLibrary::loadBooks returns HTML view with books data.
Passing parameters to View Cells
# While Calling view

<?= view_cell("\App\Libraries\BooksLibrary::loadBooks", ["category" => "Science"]) ?>

# At Library
public function loadBooks(array $params = [])
{
    // ... Other code
    return view('<template>', ['category' => $params['category']]);
}
View Cell Caching
# View cell caching for 60 seconds

<?= view_cell("\App\Libraries\BooksLibrary::loadBooks", ["category" => "Science"], 60) ?>
Application Testing
Open project into terminal and start development server.
$ php spark serve
URL: http://localhost:8080/list-data
We hope this article helped you to learn View Cells in CodeIgniter 4 Tutorial in a very detailed way.
If you liked this article, then please subscribe to our YouTube Channel for PHP & it’s framework, WordPress, Node Js video tutorials. You can also find us on Twitter and Facebook.
Read more