WordPress plugins are essential for improving your website’s functionality, and you’ll frequently want to add submenus within the plugin menu to better organise and access various functions.
In this tutorial, we’ll walk you through the process of adding WordPress submenus to your plugin menu after activation, ensuring that your plugin has a user-friendly and well-organized interface.
By the end of this tutorial, you’ll have the skills and knowledge to construct a well-structured and user-friendly interface for your plugin’s features and settings by adding WordPress submenus on plugin activation.
Read More: How To Remove Page Using Slug in WordPress Tutorial
Let’s get started.
What is WordPress Plugin Menu & Submenus?
A plugin menu and submenus in WordPress refer to custom menu items and sub-items introduced to the WordPress admin dashboard by a plugin. Within the WordPress backend, these menus provide a user interface for configuring and using the plugin’s features and settings.
Submenus, also known as sub-items, are secondary menu items that are placed beneath an existing top-level menu. They allow you to organise and group similar settings and functionalities.
Functions such as add_submenu_page() are used to create submenus. You can define the parent (top-level) menu, and the submenu shows as a drop-down or a new section under the parent menu.
Syntax
add_submenu_page(
    string $parent_slug,
    string $page_title,
    string $menu_title,
    string $capability,
    string $menu_slug,
    callable $callback = '',
    int|float $position = null
): string|false
Explanation,
- $parent_slug (string): This parameter specifies the menu slug of the parent (top-level) menu under which you want to add the submenu. The submenu will be a child of the specified parent menu.
- $page_title (string): This parameter sets the text that appears in the browser’s title bar when the submenu page is displayed. It should provide a brief, descriptive title for the page.
- $menu_title (string): This is the text that appears in the actual submenu item on the admin dashboard. It should be a concise and clear label for the submenu.
- $capability (string): Specifies the user role or capability required to access this submenu. For example, if you set it to ‘manage_options’, only users with the ‘manage_options’ capability (typically administrators) will be able to see and access the submenu.
- $menu_slug (string): This parameter sets the unique identifier, or slug, for the submenu item. It should be unique to avoid conflicts with other submenu items. The slug is used as part of the URL for the submenu page.
- $callback (callable): This is an optional parameter that specifies the function that will be called when the submenu item is clicked. If provided, this function will be responsible for displaying the content of the submenu page. If not provided, WordPress will generate a default page with a message.
- $position (int|float): This parameter determines the position of the submenu item within its parent menu. You can use an integer or floating-point number to specify the submenu’s position. Lower values place the submenu higher in the list of submenus within the parent menu.
- Return Value (string|false): The function returns the resulting submenu’s page hook suffix, which is useful for further customizing or manipulating the submenu page. It returns false if the submenu could not be added.
Read More: Concept of Deactivation Hook in WordPress Tutorial
How To Create Plugin Menu and Submenus in WordPress?
Let’s create a custom plugin in wordpress where you will see how to add plugin menus and submenus,
<?php

/*
 * Plugin name: Employee Management System
 * description: This is a CRUD Employee Management System
 * Plugin URI: https://example.com/custom-plugin
 * Author: Sample User
 * Auther URI: https://example.com
 * Version: 1.0
 * Requires at least: 6.3.2
 * Requires PHP: 7.4
*/

define("EMS_PLUGIN_PATH", plugin_dir_path(__FILE__));

// Calling action hook to add menu
add_action("admin_menu", "ems_add_admin_menu");

// Add menu
function ems_add_admin_menu(){

    add_menu_page(
        "Employee Management System", // page title
        "Employee System",            // menu title
        "manage_options",             // access level
        "employee-system",            // menu slug
        "ems_crud_system",            // callback function
        "dashicons-admin-home",       // plugin icon
        23                            // plugin menu position
    );

    // Sub-menu 1
    add_submenu_page(
        "employee-system",  // parent slug
        "Add Employee",     // page title
        "Add Employee",     // menu title
        "manage_options",   // access level
        "employee-system",  // sub menu slug
        "ems_crud_system"   // callback function
    );

    // Sub-menu 2
    add_submenu_page(
        "employee-system",  // parent slug
        "List Employee",    // page title
        "List Employee",    // menu title
        "manage_options",   // access level
        "list-employee",    // sub menu slug
        "ems_list_employee" // callback function
    );
}

// Menu handle Callback
function ems_crud_system(){

    include_once(EMS_PLUGIN_PATH."pages/add-employee.php");
}

// Submenu callback function
function ems_list_employee(){

    include_once(EMS_PLUGIN_PATH."pages/list-employee.php");
}
Go back to your plugin’s list,

Once you activate this plugin, it will create a plugin menu with name Employee System.
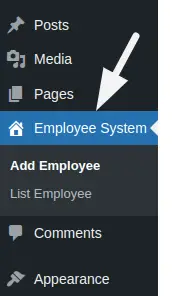
When you click on any submenu it will call their respective callback functions and load layout.
Here, are some access level according to user role in wordpress
<strong>Author</strong>: publish_posts, edit_posts
<strong>Editor</strong>: publish_posts, edit_posts, manage_categories
<strong>Contributor</strong>: edit_posts
<strong>Super Admin</strong> / <strong>Administrator</strong>: publish_posts, manage_options, edit_posts
More Settings about creating Menus in WordPress on Plugin activation you will find here in a detailed concept.
Here, you will some more useful links,
That’s it.
We hope this article helped you to learn about How To Add WordPress Submenus on Plugin Activation in a very detailed way.
If you liked this article, then please subscribe to our YouTube Channel for PHP & it’s framework, WordPress, Node Js video tutorials. You can also find us on Twitter and Facebook.
Read more