Inside this article we will see CakePHP 4 Crop Image before Upload using Croppie.js. Already we have an article to Upload Image Using Ajax in CakePHP 4.
In this tutorial we will use a jquery plugin Croppie.js. This plugin uses a CSS and JS file. Either you can use these plugin files via CDN link or by putting them into your application /webroot folder.
This tutorial will be very interesting to see and super easy to implement.

Learn More –
- Call MySQL Stored Procedure in CakePHP 4 Tutorial
- Change Default Timezone in CakePHP 4 Tutorial
- How To Check CakePHP Version in a CakePHP Project
- How To Read CSV File in CakePHP 4 Tutorial
Let’s get started.
CakePHP 4 Installation
To create a CakePHP project, run this command into your shell or terminal. Make sure composer should be installed in your system.
$ composer create-project --prefer-dist cakephp/app:~4.0 mycakephp
Above command will creates a project with the name called mycakephp.
Create Controller
Open project into terminal and run this command to create controller file.
<meta http-equiv="content-type" content="text/html; charset=utf-8">$ bin/cake bake controller Site --no-actionsIt will create SiteController.php file inside /src/Controller folder. Open controller file and write this code into it.
<?php

declare(strict_types=1);

namespace App\Controller;

class SiteController extends AppController
{
    public function initialize(): void
    {
        parent::initialize();
    }

    public function addImage()
    {
        // for the frontend layout
    }

    public function submitImage()
    {
        if ($this->request->is("ajax")) {
            $data = $this->request->getData('image');

            list($type, $data) = explode(';', $data);
            list(, $data)      = explode(',', $data);

            $data = base64_decode($data);
            $image_name = time() . '.png';
            $path =  WWW_ROOT . "/img/" . $image_name;

            file_put_contents($path, $data);

            // You can save into database table

            echo json_encode(['status' => 1, 'message' => "Image uploaded successfully"]);
            die;
        }
    }
}
Concept of Image Upload
Here, is the code snippet of image upload in above code of controller.
$data = $this->request->getData('image');

list($type, $data) = explode(';', $data);
list(, $data)      = explode(',', $data);

$data = base64_decode($data);
$image_name = time() . '.png';
$path =  WWW_ROOT . "/img/" . $image_name;

file_put_contents($path, $data);
WWW_ROOT . “img/” returns the path upto of /img folder of webroot.
It will upload the image into /webroot/img folder.
Create Template
Create Site folder inside /templates folder. Next, needs to create add_image.php file inside /templates/Site folder.
Open add_image.php file and write this following code into it. This will give the frontend layout for form.
<html lang="en">

<head>
    <title>CakePHP 4 Crop Image Before Upload Using Croppie.js</title>
    <link rel="stylesheet" href="https://maxcdn.bootstrapcdn.com/bootstrap/3.4.1/css/bootstrap.min.css">
    <link rel="stylesheet" href="https://cdnjs.cloudflare.com/ajax/libs/croppie/2.6.2/croppie.min.css">
</head>


<body>
    <div class="container" style="margin-top:30px;">
        <div class="panel panel-primary">
            <div class="panel-heading">CakePHP 4 Crop Image Before Upload Using Croppie.js</div>
            <div class="panel-body">
                <div class="row">
                    <div class="col-md-4 text-center">
                        <div id="cropie-demo" style="width:250px"></div>
                    </div>
                    <div class="col-md-4" style="padding-top:30px;">
                        <strong>Select Image:</strong>
                        <input type="file" id="upload">
                        <br />
                        <button class="btn btn-success upload-result">Upload Image</button>
                    </div>


                    <div class="col-md-4">
                        <div id="image-preview" style="background:#e1e1e1;padding:30px;height:300px;"></div>
                    </div>
                </div>


            </div>
        </div>
    </div>

    <script src="https://ajax.googleapis.com/ajax/libs/jquery/3.5.1/jquery.min.js"></script>
    <script src="https://cdnjs.cloudflare.com/ajax/libs/croppie/2.6.2/croppie.js"></script>

    <script type="text/javascript">
        $uploadCrop = $('#cropie-demo').croppie({
            enableExif: true,
            viewport: {
                width: 200,
                height: 200,
                type: 'circle'
            },
            boundary: {
                width: 300,
                height: 300
            }
        });


        $('#upload').on('change', function() {
            var reader = new FileReader();
            reader.onload = function(e) {
                $uploadCrop.croppie('bind', {
                    url: e.target.result
                }).then(function() {
                    console.log('jQuery bind complete');
                });
            }
            reader.readAsDataURL(this.files[0]);
        });


        $('.upload-result').on('click', function(ev) {
            $uploadCrop.croppie('result', {
                type: 'canvas',
                size: 'viewport'
            }).then(function(resp) {
                $.ajax({
                    url: "/save-image",
                    type: "POST",
                    cache: false,
                    data: {
                        "image": resp
                    },
                    success: function(data) {
                        html = '<img src="' + resp + '" />';
                        $("#image-preview").html(html);
                    }
                });
            });
        });
    </script>

</body>

</html>
Disable CSRF Token
When we submit a cakephp form, it needs a CSRF token should be submitted with form submission request.
We are not interested to send CSRF token with form data. To disable it, Open Application.php from /src folder.
Remove these lines of code from middleware() method.
->add(new CsrfProtectionMiddleware([
    'httponly' => true,
]))
Add Route
Open routes.php file from /config folder. Add these routes into it.
//...

$routes->connect(
    '/upload-image',
    ['controller' => 'Site', 'action' => 'addImage']
);

$routes->connect(
    '/save-image',
    ['controller' => 'Site', 'action' => 'submitImage']
);

//...
Application Testing
Open terminal and run this command to start development server.
$ bin/cake serverURL: http://localhost:8765/upload-image
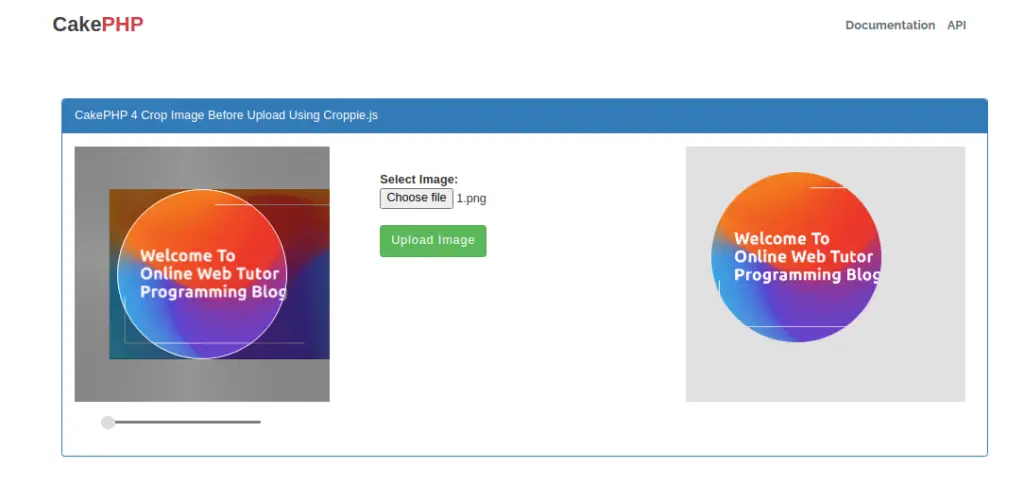
When we hit Upload Image button, it will save the cropped image into img folder of /webroot and also create a image preview at the right sided area.
We hope this article helped you to learn CakePHP 4 Crop Image Before Upload Using Croppie.js in a very detailed way.
If you liked this article, then please subscribe to our YouTube Channel for PHP & it’s framework, WordPress, Node Js video tutorials. You can also find us on Twitter and Facebook.
Read more