In several application you have seen some chats who replies very fast at anytime when you message you. It responds you immediately. This is actually handled by chatbots. To provide customer, clients 24*7 service, sometimes chatbots works.
Inside this article we will see chatbot conversation integration in laravel 8 using botman. Botman is a composer package. After installation automatically it will provide the interface of chat and it’s internal functions.
We need to install botman and botman-driver composer package.
Here, we will see the step by step guide to work with Botman chatbot in laravel 8.
Let’s get started.
Laravel Installation
We will create laravel project using composer. So, please make sure your system should have composer installed. If not, may be this article will help you to Install composer in system.
Here is the command to create a laravel project-
composer create-project --prefer-dist laravel/laravel blog
To start the development server of Laravel –
php artisan serve
URL: http://127.0.0.1:8000
Assuming laravel already installed inside your system.
Install Botman and Botman Driver
To get the functions of chatbot, next we need to install botman into laravel setup.
Open project in terminal and run this command.
composer require botman/botmanAfter installation of this package, next run this command to install botman driver.
composer require botman/driver-webCreate Configuration File (Optional)
These steps are optional. These configuration file for driver and cache.
Let’c create a folder with name botman inside /config directory. Create two files inside /config/botman.
- config.php
- web.php
Open /config/botman/config.php
<?php

return [
    'conversation_cache_time' => 40,
    'user_cache_time' => 30,
];
Open /config/botman/web.php
<?php

return [

    'matchingData' => [
        'driver' => 'web',
    ],
];
Create Controller
Open project into terminal and run this artisan command to create controller class file.
$ php artisan make:controller BotManController
It will create a file with name BotManController.php at /app/Http/Controllers folder.
Open BotManController.php and write this complete code into it.
<?php

namespace App\Http\Controllers;

use Illuminate\Http\Request;
use App\Botman\OnboardingConversation;

class BotManController extends Controller
{
    /**
     * Place your BotMan logic here.
     */
    public function handle()
    {
        $botman = app('botman');

        $botman->hears('{message}', function ($botman, $message) {

            $botman->startConversation(new OnboardingConversation);
        });

        $botman->listen();
    }
}- All conversation logics, we have separated into a class file OnboardingConversation.php.
- Create a folder with any name, example Botman inside /app folder.
- Create a file OnboardingConversation.php inside /app/Botman folder. This file will contain all conversation logic like Asking, reply, save data etc.
Create Conversation Class File
Create a file OnboardingConversation.php inside /app/Botman.
Open file and write this complete code into it.
<?php
namespace App\Botman;
use BotMan\BotMan\Messages\Conversations\Conversation;
use BotMan\BotMan\Messages\Incoming\Answer;
class OnboardingConversation extends Conversation
{
protected $name;
protected $email;
protected $query;
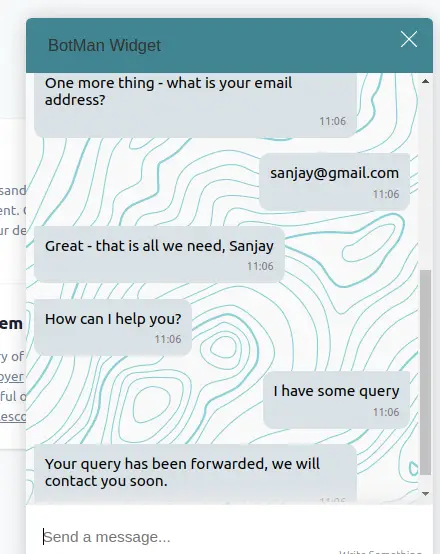
public function askName()
{
$this->ask('Hi! What is your name?', function(Answer $answer) {
// Save result
$this->name = $answer->getText();
$this->say('Nice to meet you '.$this->name);
$this->askEmail();
});
}
public function askEmail()
{
$this->ask('One more thing - what is your email address?', function(Answer $answer) {
// Save result
$this->email = $answer->getText();
$this->say('Great - that is all we need, '.$this->name);
$this->askHelp();
});
}
public function askHelp()
{
$this->ask('How can I help you?', function(Answer $answer) {
// Save result
$this->query = $answer->getText();
$this->say('Your query has been forwarded, we will contact you soon.');
});
}
public function run()
{
// This will be called immediately
$this->askName();
}
}- Here, inside this logic we are asking for Name, email, and query from user.
- We have all different different methods to fire each query.
- To save data into database also we can use Laravel model.
Add Route
Open web.php from /routes folder. Add this route into it.
use App\Http\Controllers\BotManController;

//...

Route::match(['get', 'post'], 'botman', [BotManController::class, 'handle']);
Create Blade File
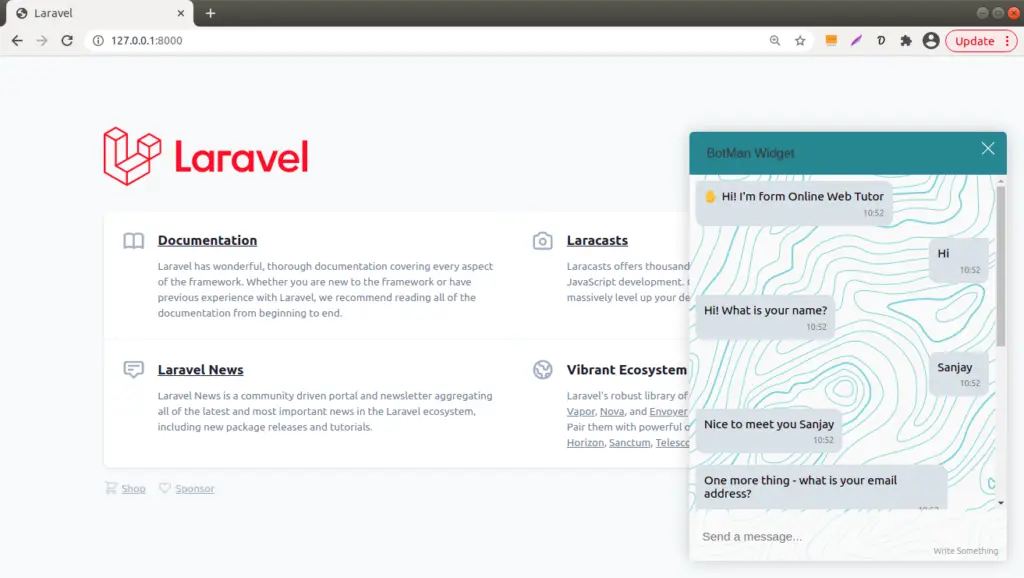
Open any of the view file from your application. I am opening the default view file i.e welcome.blade.php
Add this simple code into it. This code will creates a interface of Chatbox.
//...

<link rel="stylesheet" type="text/css" href="https://cdn.jsdelivr.net/npm/botman-web-widget@0/build/assets/css/chat.min.css">
<script>
  var botmanWidget = {
  aboutText: 'Write Something',
  introMessage: "✋ Hi! I'm form Online Web Tutor"
  };
</script>

<script src='https://cdn.jsdelivr.net/npm/botman-web-widget@0/build/js/widget.js'></script>
Application Testing
Run this command into project terminal to start development server,
php artisan serveURL: http://127.0.0.1:8000/
We hope this article helped you to learn about Chatbot Conversation integration in Laravel 8 Using Botman Tutorial in a very detailed way.
If you liked this article, then please subscribe to our YouTube Channel for PHP & it’s framework, WordPress, Node Js video tutorials. You can also find us on Twitter and Facebook.
Read more