Building secure and efficient RESTful APIs is critical for current apps in the field of web development. Today, we’ll look at how to use CodeIgniter 4 and Shield authentication to build robust and secure APIs.
Here, you will see the complete idea of How To Create CodeIgniter 4 RESTful API Using Shield Authentication. This is a Step-by-step guide to create CodeIgniter 4 RESTful APIs Using Shield Authentication.
Shield is a CodeIgniter 4 authentication and authorization framework. While it does give a foundation set of tools often used in websites, it is intended to be flexible and easily configurable. It is extremely adaptable, allowing developers to extend/override practically any aspect of it.
Read More: How To Use Laravel 10 Collection count() and countBy() Methods
We will create user authentication APIs using Shield –
- Login API
- Register API
- Profile API
- Logout API
Step by step we will create CodeIgniter 4 APIs with Shield. It will be very interesting topic to learn and implement. We will use Shield for authentication here for RESTful web services. CodeIgniter developers surely love this article.
Let’s get started.
CodeIgniter 4 Installation
To create a CodeIgniter 4 setup run this given command into your shell or terminal. Please make sure composer should be installed.
composer create-project codeigniter4/appstarter codeigniter-4Assuming you have successfully installed application into your local system.
Environment (.env) Setup
When we install CodeIgniter 4, we will have env file at root. To use the environment variables means using variables at global scope we need to do env to .env
Either we can do via renaming file as simple as that. Also we can do by terminal command.
Open project in terminal
cp env .envAbove command will create a copy of env file to .env file. Now we are ready to use environment variables.
Enable Development Mode
CodeIgniter starts up in production mode by default. You need to make it in development mode to see any error if you are working with application.
Open .env file from root.
# CI_ENVIRONMENT = production

 // Do it to

CI_ENVIRONMENT = development
Now application is in development mode.
Create Database
To create a database, either we can create via Manual tool of PhpMyadmin or by means of a mysql command.
We will use MySQL command to create database. Run this command into Sql tab of PhpMyAdmin.
CREATE DATABASE codeigniter4_app;Successfully, we have created a database.
Database Connection
Open .env file from project root.
Search for DATABASE. You should see the connection environment variables into it. Put your updated details of database connection string values.
#--------------------------------------------------------------------
# DATABASE
#--------------------------------------------------------------------

database.default.hostname = localhost
database.default.database = codeigniter4_app
database.default.username = admin
database.default.password = admin
database.default.DBDriver = MySQLi
database.default.DBPrefix =
database.default.port = 3306
Now, database successfully connected with the application.
Installation of Shield Authentication Package
Open project into terminal and run this composer command to install shield package.
$ composer require codeigniter4/shieldIMPORTANT: composer error
Read More: Create Automated Logs Every 2 hours in CodeIgniter 4 Tutorial
If you get the following error while installation:
Could not find a version of package codeigniter4/shield matching your minimum-stability (stable).
Require it with an explicit version constraint allowing its desired stability.
Follow these steps:
Steps
- Run the following commands to change your minimum-stability in your project
<strong>composer.json</strong>:
$ composer config minimum-stability dev

$ composer config prefer-stable true
OR
2. Specify an explicit version:
$ composer require codeigniter4/shield:dev-developNext, execute the initial command of Shield to install
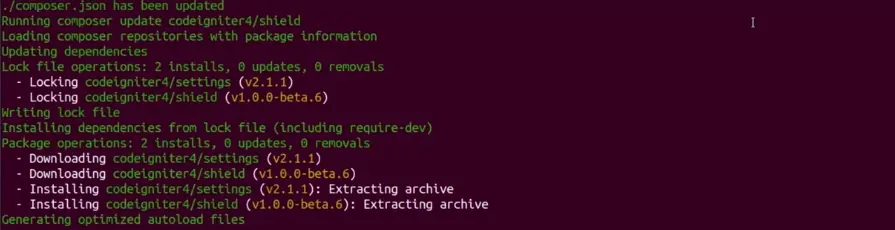
Successfully, shield package now installed. Let’s do the files setup.
Shield Authentication Files Setup
Back to terminal and run this command.
$ php spark shield:setupThis command will update some application files as well as create new files along with migration tables.

Read More: How To Get Unique values in Laravel 10 Collection Tutorial
Once, you migrate migrations. You should see tables in your database as –
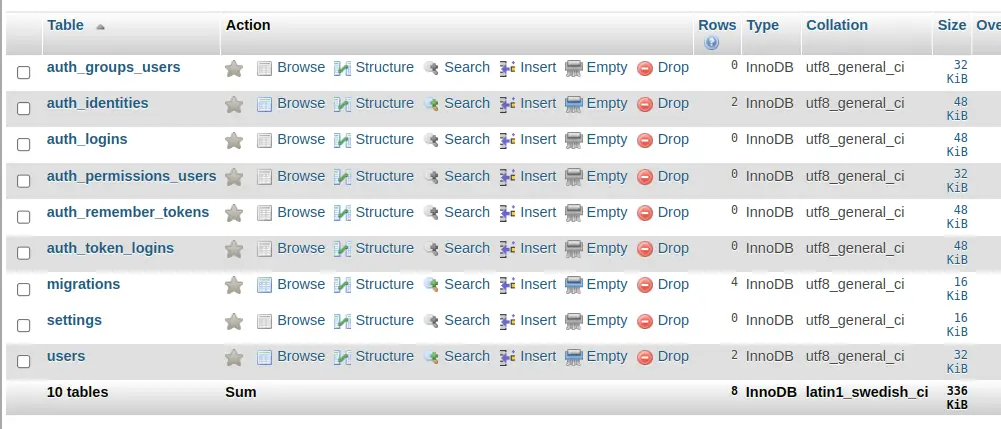
Everything now setup with shield in application. Ready to go with creating apis.
Process of User APIs Development
We will setup an API controller, routes, etc to create user apis.
Create a API Controller
Open project terminal and run this command.
$ php spark make:controller Auth --suffix --restfulIt will create AuthControlller.php file inside /app/Controllers folder.
Open AuthController.php and write this code snippet into it.
<?php

namespace App\Controllers;

use CodeIgniter\RESTful\ResourceController;
use CodeIgniter\Shield\Models\UserModel;
use CodeIgniter\Shield\Entities\User;

class AuthController extends ResourceController
{
    //...
}
Import User model and User entity to controller file.
use CodeIgniter\Shield\Models\UserModel;
use CodeIgniter\Shield\Entities\User;
Add Register Method
API helps to create and save users to database. Needs to pass username, email and password.
//...

    // Post
    public function register()
    {
        $rules = [
            "username" => "required|is_unique[users.username]",
            "email" => "required|valid_email|is_unique[auth_identities.secret]",
            "password" => "required"
        ];

        if (!$this->validate($rules)) {

            $response = [
                "status" => false,
                "message" => $this->validator->getErrors(),
                "data" => []
            ];
        } else {

            // User Model
            $userObject = new UserModel();

            // User Entity
            $userEntityObject = new User([
                "username" => $this->request->getVar("username"),
                "email" => $this->request->getVar("email"),
                "password" => $this->request->getVar("password")
            ]);

            $userObject->save($userEntityObject);

            $response = [
                "status" => true,
                "message" => "User saved successfully",
                "data" => []
            ];
        }

        return $this->respondCreated($response);
    }
//...
Add Login Method
Read More: Step-by-Step Guide To Merge Eloquents in Laravel 10 Collection
API helps to login users to application. Needs to pass email and password.
//...

    // Post
    public function login()
    {

        if(auth()->loggedIn()){
            auth()->logout();
        }

        $rules = [
            "email" => "required|valid_email",
            "password" => "required"
        ];

        if (!$this->validate($rules)) {

            $response = [
                "status" => false,
                "message" => $this->validator->getErrors(),
                "data" => []
            ];
        } else {

            // success
            $credentials = [
                "email" => $this->request->getVar("email"),
                "password" => $this->request->getVar("password")
            ];

            $loginAttempt = auth()->attempt($credentials);

            if (!$loginAttempt->isOK()) {

                $response = [
                    "status" => false,
                    "message" => "Invalid login details",
                    "data" => []
                ];
            } else {

                // We have a valid data set
                $userObject = new UserModel();

                $userData = $userObject->findById(auth()->id());

                $token = $userData->generateAccessToken("thisismysecretkey");

                $auth_token = $token->raw_token;

                $response = [
                    "status" => true,
                    "message" => "User logged in successfully",
                    "data" => [
                        "token" => $auth_token
                    ]
                ];
            }
        }

        return $this->respondCreated($response);
    }

//...
Add Profile Method
API helps to get logged in user profile data.
//...

    // Get
    public function profile()
    {
        $userId = auth()->id();

        $userObject = new UserModel();

        $userData = $userObject->findById($userId);

        return $this->respondCreated([
            "status" => true,
            "message" => "Profile information of logged in user",
            "data" => [
                "user" => $userData
            ]
        ]);
    }

//...
Add Logout Method
API helps to do user logged out from application.
//...

    // Get
    public function logout()
    {
        auth()->logout();

        auth()->user()->revokeAllAccessTokens();

        return $this->respondCreated([
            "status" => true,
            "message" => "User logged out successfully",
            "data" => []
        ]);
    }

//...
Add Access-deny Method
Method which returns a JSON response in case of access denied page.
//...

    public function accessDenied()
    {
        return $this->respondCreated([
            "status" => false,
            "message" => "Invalid access",
            "data" => []
        ]);
    }
//...
Successfully, we have added all the methods in AuthController.php file.
Next, to add api routes.
Add API Routes
Open Routes.php file from /app/Config folder.
//...

service('auth')->routes($routes);

// API Routes
$routes->group("api", ["namespace" => "App\Controllers"], function ($routes) {

    $routes->get("invalid-access", "AuthController::accessDenied");

    // Post
    $routes->post("register", "AuthController::register");

    // Post
    $routes->post("login", "AuthController::login");

    // Get
    $routes->get("profile", "AuthController::profile", ["filter" => "apiauth"]);

    // Get
    $routes->get("logout", "AuthController::logout", ["filter" => "apiauth"]);
});

//...
Create & Register API Filter
Back to project terminal and run this command to create API filter.
$ php spark make:filter Auth --suffixIt will create AuthFilter.php file inside /app/Filters folder.
Open AuthFilter.php file and add these lines of code into it.
<?php

namespace App\Filters;

use CodeIgniter\Filters\FilterInterface;
use CodeIgniter\HTTP\RequestInterface;
use CodeIgniter\HTTP\ResponseInterface;

class AuthFilter implements FilterInterface
{
    public function before(RequestInterface $request, $arguments = null)
    {
        helper("auth");

        if (!auth("tokens")->loggedIn()) {
            return redirect()->to(base_url("api/invalid-access"));
        }
    }

    public function after(RequestInterface $request, ResponseInterface $response, $arguments = null)
    {
        //
    }
}
Next,
To use above created filter, first you need to register into application.
Open Filters.php from /app/Config folder.
Search for $aliases array and add this line into it.
//...

public array $aliases = [
    //...
    'apiauth' => AuthFilter::class,
];

//...
Now, time for api testing.
Application Testing
Open project terminal and start development server via command:
php spark serveRegister API
Method: POST

Form-data: username, email, password

URL: http://localhost:8080/api/register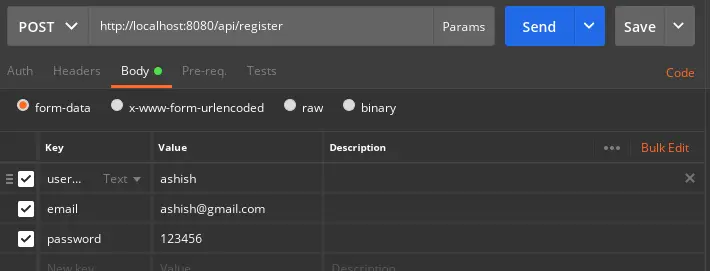
Login API
Method: POST

Form-data: email, password

URL: http://localhost:8080/api/login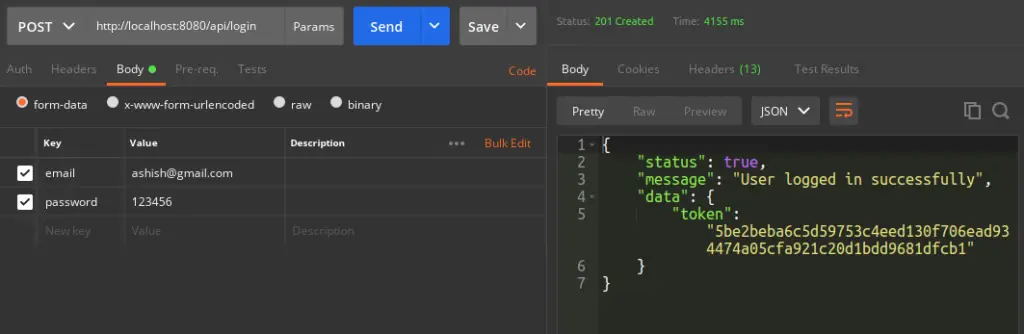
Profile API
Method: GET

Headers: Authorization: Bearer 5be2beba6c5d59753c4eed130f706ead934474a05cfa921c20d1bdd9681dfcb1

URL: http://localhost:8080/api/profile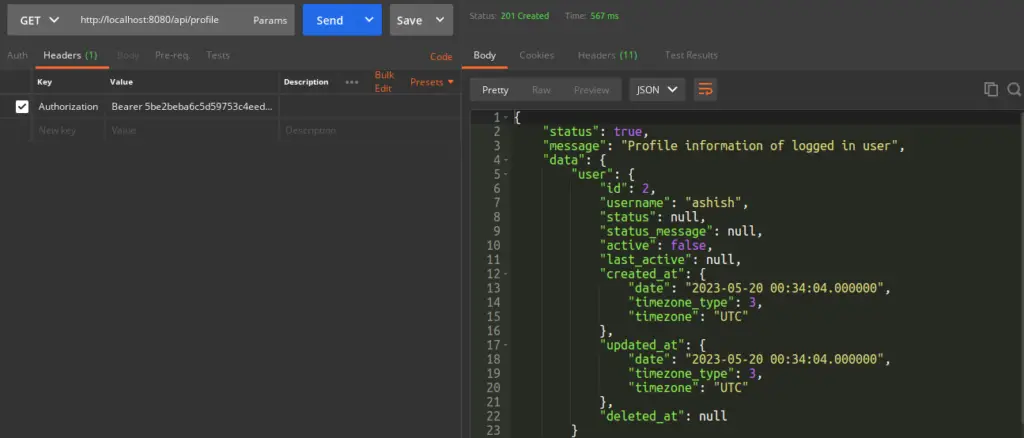
Logout API
Method: GET

Headers: Authorization: Bearer 5be2beba6c5d59753c4eed130f706ead934474a05cfa921c20d1bdd9681dfcb1

URL: http://localhost:8080/api/logout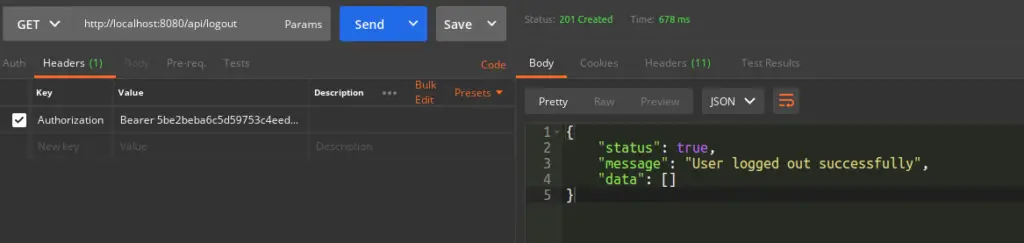
That’s it.
We hope this article helped you to learn CodeIgniter 4 RESTful API Using Shield Authentication Tutorial in a very detailed way.
If you liked this article, then please subscribe to our YouTube Channel for PHP & it’s framework, WordPress, Node Js video tutorials. You can also find us on Twitter and Facebook.
Read more