
In CodeIgniter 4, we have several spark commands available which is designed to complete some specific task. There are several sections like Database, Generators, Housekeeping etc.
Now, here we will create custom spark console command in CodeIgniter 4. Inside this article we will cover two different sections.
- Command which Takes User Inputs and Display Information
- Command Takes input from User and save to database by Model object
- Command which generates 50 fake rows data and save into database.
- Command To Change Spark Default Port, click here
Learn More –
- Call MySQL Stored Procedure in CodeIgniter 4 Tutorial
- Change Default Timezone in CodeIgniter 4 Tutorial
- CodeIgniter 4 Command – Change PHP Spark Default PORT
- CodeIgniter 4 Complete Events Tutorial
Let’s get started.
CodeIgniter 4 Installation
To create a CodeIgniter 4 setup run this given command into your shell or terminal. Please make sure composer should be installed.
composer create-project codeigniter4/appstarter codeigniter-4Assuming you have successfully installed application into your local system.
Environment (.env) Setup
When we install CodeIgniter 4, we will have env file at root. To use the environment variables means using variables at global scope we need to do env to .env
Either we can do via renaming file as simple as that. Also we can do by terminal command.
Open project in terminal
cp env .envAbove command will create a copy of env file to .env file. Now we are ready to use environment variables.
Enable Development Mode
CodeIgniter starts up in production mode by default. You need to make it in development mode to see any error if you are working with application.
Open .env file from root.
# CI_ENVIRONMENT = production

 // Do it to

CI_ENVIRONMENT = development
Now application is in development mode.
Understand make:command Spark Command
Open project into terminal and type the command
$ php sparkWe should see the list of available spark commands. So in the list of commands we have a command called make:command as you can see
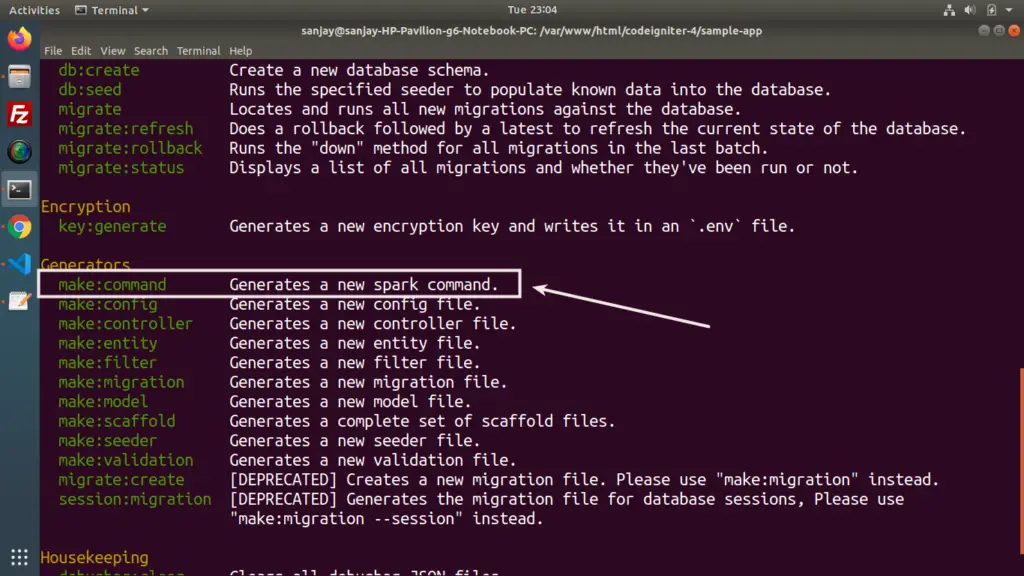
make:command is used to create custom command inside Spark CLI commands list.
Help Manual of make:command
To see the help manual of any spark command simply use this syntax.
$ php spark help <command-name>For Example –
$ php spark help make:commandCommand which Takes User Inputs and Display Information
Open project into terminal and run this command.
$ php spark make:command Userinfo
It will creates a file Userinfo.php at /app/Commands folder.
Open Userinfo.php and write this piece of code.
<?php
namespace App\Commands;
use CodeIgniter\CLI\BaseCommand;
use CodeIgniter\CLI\CLI;
class Userinfo extends BaseCommand
{
/**
* The Command's Group
*
* @var string
*/
protected $group = 'CustomCommand';
/**
* The Command's Name
*
* @var string
*/
protected $name = 'user:info';
/**
* The Command's Description
*
* @var string
*/
protected $description = 'Takes user inputs and display into console';
/**
* The Command's Usage
*
* @var string
*/
protected $usage = 'command:name [arguments] [options]';
/**
* The Command's Arguments
*
* @var array
*/
protected $arguments = [];
/**
* The Command's Options
*
* @var array
*/
protected $options = [];
/**
* Actually execute a command.
*
* @param array $params
*/
public function run(array $params)
{
$name = CLI::prompt("What is your name?");
CLI::newLine(1); // to add a new line into console
$email = CLI::prompt("Please provide your email address?");
CLI::newLine(1); // to add a new line into console
CLI::write("User Informations - Name: " . $name . " & Email: " . $email);
}
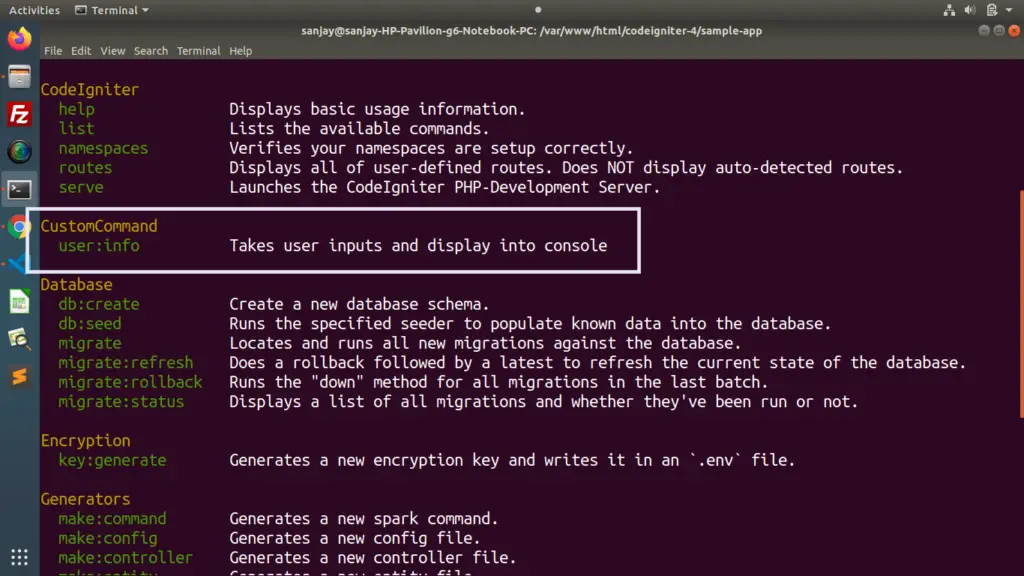
}Back to terminal and type this command –
$ php sparkInside PHP spark command list, we should see own custom created command.
Command Testing
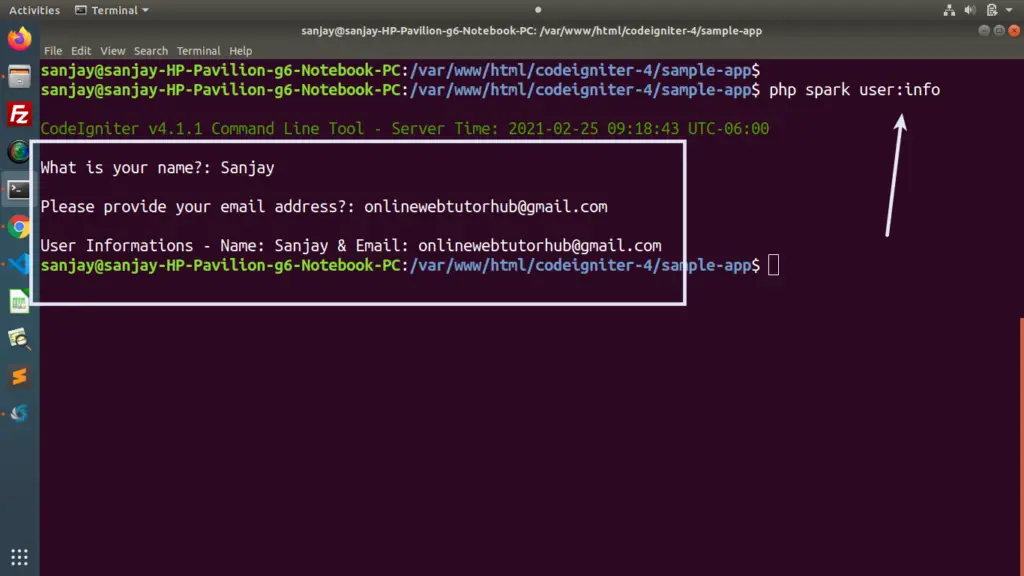
Write this command to terminal and hit enter.
$ php spark user:infoIt will ask few questions and display user information.
Inputs from User and save to database by Model
Let’s create a database and a table. Connect database with .env at your own.
<strong># Database</strong>
CREATE DATABASE codeigniter4_app;

<strong># Table</strong>
CREATE TABLE `users` (
 `id` int(5) unsigned NOT NULL AUTO_INCREMENT,
 `name` varchar(100) NOT NULL,
 `email` varchar(100) NOT NULL,
 `mobile` varchar(25) DEFAULT NULL,
 `created_at` datetime DEFAULT CURRENT_TIMESTAMP,
 PRIMARY KEY (`id`),
) ENGINE=InnoDB DEFAULT CHARSET=utf8
Next, we need to create a Model. We will spark command to create it.
$ php spark make:model User --suffixmake:model will create a model file with name UserModel.php at /app/Models folder.
Open UserModel.php and write this code.
<?php

namespace App\Models;

use CodeIgniter\Model;

class UserModel extends Model
{
	protected $DBGroup              = 'default';
	protected $table                = 'users';
	protected $primaryKey           = 'id';
	protected $useAutoIncrement     = true;
	protected $insertID             = 0;
	protected $returnType           = 'array';
	protected $useSoftDelete        = false;
	protected $protectFields        = true;
	protected $allowedFields        = [
		"name",
		"email",
		"mobile"
	];

	// Dates
	protected $useTimestamps        = false;
	protected $dateFormat           = 'datetime';
	protected $createdField         = 'created_at';
	protected $updatedField         = 'updated_at';
	protected $deletedField         = 'deleted_at';

	// Validation
	protected $validationRules      = [];
	protected $validationMessages   = [];
	protected $skipValidation       = false;
	protected $cleanValidationRules = true;

	// Callbacks
	protected $allowCallbacks       = true;
	protected $beforeInsert         = [];
	protected $afterInsert          = [];
	protected $beforeUpdate         = [];
	protected $afterUpdate          = [];
	protected $beforeFind           = [];
	protected $afterFind            = [];
	protected $beforeDelete         = [];
	protected $afterDelete          = [];
}
$ php spark make:command Usercreatemake:command will create a file Usercreate.php at /app/Commands
Open Usercreate.php and write this code into it.
<?php

namespace App\Commands;

use CodeIgniter\CLI\BaseCommand;
use CodeIgniter\CLI\CLI;
use App\Models\UserModel;

class Usercreate extends BaseCommand
{
    /**
     * The Command's Group
     *
     * @var string
     */
    protected $group = 'CustomCommand';

    /**
     * The Command's Name
     *
     * @var string
     */
    protected $name = 'user:create';

    /**
     * The Command's Description
     *
     * @var string
     */
    protected $description = 'Takes user inputs and create user into database';

    /**
     * The Command's Usage
     *
     * @var string
     */
    protected $usage = 'command:name [arguments] [options]';

    /**
     * The Command's Arguments
     *
     * @var array
     */
    protected $arguments = [];

    /**
     * The Command's Options
     *
     * @var array
     */
    protected $options = [];

    /**
     * Actually execute a command.
     *
     * @param array $params
     */
    public function run(array $params)
    {
        $user_obj = new UserModel();

        $name = CLI::prompt("What is your name?");
        CLI::newLine(1); // to add new line to console

        $email = CLI::prompt("Please provide your email address?");
        CLI::newLine(1); // to add new line to console

        $mobile_no = CLI::prompt("What is your mobile number?");
        CLI::newLine(1); // to add new line to console

        // Creating user
        $user_obj->insert([
            "name" => $name,
            "email" => $email,
            "mobile" => $mobile_no,
        ]);

        CLI::write("User created successfully");
    }
}
Command Testing
Back to terminal & run this command.
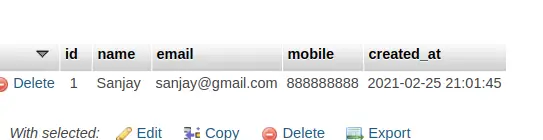
$ php spark user:create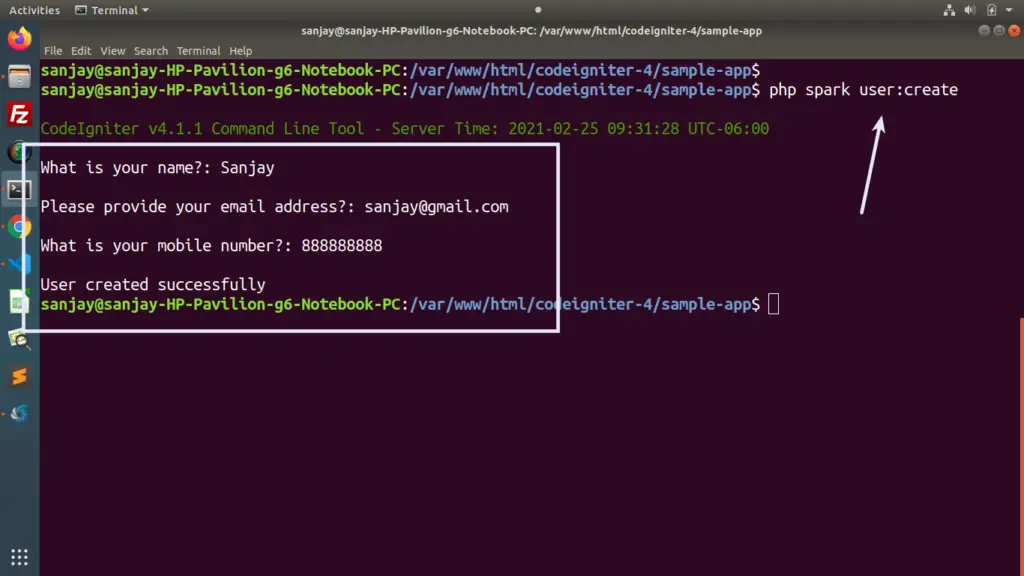
Generates 50 fake rows data and save into database
We will consider the same database, table & model what we have created for above command.
$ php spark make:command FakeusersIt will creates a file Fakeusers.php at /app/Commands.
Open Fakeusers.php and write this code into it.
<?php

namespace App\Commands;

use App\Models\UserModel;
use CodeIgniter\CLI\BaseCommand;
use CodeIgniter\CLI\CLI;
use \Faker\Factory;

class Fakeusers extends BaseCommand
{
    /**
     * The Command's Group
     *
     * @var string
     */
    protected $group = 'CustomCommand';

    /**
     * The Command's Name
     *
     * @var string
     */
    protected $name = 'fake:users';

    /**
     * The Command's Description
     *
     * @var string
     */
    protected $description = 'It will create 50 fake users and save into database';

    /**
     * The Command's Usage
     *
     * @var string
     */
    protected $usage = 'command:name [arguments] [options]';

    /**
     * The Command's Arguments
     *
     * @var array
     */
    protected $arguments = [];

    /**
     * The Command's Options
     *
     * @var array
     */
    protected $options = [];

    /**
     * Actually execute a command.
     *
     * @param array $params
     */
    public function run(array $params)
    {
        $user_obj = new UserModel();

        $data = [];

        for ($i = 0; $i < 50; $i++) {

            $data[] = $this->generateFakeUser();
        }

        $user_obj->insertBatch($data);

        CLI::write("50 Fake Users created successfully");
    }

    public function generateFakeUser()
    {
        $faker = Factory::create();

        return [
            "name" => $faker->name(),
            "email" => $faker->email,
            "mobile" => $faker->phoneNumber,
        ];
    }
}
Command Testing
Back to terminal & run this command.
$ php spark fake:usersIt will create 50 fake users and save to database.
We hope this article helped you to learn about Create Custom Spark Console Command in CodeIgniter 4 in a very detailed way.
If you liked this article, then please subscribe to our YouTube Channel for PHP & it’s framework, WordPress, Node Js video tutorials. You can also find us on Twitter and Facebook.
Read more