
In business, making good-looking invoices is really important. In Laravel 11, you can make PDF invoices that look great and are made on the fly. Using packages like barryvdh/laravel-dompdf makes it easy for developers to create PDF invoices from HTML templates.
This tutorial will guide you through the whole process of making invoice PDFs in Laravel 11. With this feature, developers can make invoices quickly, change how they look, and give clients invoices they can download and print. It’s all about making invoicing easier and more professional!
Really really super easy to create.
Read More: Laravel 11 RESTful APIs with Sanctum Authentication
Let’s get started.
Laravel Installation
Open terminal and run this command to create a laravel project.
composer create-project laravel/laravel myblogIt will create a project folder with name myblog inside your local system.
To start the development server of laravel –
php artisan serveURL: http://127.0.0.1:8000
Assuming laravel already installed inside your system.
Installation of “barryvdh/laravel-dompdf” Package
Open project terminal and run this command to install pdf package,
composer require barryvdh/laravel-dompdfCreate Invoice Controller
Open project terminal and run this command,
php artisan make:controller InvoiceControllerIt will create a controller class with name InvoiceController.php inside app/Http/Controllers folder.
Open controller class and write this complete code into it,
<?php

namespace App\Http\Controllers;

use Illuminate\Http\Request;
use Barryvdh\DomPDF\Facade\Pdf;

class InvoiceController extends Controller
{
    public function index()
    {
        $data = [
            [
                'quantity' => 2,
                'description' => 'Gold',
                'price' => '$500.00'
            ],
            [
                'quantity' => 3,
                'description' => 'Silver',
                'price' => '$300.00'
            ],
            [
                'quantity' => 5,
                'description' => 'Platinum',
                'price' => '$200.00'
            ]
        ];

        $pdf = Pdf::loadView('invoice', ['data' => $data]);

        return $pdf->download();
    }
}
Read More: Laravel 11 RESTful APIs with JWT Authentication Tutorial
Blade Template Setup
Create a file invoice.blade.php inside resources/views folder.
You need two files here invoice.css and a logo for you brand into /public folder.
<!DOCTYPE html>
<html>

<head>
    <meta charset="utf-8">
    <meta name="viewport" content="width=device-width, initial-scale=1">
    <title></title>
    <link rel="stylesheet" href="{{ public_path('invoice.css') }}" type="text/css">
</head>

<body>

    <table class="table-no-border">
        <tr>
            <td class="width-70">
                <img src="{{ public_path('logo.jpg') }}" alt="" width="150" />
            </td>
            <td class="width-30">
                <h2>Invoice ID: 852693</h2>
            </td>
        </tr>
    </table>

    <div class="margin-top">
        <table class="table-no-border">
            <tr>
                <td class="width-50">
                    <div><strong>To:</strong></div>
                    <div>Mark Gadala</div>
                    <div>1401 NW 17th Ave, Florida - 33125</div>
                    <div><strong>Phone:</strong> (305) 981-1561</div>
                    <div><strong>Email:</strong> mark@gmail.com</div>
                </td>
                <td class="width-50">
                    <div><strong>From:</strong></div>
                    <div>Sanjay Kumar</div>
                    <div>132, Darpan Greens, Mohali - 140055</div>
                    <div><strong>Phone:</strong> 8529631470</div>
                    <div><strong>Email:</strong> sanjay@gmail.com</div>
                </td>
            </tr>
        </table>
    </div>

    <div>
        <table class="product-table">
            <thead>
                <tr>
                    <th class="width-25">
                        <strong>Qty</strong>
                    </th>
                    <th class="width-50">
                        <strong>Product</strong>
                    </th>
                    <th class="width-25">
                        <strong>Price</strong>
                    </th>
                </tr>
            </thead>
            <tbody>
                @foreach($data as $value)
                <tr>
                    <td class="width-25">
                        {{ $value['quantity'] }}
                    </td>
                    <td class="width-50">
                        {{ $value['description'] }}
                    </td>
                    <td class="width-25">
                        {{ $value['price'] }}
                    </td>
                </tr>
                @endforeach
            </tbody>
            <tfoot>
                <tr>
                    <td class="width-70" colspan="2">
                        <strong>Sub Total:</strong>
                    </td>
                    <td class="width-25">
                        <strong>$1000.00</strong>
                    </td>
                </tr>
                <tr>
                    <td class="width-70" colspan="2">
                        <strong>Tax</strong>(10%):
                    </td>
                    <td class="width-25">
                        <strong>$100.00</strong>
                    </td>
                </tr>
                <tr>
                    <td class="width-70" colspan="2">
                        <strong>Total Amount:</strong>
                    </td>
                    <td class="width-25">
                        <strong>$1100.00</strong>
                    </td>
                </tr>
            </tfoot>
        </table>
    </div>

    <div class="footer-div">
        <p>Thank you, <br />@OnlineWebTutor</p>
    </div>

</body>

</html>
Now, let’s add some css to design it.
Add Invoice CSS
Create a file invoice.css inside public folder. Open file and write this complete code into it,
body {
    font-family: system-ui, system-ui, sans-serif;
}

table {
    border-spacing: 0;
}

table td,
table th,
p {
    font-size: 13px !important;
}

img {
    border: 3px solid #F1F5F9;
    padding: 6px;
    background-color: #F1F5F9;
}

.table-no-border {
    width: 100%;
}

.table-no-border .width-50 {
    width: 50%;
}

.table-no-border .width-70 {
    width: 70%;
    text-align: left;
}

.table-no-border .width-30 {
    width: 30%;
}

.margin-top {
    margin-top: 40px;
}

.product-table {
    margin-top: 20px;
    width: 100%;
    border-width: 0px;
}

.product-table thead th {
    background-color: #60A5FA;
    color: white;
    padding: 5px;
    text-align: left;
    padding: 5px 15px;
}

.width-20 {
    width: 20%;
}

.width-50 {
    width: 50%;
}

.width-25 {
    width: 25%;
}

.width-70 {
    width: 70%;
    text-align: right;
}

.product-table tbody td {
    background-color: #F1F5F9;
    color: black;
    padding: 5px 15px;
}

.product-table td:last-child,
.product-table th:last-child {
    text-align: right;
}

.product-table tfoot td {
    color: black;
    padding: 5px 15px;
}

.footer-div {
    background-color: #F1F5F9;
    margin-top: 100px;
    padding: 3px 10px;
}
Add Route
Open routes/web.php and add this route into it,
//...
use App\Http\Controllers\InvoiceController;

//...
Route::get('invoice-pdf', [InvoiceController::class, 'index']);
Application Testing
Run this command into project terminal to start development server,
php artisan serveURL: http://127.0.0.1:8000/invoice-pdf
Once you hit enter, it will download PDF file to your system
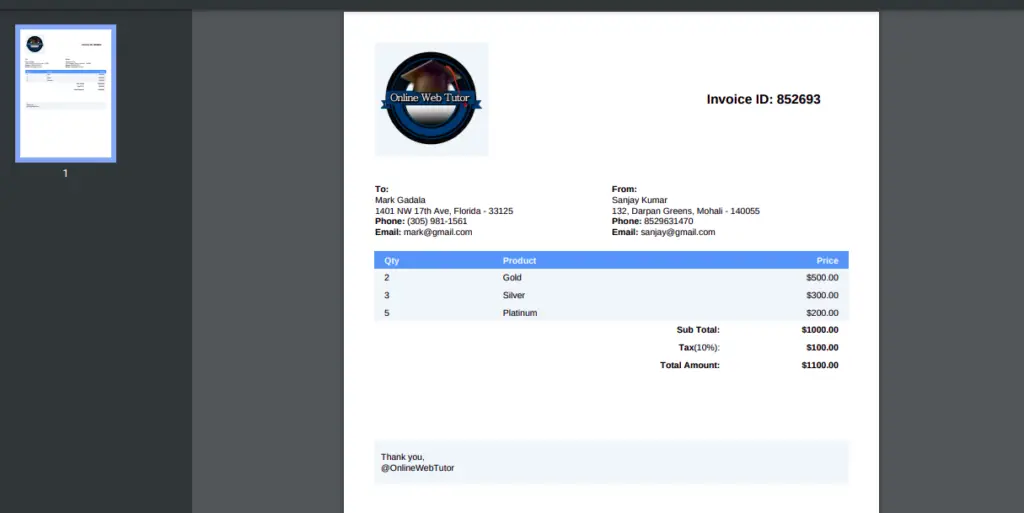
That’s it.
We hope this article helped you to learn about How To Generate Invoice PDF in Laravel 11 Example in a very detailed way.
If you liked this article, then please subscribe to our YouTube Channel for PHP & it’s framework, WordPress, Node Js video tutorials. You can also find us on Twitter and Facebook.