In the dynamic world of web development, creating robust and secure APIs is paramount. Laravel, the PHP framework renowned for its elegance and simplicity, continues to evolve, offering developers powerful tools to streamline the API development process.
In this blog post, we delve into Laravel 11‘s capabilities, focusing particularly on its integration with Passport for authentication. Whether you’re a seasoned Laravel developer or just venturing into API development, this comprehensive guide will walk you through the process of building RESTful APIs with Passport authentication, ensuring your applications are not only secure but also highly efficient.
Read More: Laravel 11 RESTful APIs with Sanctum Authentication
Here, we will see to create these APIs:
- Register API
- Login API
- Profile API
- Refresh Token API
- Logout API
Let’s get started.
Laravel Installation
Open terminal and run this command to create a laravel project.
composer create-project laravel/laravel myblogIt will create a project folder with name myblog inside your local system.
To start the development server of laravel –
php artisan serveURL: http://127.0.0.1:8000
Assuming laravel already installed inside your system.
Create Database & Connect
To create a database, either we can create via Manual tool of PhpMyadmin or by means of a mysql command.
CREATE DATABASE laravel_app;
To connect database with application, Open .env file from application root. Search for DB_ and update your details.
DB_CONNECTION=mysql
DB_HOST=127.0.0.1
DB_PORT=3306
DB_DATABASE=laravel_app
DB_USERNAME=root
DB_PASSWORD=root
Install Passport Auth Package and Create “api.php”
Follow these following steps to do installation,
Step #1
Open project terminal and run this command,
php artisan install:api --passportAfter installation you will find this package into composer.json file,
"laravel/passport": "^12.0"It will create “api.php” into /routes folder as well as it setup passport auth package.
Step #2
Create a personal passport client to issue access tokens,
php artisan passport:client --personalIt will output as,
What should we name the personal access client? [Laravel Personal Access Client]:
 > API Auth

   INFO  Personal access client created successfully.

  Client ID .....................................................4
  Client secret ..............................................Xm3AtRotbAkAB96ppf8XSDW2WpN75ZqsrcspyE
Step #3
Open auth.php file from /config folder.
Search for “guards“. Add these lines of code into it,
'guards' => [
    //...
    <strong>'api' => [
        'driver' => 'passport',
        'provider' => 'users',
    ],</strong>
],
Step #4
Update “User.php” model file
Add this line,
use Laravel\Passport\HasApiTokens;next, Use this HasApiTokens
Here, is the complete code of model class file.
<?php

namespace App\Models;

// use Illuminate\Contracts\Auth\MustVerifyEmail;
use Illuminate\Database\Eloquent\Factories\HasFactory;
use Illuminate\Foundation\Auth\User as Authenticatable;
use Illuminate\Notifications\Notifiable;
use Laravel\Passport\HasApiTokens;

class User extends Authenticatable
{
    use HasApiTokens, HasFactory, Notifiable;

    /**
     * The attributes that are mass assignable.
     *
     * @var array<int, string>
     */
    protected $fillable = [
        'name',
        'email',
        'password'
    ];

    /**
     * The attributes that should be hidden for serialization.
     *
     * @var array<int, string>
     */
    protected $hidden = [
        'password',
        'remember_token',
    ];

    /**
     * Get the attributes that should be cast.
     *
     * @return array<string, string>
     */
    protected function casts(): array
    {
        return [
            'email_verified_at' => 'datetime',
            'password' => 'hashed',
        ];
    }
}
Run Migrations (If any pending)
php artisan migrateIt will migrate all pending migrations of application.
Successfully, you have setup Passport auth package into application.
Now, you have a middleware which you can use to protect api routes i.e “auth:api”
API Controller Settings
Run this command to create API controller class,
php artisan make:controller Api/ApiControllerIt will create a file named ApiController.php inside /app/Http/Controllers folder.
Open file and write this complete code into it,
<?php

namespace App\Http\Controllers\Api;

use App\Http\Controllers\Controller;
use Illuminate\Http\Request;
use App\Models\User;
use Illuminate\Support\Facades\Hash;

class ApiController extends Controller
{
    // Register API [POST] (name, email, password, phone_no)
    public function register(Request $request){

        // Validation
        $request->validate([
            "name" => "required|string",
            "email" => "required|string|email|unique:users",
            "password" => "required|confirmed" // password_confirmation
        ]);

        // User
        User::create([
            "name" => $request->name,
            "email" => $request->email,
            "password" => bcrypt($request->password),
            "phone_no" => $request->mobile
        ]);

        // Response
        return response()->json([
            "status" => true,
            "message" => "User registered successfully"
        ]);
    }

    // Login API (POST) [email, password]
    public function login(Request $request){

        // Validation
        $request->validate([
            "email" => "required|string|email",
            "password" => "required"
        ]);

        // Check user by "email" value
        $user = User::where("email", $request->email)->first();

         // Check user by "password" value
         if(!empty($user)){

            if(Hash::check($request->password, $user->password)){

                // Auth Token value
                $token = $user->createToken("myToken")->accessToken;

                return response()->json([
                    "status" => true,
                    "message" => "User logged in successfully",
                    "token" => $token
                ]);
            }else{

                return response()->json([
                    "status" => false,
                    "message" => "Password didn't match"
                ]);
            }
         }else{

            return response()->json([
                "status" => false,
                "message" => "Invalid credentials"
            ]);
         }
    }

    // Profile API (GET) (Auth Token - Header)
    public function profile(){

        $user = auth()->user();

        return response()->json([
            "status" => true,
            "message" => "User profile data",
            "user" => $user,
            "id" => auth()->user()->id
        ]);
    }

    // Refresh Token API (GET) (Auth Token - Header)
    public function refreshToken(){

        $user = request()->user(); //user data
        $token = $user->createToken("newToken");

        $refreshToken = $token->accessToken;

        return response()->json([
            "status" => true,
            "message" => "Refresh token",
            "token" => $refreshToken
        ]);
    }

    // Logout API (GET) (Auth Token - Header)
    public function logout(){

        request()->user()->tokens()->delete();

        return response()->json([
            "status" => true,
            "message" => "User logged out"
        ]);
    }
}
Setup API Routes
Open api.php file from /routes folder. Add these routes into it,
use App\Http\Controllers\Api\ApiController;

// Open Routes
Route::post("register", [ApiController::class, "register"]);
Route::post("login", [ApiController::class, "login"]);

// Protected Routes
Route::group([
    "middleware" => ["auth:api"]
], function(){

    Route::get("profile", [ApiController::class, "profile"]);
    Route::get("refresh-token", [ApiController::class, "refreshToken"]);
    Route::get("logout", [ApiController::class, "logout"]);
});
Application Testing
Run this command into project terminal to start development server,
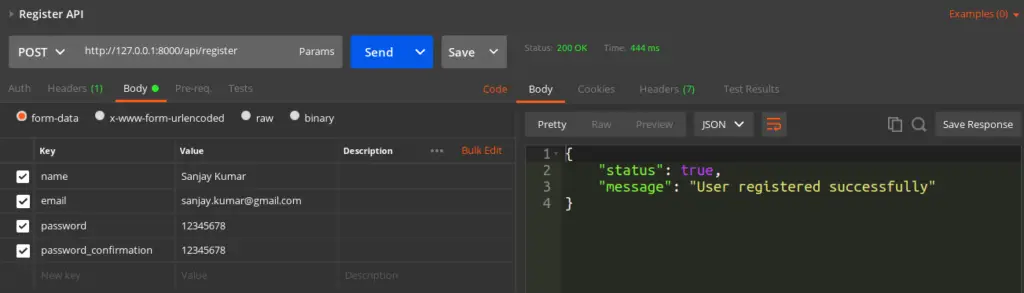
php artisan serveAPI #1: Register API
URL – http://127.0.0.1:8000/api/register
Method – POST
Header –
Accept:application/jsonForm data –
{
   "name": "Sanjay Kumar",
   "email": "sanjay.kumar@gmail.com",
   "password": 12345678
   "password_confirmation": 12345678
}
Screenshot –
API #2: Login API
URL – http://127.0.0.1:8000/api/login
Method – POST
Header –
Accept:application/jsonForm data –
{
   "email": "sanjay.kumar@gmail.com",
   "password": 12345678
}
Screenshot –

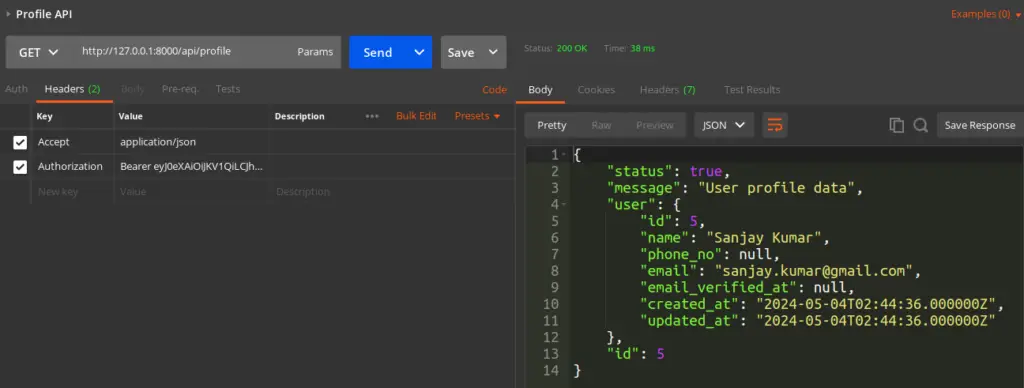
API #3: Profile API
URL – http://127.0.0.1:8000/api/profile
Method – GET
Header –
Accept:application/json
Authorization:Bearer <token>
Screenshot –
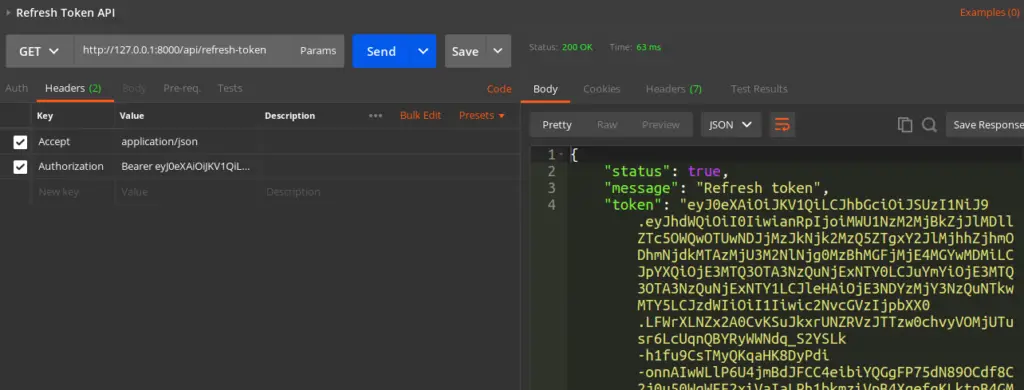
API #4: Refresh Token API
URL – http://127.0.0.1:8000/api/refresh-token
Method – GET
Header –
Accept:application/json
Authorization:Bearer <token>
Screenshot –
API #5: Logout API
URL – http://127.0.0.1:8000/api/logout
Method – GET
Header –
Accept:application/json
Authorization:Bearer <token>
That’s it.
We hope this article helped you to learn about Laravel 11 RESTful APIs with Passport Authentication in a very detailed way.
If you liked this article, then please subscribe to our YouTube Channel for PHP & it’s framework, WordPress, Node Js video tutorials. You can also find us on Twitter and Facebook.
Read more