Many web applications benefit from interactive and dynamic event calendars, which provide users with an organised approach to manage and visualise events. Laravel, a powerful PHP framework, in conjunction with the FullCalendar module, provides a great base for developing such calendars.
In this tutorial, we’ll walk you through creating a FullCalendar with AJAX CRUD capability in Laravel 10, allowing you to easily create, read, update, and delete events.
Throughout this class, we’ll look at how to integrate FullCalendar, set up AJAX queries, and conduct Create, Read, Update, and Delete operations on events.
Read More: How To Work with Javascript Cookie For GET SET and REMOVE
Let’s get started.
What is jQuery FullCalendar Plugin?
FullCalendar is a popular open-source JavaScript framework and jQuery plugin used in web applications to create interactive and customisable calendar and event scheduling interfaces.
It has a plethora of features and options for presenting and organising events, making it an invaluable tool for developing event-driven applications, booking systems, and scheduling applications.
The FullCalendar plugin’s few key features and capabilities are as follows:
- Interactive Calendar Views
- Custom Event Rendering
- Drag-and-Drop
- Event Click and Hover Handling
- Event Editing
Laravel Installation
Open terminal and run this command to create a laravel project.
composer create-project laravel/laravel myblogIt will create a project folder with name myblog inside your local system.
To start the development server of laravel –
php artisan serveURL: http://127.0.0.1:8000
Assuming laravel already installed inside your system.
Create Database & Connect
To create a database, either we can create via Manual tool of PhpMyadmin or by means of a mysql command.
CREATE DATABASE laravel_app;
To connect database with application, Open .env file from application root. Search for DB_ and update your details.
DB_CONNECTION=mysql
DB_HOST=127.0.0.1
DB_PORT=3306
DB_DATABASE=laravel_app
DB_USERNAME=root
DB_PASSWORD=root
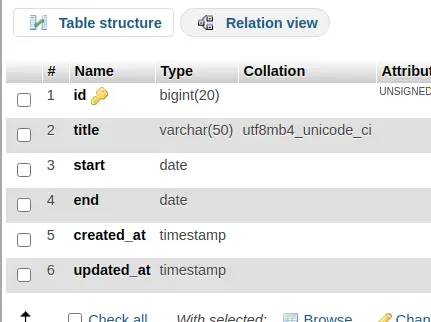
Setup Event Migration
Open project into terminal and run this command,
php artisan make:migration create_events_tableIt will create 2023_03_04_031027_create_events_table.php file inside /database/migrations folder. Open file and write this following code into it.
Read More: PHP Exception How To Create Your Own Exception Class
The code is all about for the schema of events table.
<?php

use Illuminate\Database\Migrations\Migration;
use Illuminate\Database\Schema\Blueprint;
use Illuminate\Support\Facades\Schema;

return new class extends Migration
{
    /**
     * Run the migrations.
     *
     * @return void
     */
    public function up(): void
    {
        Schema::create('events', function (Blueprint $table) {
            $table->id();
            $table->string('title', 50);
            $table->date('start');
            $table->date('end');
            $table->timestamps();
        });
    }

    /**
     * Reverse the migrations.
     *
     * @return void
     */
    public function down(): void
    {
        Schema::dropIfExists('events');
    }
};
Run Migration
Back to terminal and run this command.
php artisan migrateIt will create events table inside database.
Next,
Create Event Model
Run this command,
php artisan make:model EventIt will create a model file Event.php inside /app/Models folder. Open up the file and write this code into it.
<?php

namespace App\Models;

use Illuminate\Database\Eloquent\Factories\HasFactory;
use Illuminate\Database\Eloquent\Model;

class Event extends Model
{
    use HasFactory;

    protected $fillable = [
        'title', 'start', 'end'
    ];
}
Create Event Controller
Open project into terminal and run this command into it,
php artisan make:controller FullCalendarControllerIt will create FullcalendarController.php file inside /app/Http/Controllers folder. Open controller file and write this code into it.
<?php

namespace App\Http\Controllers;

use Illuminate\Http\Request;
use App\Models\Event;

class FullCalendarController extends Controller
{
    public function index(Request $request)
    {
        if ($request->ajax()) {

            $data = Event::whereDate('start', '>=', $request->start)
                ->whereDate('end',   '<=', $request->end)
                ->get(['id', 'title', 'start', 'end']);

            return response()->json($data);
        }

        return view('fullcalendar');
    }

    public function ajax(Request $request)
    {
        switch ($request->type) {
            case 'add':
                $event = Event::create([
                    'title' => $request->title,
                    'start' => $request->start,
                    'end' => $request->end,
                ]);

                return response()->json($event);
                break;

            case 'update':
                $event = Event::find($request->id)->update([
                    'title' => $request->title,
                    'start' => $request->start,
                    'end' => $request->end,
                ]);

                return response()->json($event);
                break;

            case 'delete':
                $event = Event::find($request->id)->delete();

                return response()->json($event);
                break;

            default:
                # code...
                break;
        }
    }
}
Inside above code, you have two methods –
- index() method for frontend layout of fullcalendar.
- ajax() method responsible to process ajax request when insert, update and delete.
Read More: What is CSRF Token and How To Use in Core PHP Tutorial
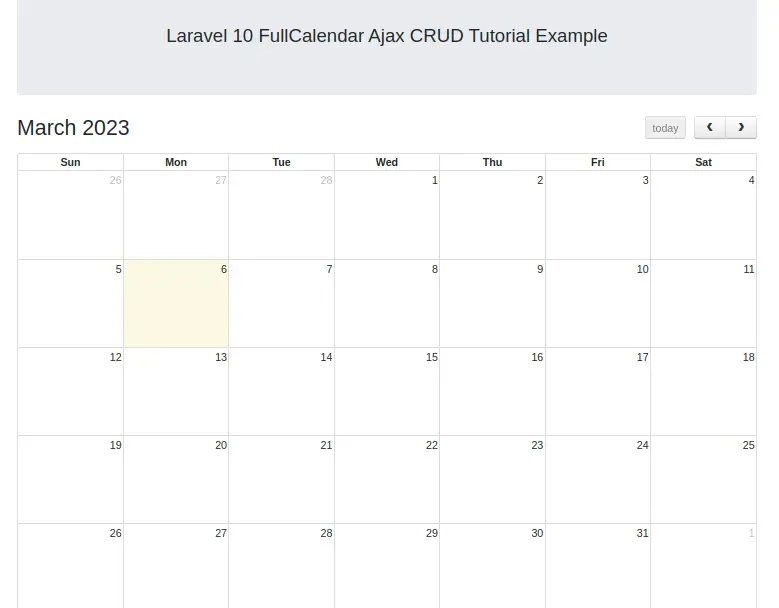
Create Blade Template
Next, needs to create fullcalendar.blade.php file inside /resources/views folder.
Open file and write this following code into it. This will give the frontend view for fullcalendar.
<!DOCTYPE html>
<html>

<head>
    <title>Laravel 10 FullCalendar Ajax CRUD Tutorial Example</title>
    <meta name="csrf-token" content="{{ csrf_token() }}">
    <link rel="stylesheet" href="https://stackpath.bootstrapcdn.com/bootstrap/4.3.1/css/bootstrap.min.css" />
    <link rel="stylesheet" href="https://cdnjs.cloudflare.com/ajax/libs/fullcalendar/3.9.0/fullcalendar.css" />
    <link rel="stylesheet" href="https://cdnjs.cloudflare.com/ajax/libs/toastr.js/latest/toastr.min.css" />
</head>

<body>
    <div class="container">
        <div class="jumbotron">
            <div class="container text-center">
                <h3>Laravel 10 FullCalendar Ajax CRUD Tutorial Example</h3>
            </div>
        </div>
        <div id='calendar'></div>
    </div>

    <script src="https://cdnjs.cloudflare.com/ajax/libs/jquery/3.1.1/jquery.min.js"></script>
    <script src="https://cdnjs.cloudflare.com/ajax/libs/moment.js/2.24.0/moment.min.js"></script>
    <script src="https://cdnjs.cloudflare.com/ajax/libs/fullcalendar/3.9.0/fullcalendar.js"></script>
    <script src="https://cdnjs.cloudflare.com/ajax/libs/toastr.js/latest/toastr.min.js"></script>

    <script>
        $(document).ready(function() {

            var SITEURL = "{{ url('/') }}";

            $.ajaxSetup({
                headers: {
                    'X-CSRF-TOKEN': $('meta[name="csrf-token"]').attr('content')
                }
            });

            var calendar = $('#calendar').fullCalendar({
                editable: true,
                events: SITEURL + "/fullcalendar",
                displayEventTime: false,
                editable: true,
                eventRender: function(event, element, view) {
                    if (event.allDay === 'true') {
                        event.allDay = true;
                    } else {
                        event.allDay = false;
                    }
                },
                selectable: true,
                selectHelper: true,
                select: function(start, end, allDay) {
                    var title = prompt('Event Title:');
                    if (title) {
                        var start = $.fullCalendar.formatDate(start, "Y-MM-DD");
                        var end = $.fullCalendar.formatDate(end, "Y-MM-DD");
                        $.ajax({
                            url: SITEURL + "/fullcalendar-ajax",
                            data: {
                                title: title,
                                start: start,
                                end: end,
                                type: 'add'
                            },
                            type: "POST",
                            success: function(data) {
                                displayMessage("Event Created Successfully");

                                calendar.fullCalendar('renderEvent', {
                                    id: data.id,
                                    title: title,
                                    start: start,
                                    end: end,
                                    allDay: allDay
                                }, true);

                                calendar.fullCalendar('unselect');
                            }
                        });
                    }
                },
                eventDrop: function(event, delta) {
                    var start = $.fullCalendar.formatDate(event.start, "Y-MM-DD");
                    var end = $.fullCalendar.formatDate(event.end, "Y-MM-DD");

                    $.ajax({
                        url: SITEURL + '/fullcalendar-ajax',
                        data: {
                            title: event.title,
                            start: start,
                            end: end,
                            id: event.id,
                            type: 'update'
                        },
                        type: "POST",
                        success: function(response) {
                            displayMessage("Event Updated Successfully");
                        }
                    });
                },
                eventClick: function(event) {
                    var deleteMsg = confirm("Do you really want to delete?");
                    if (deleteMsg) {
                        $.ajax({
                            type: "POST",
                            url: SITEURL + '/fullcalendar-ajax',
                            data: {
                                id: event.id,
                                type: 'delete'
                            },
                            success: function(response) {
                                calendar.fullCalendar('removeEvents', event.id);
                                displayMessage("Event Deleted Successfully");
                            }
                        });
                    }
                }

            });

        });

        function displayMessage(message) {
            toastr.success(message, 'Event');
        }

    </script>
</body>

</html>
Add Route
Open web.php file from /routes folder. Add these routes into it.
//...

use App\Http\Controllers\FullCalendarController;

//...

Route::get('fullcalendar', [FullCalendarController::class, 'index']);
Route::post('fullcalendar-ajax', [FullCalendarController::class, 'ajax']);

//...
Application Testing
Run this command into project terminal to start development server,
php artisan serveURL: http://127.0.0.1:8000/fullcalendar
Frontend
Create Event
Click on any date, add and save your event.
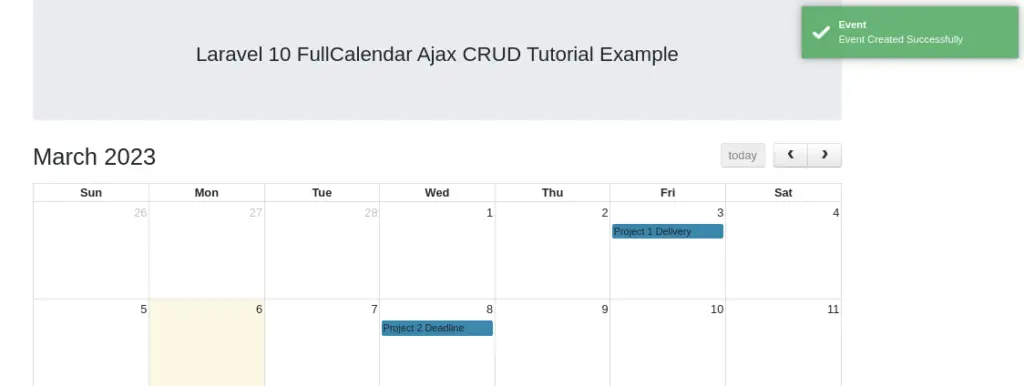
Update Event
To update any event, Simple you can move (drag and drop) that event into any of your date. It will be automatically updated.
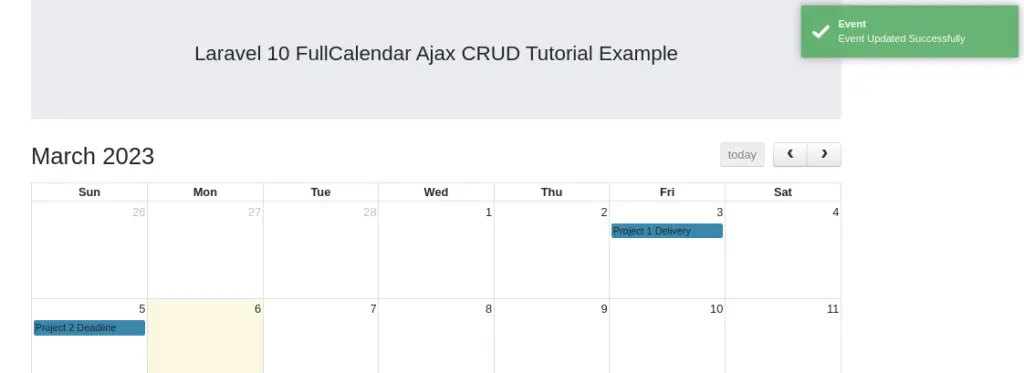
Delete Event
To delete, simple click on event and confirm via javascript alert box. It will delete automatically via ajax request.
Read More: How Many Different ways of Writing Functions in JavaScript
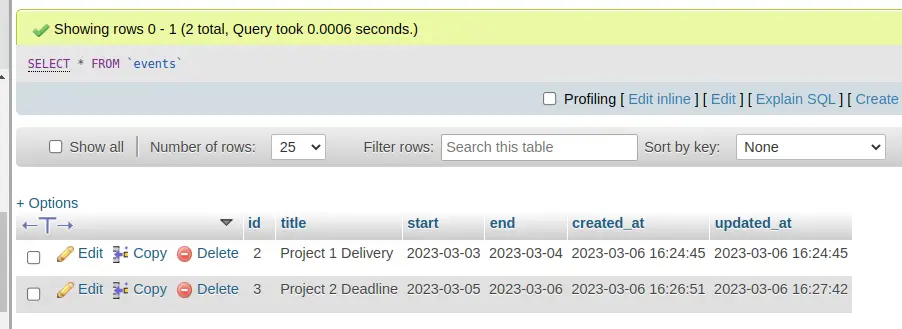
In database events table, you will see the events as –
That’s it.
We hope this article helped you to learn about Laravel 10 FullCalendar Ajax CRUD Example Tutorial in a very detailed way.
If you liked this article, then please subscribe to our YouTube Channel for PHP & it’s framework, WordPress, Node Js video tutorials. You can also find us on Twitter and Facebook.
Read more