With our complete article on overriding the Auth login method, you can unleash the power of customization in Laravel 10. Personalization is important in web development, and being able to adjust the authentication process to your application’s individual needs can improve both security and user experience.
This article will walk you through the process of customizing the Auth login method in Laravel 10. We’ll guide you on a trip to develop a login process that exactly corresponds with the objectives of your project, from understanding the basic authentication method to smoothly incorporating your unique logic.
Read More: Laravel 10 Send Email To Multiple Users Tutorial
Laravel authentication via laravel ui package provides the simple steps to override auth register method, login method etc.
Let’s get started.
Laravel Installation
Open terminal and run this command to create a laravel project.
composer create-project laravel/laravel myblogIt will create a project folder with name myblog inside your local system.
To start the development server of laravel –
php artisan serveURL: http://127.0.0.1:8000
Assuming laravel already installed inside your system.
Authentication with Laravel UI
To learn complete process of laravel authentication with laravel ui package, click here. This will provide you the step by step solution to get into laravel authentication.
Next,
We will see how to change or override auth login method of laravel authentication.
Authentication Routes
Open project into terminal, if you type this command.
$ php artisan route:listYou will see all hidden routes of laravel authentication.

To override login function or say login() method you need to work on LoginController.php file /app/Http/Controllers/Auth folder.
Override Login in Authentication
Open LoginController.php file from /app/Http/Controllers/Auth folder.
<?php

namespace App\Http\Controllers\Auth;

use App\Http\Controllers\Controller;
use App\Providers\RouteServiceProvider;
use Illuminate\Foundation\Auth\AuthenticatesUsers;
use Illuminate\Http\Request;
use Illuminate\Support\Facades\Auth;

class LoginController extends Controller
{
    /*
    |--------------------------------------------------------------------------
    | Login Controller
    |--------------------------------------------------------------------------
    |
    | This controller handles authenticating users for the application and
    | redirecting them to your home screen. The controller uses a trait
    | to conveniently provide its functionality to your applications.
    |
    */

    use AuthenticatesUsers;

    /**
     * Where to redirect users after login.
     *
     * @var string
     */
    protected $redirectTo = RouteServiceProvider::HOME;

    /**
     * Create a new controller instance.
     *
     * @return void
     */
    public function __construct()
    {
        $this->middleware('guest')->except('logout');
    }

    // Custom Login form
    public function showLoginForm()
    {
        return view("login");
    }

    // Add mobile number to login
    public function login(Request $request)
    {
        $request->validate([
            'mobile' => 'required',
            'password' => 'required',
        ]);

        $credentials = $request->only('mobile', 'password');
        if (Auth::attempt($credentials)) {

            return redirect()->route('home');
        }

        return redirect("login")->withSuccess('Oppes! You have entered invalid credentials');
    }
}
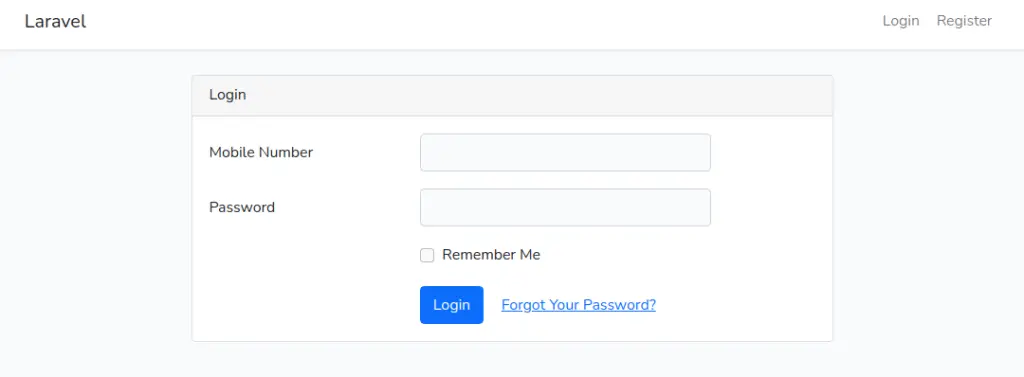
We have added a method showLoginForm() to override the default auth login page.
Read More: Laravel 10 Install Tailwind CSS Example Tutorial
Also, we updated login() method for login via mobile number and password.
Next, we need to create / update a login layout file.
Custom Login Blade Template
Create a layout file named as login.blade.php inside /resources/views folder.
Open file and write this complete code into it.
@extends('layouts.app')

@section('content')
<div class="container">
    <div class="row justify-content-center">
        <div class="col-md-8">
            <div class="card">
                <div class="card-header">{{ __('Login') }}</div>

                <div class="card-body">
                    <form method="POST" action="{{ route('login') }}">
                        @csrf

                        <div class="row mb-3">
                            <label for="mobile" class="col-md-4 col-form-label text-md-right">{{ __('Mobile Number') }}</label>

                            <div class="col-md-6">
                                <input id="mobile" type="text" class="form-control @error('mobile') is-invalid @enderror" name="mobile" value="{{ old('mobile') }}" required autocomplete="mobile" autofocus>

                                @error('mobile')
                                    <span class="invalid-feedback" role="alert">
                                        <strong>{{ $message }}</strong>
                                    </span>
                                @enderror
                            </div>
                        </div>

                        <div class="row mb-3">
                            <label for="password" class="col-md-4 col-form-label text-md-right">{{ __('Password') }}</label>

                            <div class="col-md-6">
                                <input id="password" type="password" class="form-control @error('password') is-invalid @enderror" name="password" required autocomplete="current-password">

                                @error('password')
                                    <span class="invalid-feedback" role="alert">
                                        <strong>{{ $message }}</strong>
                                    </span>
                                @enderror
                            </div>
                        </div>

                        <div class="row mb-3">
                            <div class="col-md-6 offset-md-4">
                                <div class="form-check">
                                    <input class="form-check-input" type="checkbox" name="remember" id="remember" {{ old('remember') ? 'checked' : '' }}>

                                    <label class="form-check-label" for="remember">
                                        {{ __('Remember Me') }}
                                    </label>
                                </div>
                            </div>
                        </div>

                        <div class="row mb-0">
                            <div class="col-md-8 offset-md-4">
                                <button type="submit" class="btn btn-primary">
                                    {{ __('Login') }}
                                </button>

                                @if (Route::has('password.request'))
                                    <a class="btn btn-link" href="{{ route('password.request') }}">
                                        {{ __('Forgot Your Password?') }}
                                    </a>
                                @endif
                            </div>
                        </div>
                    </form>
                </div>
            </div>
        </div>
    </div>
</div>
@endsection
We have added a mobile number input field in place of Email address as login input.
Note*: When you override login() method, first you need to add custom field for mobile number into database table i.e mobile.
Application Testing
Run this command into project terminal to start development server,
php artisan serveURL: http://127.0.0.1:8000/
Read More: Laravel 10 Generate Dynamic Sitemap Example
Click on Login link of dashboard.

When you provide data Mobile and password then hit on Login button, it will login user to the dashboard.
We hope this article helped you to learn Laravel 10 How to Override Auth Login Method in a very detailed way.
Online Web Tutor invites you to try Skillshike! Learn CakePHP, Laravel, CodeIgniter, Node Js, MySQL, Authentication, RESTful Web Services, etc into a depth level. Master the Coding Skills to Become an Expert in PHP Web Development. So, Search your favourite course and enroll now.
If you liked this article, then please subscribe to our YouTube Channel for PHP & it’s framework, WordPress, Node Js video tutorials. You can also find us on Twitter and Facebook.
