The authentication system in Laravel 10 provides a unified interface for managing user registration, login, and other authentication-related functions. However, there may be times when you need to customise and adjust the authentication process’s default behaviour to match the specific needs of your project. Overriding the Auth Register function is one such scenario.
In this tutorial, we will show you how to override the Auth Register method in Laravel 10. This gives you complete control over the registration process and allows you to apply custom logic such as additional user data collecting, integration with external services, or specialised validation stages.
Read More: Learn Laravel 10 Authentication with Laravel UI Tutorial
Laravel authentication via laravel ui package provides the simple steps to override auth register method, login method etc.
Let’s get started.
Laravel Installation
Open terminal and run this command to create a laravel project.
composer create-project laravel/laravel myblogIt will create a project folder with name myblog inside your local system.
To start the development server of laravel –
php artisan serveURL: http://127.0.0.1:8000
Assuming laravel already installed inside your system.
Authentication with Laravel UI
To learn complete process of laravel authentication with laravel ui package, click here. This will provide you the step by step solution to get into laravel authentication.
Next,
We will see how to change or override auth register method of laravel authentication.
Authentication Routes
Open project into terminal, if you type this command.
$ php artisan route:listYou will see all hidden routes of laravel authentication.

To override login function or say login() method you need to work on RegisterController.php file /app/Http/Controllers/Auth folder.
Override Register in Authentication
Open RegisterController.php file from /app/Http/Controllers/Auth folder.
<?php

namespace App\Http\Controllers\Auth;

use App\Http\Controllers\Controller;
use App\Providers\RouteServiceProvider;
use App\Models\User;
use Illuminate\Foundation\Auth\RegistersUsers;
use Illuminate\Support\Facades\Hash;
use Illuminate\Support\Facades\Validator;

class RegisterController extends Controller
{
    /*
    |--------------------------------------------------------------------------
    | Register Controller
    |--------------------------------------------------------------------------
    |
    | This controller handles the registration of new users as well as their
    | validation and creation. By default this controller uses a trait to
    | provide this functionality without requiring any additional code.
    |
    */

    use RegistersUsers;

    /**
     * Where to redirect users after registration.
     *
     * @var string
     */
    protected $redirectTo = RouteServiceProvider::HOME;

    /**
     * Create a new controller instance.
     *
     * @return void
     */
    public function __construct()
    {
        $this->middleware('guest');
    }

    /**
     * Get a validator for an incoming registration request.
     *
     * @param  array  $data
     * @return \Illuminate\Contracts\Validation\Validator
     */
    protected function validator(array $data)
    {
        return Validator::make($data, [
            'name' => ['required', 'string', 'max:255'],
            'mobile' => ['required', 'max:20'],
            'email' => ['required', 'string', 'email', 'max:255', 'unique:users'],
            'password' => ['required', 'string', 'min:8', 'confirmed'],
        ]);
    }

    /**
     * Create a new user instance after a valid registration.
     *
     * @param  array  $data
     * @return \App\Models\User
     */
    protected function create(array $data)
    {
        return User::create([
            'name' => $data['name'],
            'mobile' => $data['mobile'],
            'email' => $data['email'],
            'password' => Hash::make($data['password']),
        ]);
    }

    // Custom Register form
    public function showRegistrationForm()
    {
        return view('register');
    }
}
We have added a method showRegistrationForm() to override the default auth register page.
Read More: Use Laravel 10 To Get Files Information From Directory
Also, we updated validator() method for field validations. Added line –
'mobile' => ['required', 'max:20'],Update create() method to create a mobile field with post data. Added line –
'mobile' => $data['mobile'],Next,
We need to create / update register.blade.php layout file inside /resources/views folder.
Custom Register Blade Template
Create a layout file named as register.blade.php inside /resources/views folder.
Open file and write this complete code into it.
@extends('layouts.app')

@section('content')
<div class="container">
    <div class="row justify-content-center">
        <div class="col-md-8">
            <div class="card">
                <div class="card-header">{{ __('Register') }}</div>

                <div class="card-body">
                    <form method="POST" action="{{ route('register') }}">
                        @csrf

                        <div class="row mb-3">
                            <label for="name" class="col-md-4 col-form-label text-md-right">{{ __('Name') }}</label>

                            <div class="col-md-6">
                                <input id="name" type="text" class="form-control @error('name') is-invalid @enderror" name="name" value="{{ old('name') }}" required autocomplete="name" autofocus>

                                @error('name')
                                    <span class="invalid-feedback" role="alert">
                                        <strong>{{ $message }}</strong>
                                    </span>
                                @enderror
                            </div>
                        </div>

                        <div class="row mb-3">
                            <label for="mobile" class="col-md-4 col-form-label text-md-right">{{ __('Mobile') }}</label>

                            <div class="col-md-6">
                                <input id="mobile" type="text" class="form-control @error('mobile') is-invalid @enderror" name="mobile" value="{{ old('mobile') }}" required autocomplete="mobile" autofocus>

                                @error('mobile')
                                    <span class="invalid-feedback" role="alert">
                                        <strong>{{ $message }}</strong>
                                    </span>
                                @enderror
                            </div>
                        </div>

                        <div class="row mb-3">
                            <label for="email" class="col-md-4 col-form-label text-md-right">{{ __('E-Mail Address') }}</label>

                            <div class="col-md-6">
                                <input id="email" type="email" class="form-control @error('email') is-invalid @enderror" name="email" value="{{ old('email') }}" required autocomplete="email">

                                @error('email')
                                    <span class="invalid-feedback" role="alert">
                                        <strong>{{ $message }}</strong>
                                    </span>
                                @enderror
                            </div>
                        </div>

                        <div class="row mb-3">
                            <label for="password" class="col-md-4 col-form-label text-md-right">{{ __('Password') }}</label>

                            <div class="col-md-6">
                                <input id="password" type="password" class="form-control @error('password') is-invalid @enderror" name="password" required autocomplete="new-password">

                                @error('password')
                                    <span class="invalid-feedback" role="alert">
                                        <strong>{{ $message }}</strong>
                                    </span>
                                @enderror
                            </div>
                        </div>

                        <div class="row mb-3">
                            <label for="password-confirm" class="col-md-4 col-form-label text-md-right">{{ __('Confirm Password') }}</label>

                            <div class="col-md-6">
                                <input id="password-confirm" type="password" class="form-control" name="password_confirmation" required autocomplete="new-password">
                            </div>
                        </div>

                        <div class="row mb-0">
                            <div class="col-md-6 offset-md-4">
                                <button type="submit" class="btn btn-primary">
                                    {{ __('Register') }}
                                </button>
                            </div>
                        </div>
                    </form>
                </div>
            </div>
        </div>
    </div>
</div>
@endsection
We have added a mobile number input field into register form.
Update Migration File
Open 2014_10_12_000000_create_users_table.php migration file and add mobile a new column for users table.
Migration file which update the schema of database table.
<?php

use Illuminate\Database\Migrations\Migration;
use Illuminate\Database\Schema\Blueprint;
use Illuminate\Support\Facades\Schema;

return new class extends Migration
{
    /**
     * Run the migrations.
     */
    public function up(): void
    {
        Schema::create('users', function (Blueprint $table) {
            $table->id();
            $table->string('name');
            $table->string('mobile', 20); // New field added
            $table->string('email')->unique();
            $table->timestamp('email_verified_at')->nullable();
            $table->string('password');
            $table->rememberToken();
            $table->timestamps();
        });
    }

    /**
     * Reverse the migrations.
     */
    public function down(): void
    {
        Schema::dropIfExists('users');
    }
};
Read More: Laravel 10 Override Auth Login Method Tutorial
Run Migration
Back to terminal and run migrate command,
$ php artisan migrateOR
$ php artisan migrate:refreshUpdate User Model
Open User.php from /app/Models folder.
<?php

namespace App\Models;

// use Illuminate\Contracts\Auth\MustVerifyEmail;
use Illuminate\Database\Eloquent\Factories\HasFactory;
use Illuminate\Foundation\Auth\User as Authenticatable;
use Illuminate\Notifications\Notifiable;
use Laravel\Sanctum\HasApiTokens;

class User extends Authenticatable
{
    use HasApiTokens, HasFactory, Notifiable;

    /**
     * The attributes that are mass assignable.
     *
     * @var array<int, string>
     */
    protected $fillable = [
        'name',
        'mobile',
        'email',
        'password',
    ];

    /**
     * The attributes that should be hidden for serialization.
     *
     * @var array<int, string>
     */
    protected $hidden = [
        'password',
        'remember_token',
    ];

    /**
     * The attributes that should be cast.
     *
     * @var array<string, string>
     */
    protected $casts = [
        'email_verified_at' => 'datetime',
        'password' => 'hashed',
    ];
}
Added mobile field into $fillable array.
Application Testing
Run this command into project terminal to start development server,
php artisan serveURL: URL: http://127.0.0.1:8000/
Click on Register link of dashboard.
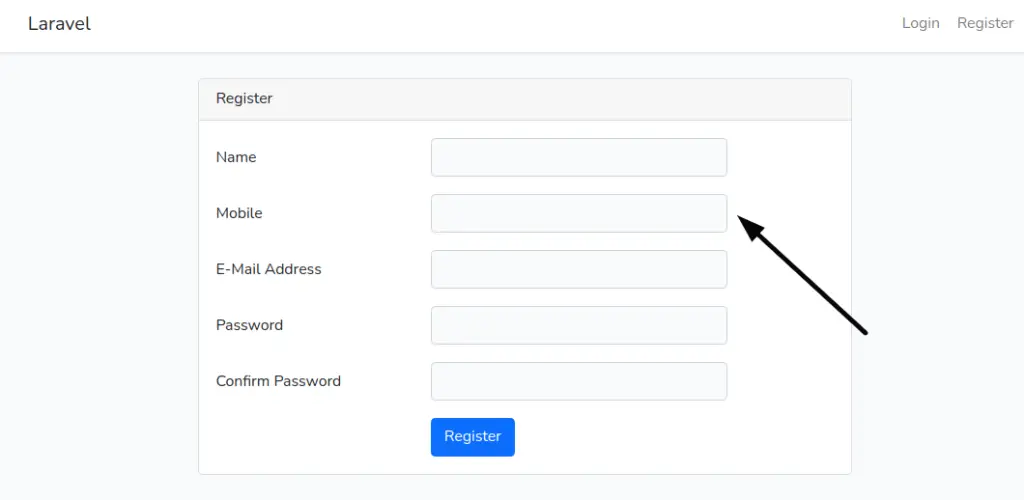
When you provide all data and hit on Register button, it will add a new user to users table.
Read More: How To Clear Complete Application Caches in Laravel 10
We hope this article helped you to learn about Laravel 10 Override Auth Register Method Tutorial in a very detailed way.
If you liked this article, then please subscribe to our YouTube Channel for PHP & it’s framework, WordPress, Node Js video tutorials. You can also find us on Twitter and Facebook.
Read more