Inside this article we will see the concept i.e Laravel 9 How To save array data in database table. Article contains classified information about saving array data into database in laravel 9.
If you are looking for a solution where you want to save data in bulk inside database table then this article will help you a lot to learn and implement. Sometime when you have a huge amount of data which have no order to save and also we don’t have sufficient columns inside database table then you can use this concept to save data in JSON format.
We will use the concept of laravel 9 getter and setter functions. We will save array data into json format inside database. If you know about MySQL datatypes then JSON data type you heard. So, in this case we will use JSON data type for column to store array data.
Learn More –
- Laravel 9 Work With Livewire Form Submit Tutorial
- Laravel 9 How To Create RSS Feed Tutorial
- How To Print Iframe Content Using jQuery Tutorial
- Laravel 9 How To Work With Livewire Pagination Example
Let’s get started.
Laravel Installation
Open terminal and run this command to create a laravel project.
composer create-project laravel/laravel myblogIt will create a project folder with name myblog inside your local system.
To start the development server of laravel –
php artisan serveURL: http://127.0.0.1:8000
Assuming laravel already installed inside your system.
Create Database & Connect
To create a database, either we can create via Manual tool of PhpMyadmin or by means of a mysql command.
CREATE DATABASE laravel_app;
To connect database with application, Open .env file from application root. Search for DB_ and update your details.
DB_CONNECTION=mysql
DB_HOST=127.0.0.1
DB_PORT=3306
DB_DATABASE=laravel_app
DB_USERNAME=root
DB_PASSWORD=root
Create Migration
We will create a migration file for items table. Open project into terminal and run this command.
$ php artisan make:migration create_items_tableIt will create a migration file 2022_07_19_145319_create_items_table.php inside /database/migrations folder.
Open migration file and write this code into it.
<?php

use Illuminate\Database\Migrations\Migration;
use Illuminate\Database\Schema\Blueprint;
use Illuminate\Support\Facades\Schema;

return new class extends Migration
{
    /**
     * Run the migrations.
     *
     * @return void
     */
    public function up()
    {
        Schema::create('items', function (Blueprint $table) {
            $table->id();
            $table->string('title');
            $table->json('data')->nullable();
            $table->timestamps();
        });
    }

    /**
     * Reverse the migrations.
     *
     * @return void
     */
    public function down()
    {
        Schema::dropIfExists('items');
    }
};
Run Migration
Next,
To migrate migration so that we create the schema of items table inside database.
$ php artisan migrateIt will create items table.

Create Model
Open project terminal and run this artisan command to create model.
$ php artisan make:model ItemIt will create Item.php inside /app/Models folder. Open Item.php and write this code into it.
<?php

namespace App\Models;

use Illuminate\Database\Eloquent\Factories\HasFactory;
use Illuminate\Database\Eloquent\Model;
use Illuminate\Database\Eloquent\Casts\Attribute;

class Item extends Model
{
    use HasFactory;

    protected $fillable = [
        'title', 'data'
    ];

    /**
     *
     * @return \Illuminate\Database\Eloquent\Casts\Attribute
     */
    protected function data(): Attribute
    {
        return Attribute::make(
            get: fn ($value) => json_decode($value, true),
            set: fn ($value) => json_encode($value),
        );
    }
}
Concept
Here, this is the concept of laravel model known as get and set method blocks. While processing data input these methods will be used.
get: fn ($value) will be used when we fetch data from database table. Automatically it will process the incoming data from db.
set: fn ($value) will be used when we save data into database.
protected function data(): Attribute
{
    return Attribute::make(
        get: fn ($value) => json_decode($value, true),
        set: fn ($value) => json_encode($value),
    );
}
Here, before data save -> json_encode() will be used. And when data get from database json_decode() will be used.
Create Controller
Next,
We need to controller file to work with the concept. Open project terminal and run this command to create application controller.
$ php artisan make:controller ItemControllerIt will create ItemController.php file inside /app/Http/Controllers folder. Open controller file and write this code into it.
<?php

namespace App\Http\Controllers;

use Illuminate\Http\Request;
use App\Models\Item;

class ItemController extends Controller
{
    public function index()
    {
        $input = [
            'title' => 'Sample Title',
            'data' => [
                '1' => 'First',
                '2' => 'Second',
                '3' => 'Third'
            ]
        ];

        $item = Item::create($input);

        dd($item->data);
    }
}
You can see, we are creating an item with title (a string value) and data (an array of values).
Add Route
Open web.php file from /routes folder. Add this route into it.
//...
use App\Http\Controllers\ItemController;

Route::get('item', [ItemController::class, 'index']);
Application Testing
Run this command into project terminal to start development server,
php artisan serveURL: http://127.0.0.1:8000/item
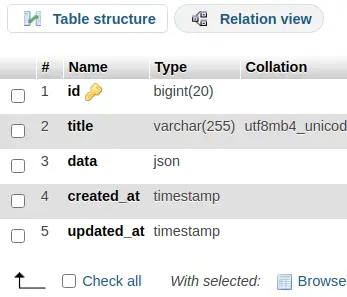
Once you hit this URL, your data will be saved into database into encoded format and also will get outputted in decoded format.
Database table will look like this –

We hope this article helped you to learn Laravel 9 How To Save Array Data in Database Table in a very detailed way.
Online Web Tutor invites you to try Skillshike! Learn CakePHP, Laravel, CodeIgniter, Node Js, MySQL, Authentication, RESTful Web Services, etc into a depth level. Master the Coding Skills to Become an Expert in PHP Web Development. So, Search your favourite course and enroll now.
If you liked this article, then please subscribe to our YouTube Channel for PHP & it’s framework, WordPress, Node Js video tutorials. You can also find us on Twitter and Facebook.
