Inside this article we will learn one more important concept of laravel i.e Laravel 9 REST API Development Using Sanctum. This will be step by step guide to create restful services from scratch.
REpresentational State Transfer (REST) is an architectural style that defines a set of constraints to be used for creating web services. REST API is a way of accessing web services in a simple and flexible way without having any processing.
In this article we will create a secure set of rest apis using laravel using Sanctum. Sanctum is a laravel composer package.
What we will do in this article –
- User Register API
- Login API
- Create Post
- List Post
- Single Post details
- Update Post
- Delete Post
Above are the apis, we will create using sanctum authentication.
Learn More –
- Laravel 9 REST API Development Using Passport Tutorial
- Laravel 9 Scout How To Add Full Text Search in Table
- Laravel 9 REST API Development Using JWT Authentication
- Laravel 9 YajraBox Server Side Datatable Tutorial
Let’s get started.
Laravel Installation
Open terminal and run this command to create a laravel project.
composer create-project laravel/laravel myblogIt will create a project folder with name myblog inside your local system.
To start the development server of laravel –
php artisan serveURL: http://127.0.0.1:8000
Assuming laravel already installed inside your system.
Create Database & Connect
To create a database, either we can create via Manual tool of PhpMyadmin or by means of a mysql command.
CREATE DATABASE laravel_app;
To connect database with application, Open .env file from application root. Search for DB_ and update your details.
DB_CONNECTION=mysql
DB_HOST=127.0.0.1
DB_PORT=3306
DB_DATABASE=laravel_app
DB_USERNAME=root
DB_PASSWORD=root
Install And Configure Laravel Sanctum
Laravel Sanctum package provides a full 0Auth2 server implementation for Laravel applications. By using it, we can easily generate a personal access token to uniquely identify a currently authenticated user. This token will then be attached to every request allowing each user access to protected routes.
Open project into terminal and run this command.
$ composer require laravel/sanctum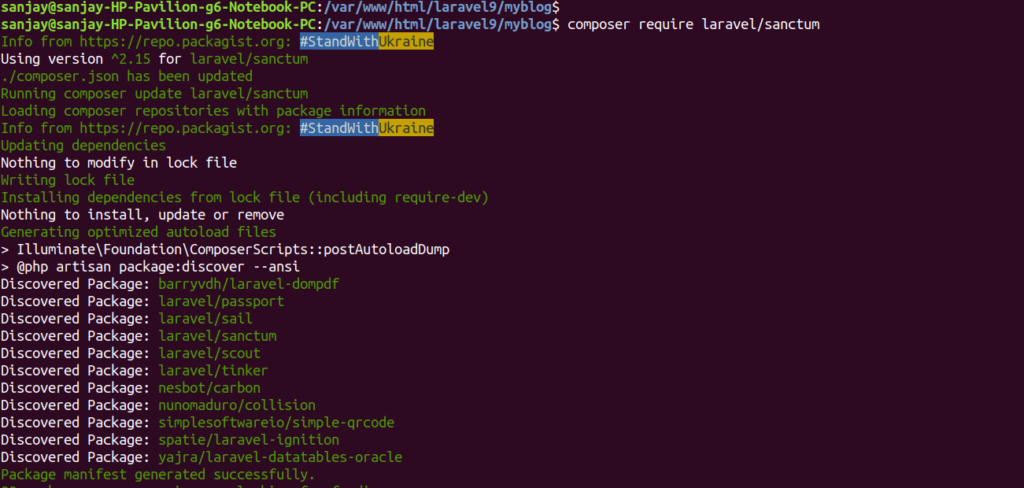
Next, we need to migrate migration files.
$ php artisan migratePublish Provider
Back to project terminal and run this command.
$ php artisan vendor:publish --provider="Laravel\Sanctum\SanctumServiceProvider"Update User Model
When we install laravel setup, by default we get a model User.php inside /app/Models folder.
use Laravel\Sanctum\HasApiTokens; // Add this line

...

use HasApiTokens;
Open User.php and update by this code.
<?php

namespace App\Models;

use Illuminate\Contracts\Auth\MustVerifyEmail;
use Illuminate\Database\Eloquent\Factories\HasFactory;
use Illuminate\Foundation\Auth\User as Authenticatable;
use Illuminate\Notifications\Notifiable;
use Laravel\Sanctum\HasApiTokens;

class User extends Authenticatable
{
    use HasApiTokens, HasFactory, Notifiable;

    /**
     * The attributes that are mass assignable.
     *
     * @var array<int, string>
     */
    protected $fillable = [
        'name',
        'email',
        'password',
    ];

    /**
     * The attributes that should be hidden for serialization.
     *
     * @var array<int, string>
     */
    protected $hidden = [
        'password',
        'remember_token',
    ];

    /**
     * The attributes that should be cast.
     *
     * @var array<string, string>
     */
    protected $casts = [
        'email_verified_at' => 'datetime',
    ];
}
Create Model & Migration For Post
Open project into terminal and run this artisan command.
$ php artisan make:model Post -m-m to create migration file as well.
Above command will generate two files. One is Model and second is migration file.
Model – Post.php inside /app/Models folder
Migration – 2022_03_20_040948_create_posts_table.php inside /database/migrations
Open Post.php and write this code into it.
<?php

namespace App\Models;

use Illuminate\Database\Eloquent\Factories\HasFactory;
use Illuminate\Database\Eloquent\Model;

class Post extends Model
{
    use HasFactory;

    protected $fillable = [
        'title', 'body'
    ];
}
Open Migration file 2022_03_20_040948_create_posts_table.php and write this code.
<?php

use Illuminate\Database\Migrations\Migration;
use Illuminate\Database\Schema\Blueprint;
use Illuminate\Support\Facades\Schema;

return new class extends Migration
{
    /**
     * Run the migrations.
     *
     * @return void
     */
    public function up()
    {
        Schema::create('posts', function (Blueprint $table) {
            $table->id();
            $table->string('title');
            $table->text('body');
            $table->timestamps();
        });
    }

    /**
     * Reverse the migrations.
     *
     * @return void
     */
    public function down()
    {
        Schema::dropIfExists('posts');
    }
};
Run Migration
Back to terminal and run this command to migrate.
$ php artisan migrateCreate Controllers
Back to terminal and run these artisan commands to create.
Parent Api Controller
$ php artisan make:controller API/BaseControllerThis command will create a file BaseController.php inside /app/Http/Controllers/API folder. API is the folder which will be created to store API controller files.
BaseController will be our parent controller for api controllers for this article.
Open BaseController.php and write this code into it.
<?php

namespace App\Http\Controllers\API;

use Illuminate\Http\Request;
use App\Http\Controllers\Controller as Controller;

class BaseController extends Controller
{
    /**
     * success response method.
     *
     * @return \Illuminate\Http\Response
     */
    public function sendResponse($result, $message)
    {
        $response = [
            'success' => true,
            'data'    => $result,
            'message' => $message,
        ];

        return response()->json($response, 200);
    }

    /**
     * return error response.
     *
     * @return \Illuminate\Http\Response
     */
    public function sendError($error, $errorMessages = [], $code = 404)
    {
        $response = [
            'success' => false,
            'message' => $error,
        ];

        if (!empty($errorMessages)) {
            $response['data'] = $errorMessages;
        }

        return response()->json($response, $code);
    }
}
Register Controller
$ php artisan make:controller API/RegisterController --api --model=UserThis command will create a RegisterController.php file inside /app/Http/Controllers/API folder.
Open RegisterController.php and write this code.
<?php

namespace App\Http\Controllers\API;

use Illuminate\Http\Request;
use App\Http\Controllers\API\BaseController as BaseController;
use App\Models\User;
use Illuminate\Support\Facades\Auth;
use Validator;

class RegisterController extends BaseController
{
    /**
     * Register api
     *
     * @return \Illuminate\Http\Response
     */
    public function register(Request $request)
    {
        $validator = Validator::make($request->all(), [
            'name' => 'required',
            'email' => 'required|email',
            'password' => 'required',
        ]);

        if ($validator->fails()) {
            return $this->sendError('Validation Error.', $validator->errors());
        }

        $input = $request->all();
        $input['password'] = bcrypt($input['password']);
        $user = User::create($input);
        $success['token'] =  $user->createToken('MyApp')->plainTextToken;
        $success['name'] =  $user->name;

        return $this->sendResponse($success, 'User register successfully.');
    }

    /**
     * Login api
     *
     * @return \Illuminate\Http\Response
     */
    public function login(Request $request)
    {
        if (Auth::attempt(['email' => $request->email, 'password' => $request->password])) {
            $user = Auth::user();
            $success['token'] =  $user->createToken('MyApp')->plainTextToken;
            $success['name'] =  $user->name;

            return $this->sendResponse($success, 'User login successfully.');
        } else {
            return $this->sendError('Unauthorised.', ['error' => 'Unauthorised']);
        }
    }
}
Post Controller
$ php artisan make:controller API/PostController --api --model=PostThis command will create a PostController.php file inside /app/Http/Controllers/API folder.
Open PostController.php and write this code.
<?php

namespace App\Http\Controllers\API;

use Illuminate\Http\Request;
use App\Http\Controllers\API\BaseController as BaseController;
use App\Http\Resources\PostResource;
use App\Models\Post;
use Validator;

class PostController extends BaseController
{
    /**
     * Display a listing of the resource.
     *
     * @return \Illuminate\Http\Response
     */
    public function index()
    {
        $posts = Post::all();

        return $this->sendResponse(PostResource::collection($posts), 'Post retrieved successfully.');
    }

    /**
     * Store a newly created resource in storage.
     *
     * @param  \Illuminate\Http\Request  $request
     * @return \Illuminate\Http\Response
     */
    public function store(Request $request)
    {
        $input = $request->all();

        $validator = Validator::make($input, [
            'title' => 'required',
            'body' => 'required'
        ]);

        if ($validator->fails()) {
            return $this->sendError('Validation Error.', $validator->errors());
        }

        $post = Post::create($input);

        return $this->sendResponse(new PostResource($post), 'Post created successfully.');
    }

    /**
     * Display the specified resource.
     *
     * @param  int  $id
     * @return \Illuminate\Http\Response
     */
    public function show($id)
    {
        $post = Post::find($id);

        if (is_null($post)) {
            return $this->sendError('Post not found.');
        }

        return $this->sendResponse(new PostResource($post), 'Post retrieved successfully.');
    }

    /**
     * Update the specified resource in storage.
     *
     * @param  \Illuminate\Http\Request  $request
     * @param  int  $id
     * @return \Illuminate\Http\Response
     */
    public function update(Request $request, Post $post)
    {
        $input = $request->all();

        $validator = Validator::make($input, [
            'title' => 'required',
            'body' => 'required'
        ]);

        if ($validator->fails()) {
            return $this->sendError('Validation Error.', $validator->errors());
        }

        $post->title = $input['title'];
        $post->body = $input['body'];
        $post->save();

        return $this->sendResponse(new PostResource($post), 'Post updated successfully.');
    }

    /**
     * Remove the specified resource from storage.
     *
     * @param  int  $id
     * @return \Illuminate\Http\Response
     */
    public function destroy(Post $post)
    {
        $post->delete();

        return $this->sendResponse([], 'Post deleted successfully.');
    }
}
Create Eloquent API Resource
Laravel Eloquent resources allow you to convert your models and collections into JSON format.
Open terminal and write this command
$ php artisan make:resource PostResourceIt will create a file PostResource.php inside /app/Http/Resources folder.
Open PostResource.php and write this code.
<?php

namespace App\Http\Resources;

use Illuminate\Http\Resources\Json\JsonResource;

class PostResource extends JsonResource
{
    /**
     * Transform the resource into an array.
     *
     * @param  \Illuminate\Http\Request  $request
     * @return array
     */
    public function toArray($request)
    {
        return [
            'id' => $this->id,
            'title' => $this->title,
            'body' => $this->body,
            'created_at' => $this->created_at->format('d/m/Y'),
            'updated_at' => $this->updated_at->format('d/m/Y'),
        ];
    }
}
Add API Routes
Open api.php from /routes folder. Add these routes into it.
//...
use App\Http\Controllers\API\RegisterController;
use App\Http\Controllers\API\PostController;

//...
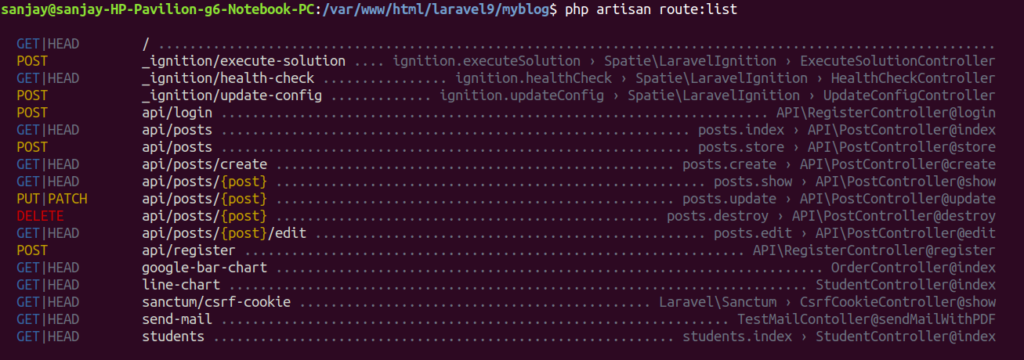
Route::controller(RegisterController::class)->group(function () {
    Route::post('register', 'register');
    Route::post('login', 'login');
});

Route::middleware('auth:sanctum')->group(function () {
    Route::resource('posts', PostController::class);
});
Open terminal and run this artisan command to see all available routes.
Application Testing
Run this command into project terminal to start development server,
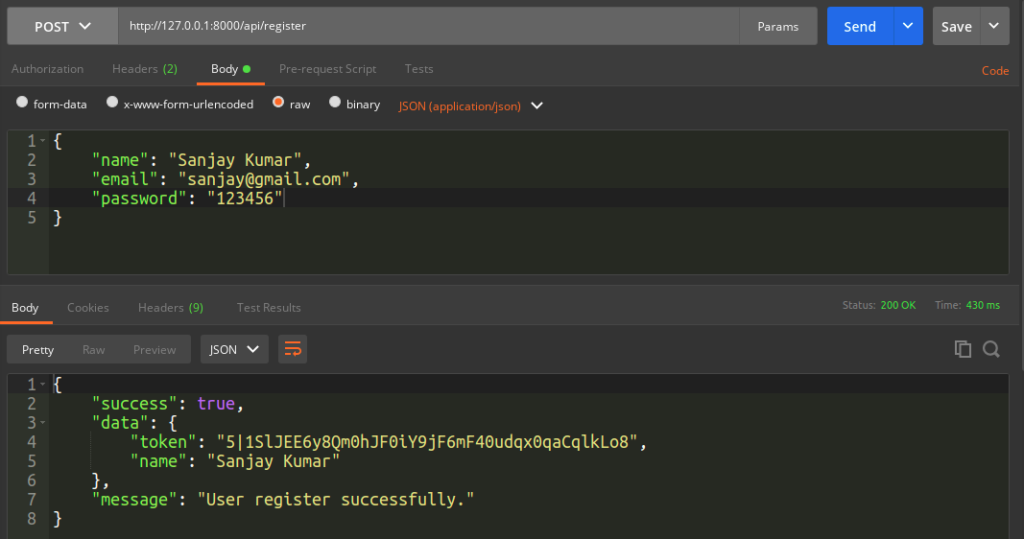
php artisan serveRegister API
URL – http://127.0.0.1:8000/api/register
Method – POST
Header –
Content-Type:application/json
Accept:application/json
Body –
{
   "name": "Sanjay Kumar",
   "email": "sanjay@gmail.com",
   "password": "123456"
}
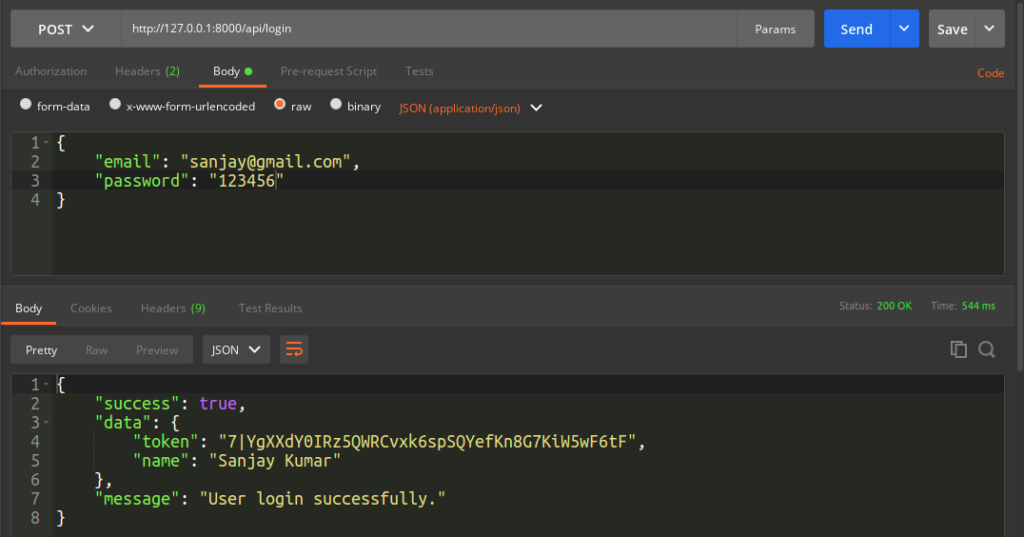
Login API
URL – http://127.0.0.1:8000/api/login
Method – POST
Header –
Content-Type:application/json
Accept:application/json
Body –
{
   "email": "sanjay@gmail.com",
   "password": "123456"
}
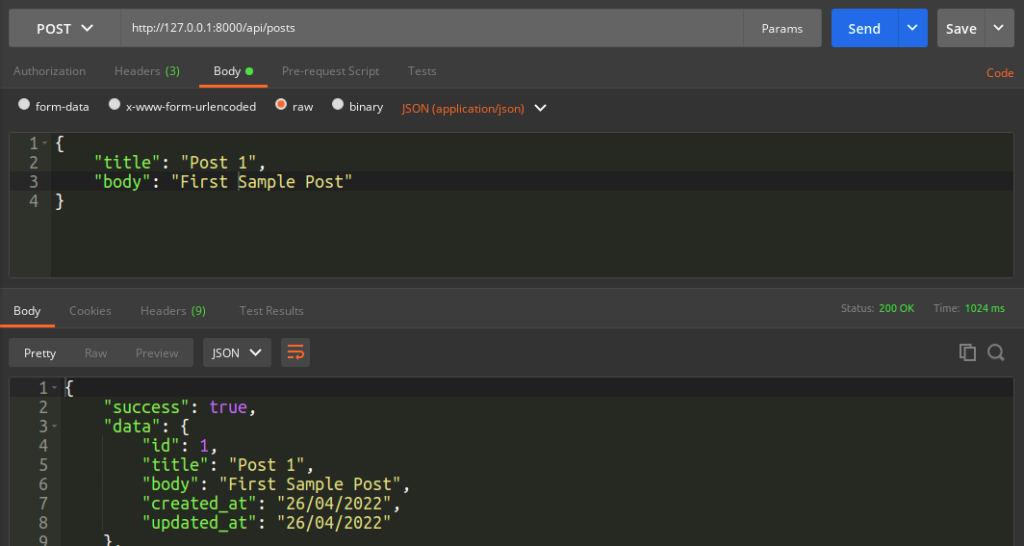
Create Post API
URL – http://127.0.0.1:8000/api/posts
Method – POST
Header –
Content-Type:application/json
Authorization:Bearer <token>
Accept:application/json
Body –
{
	"title": "Post 1",
	"body": "First Sample Post"
}
List Post API
URL – http://127.0.0.1:8000/api/posts
Method – GET
Header –
Authorization:Bearer <token>
Accept:application/json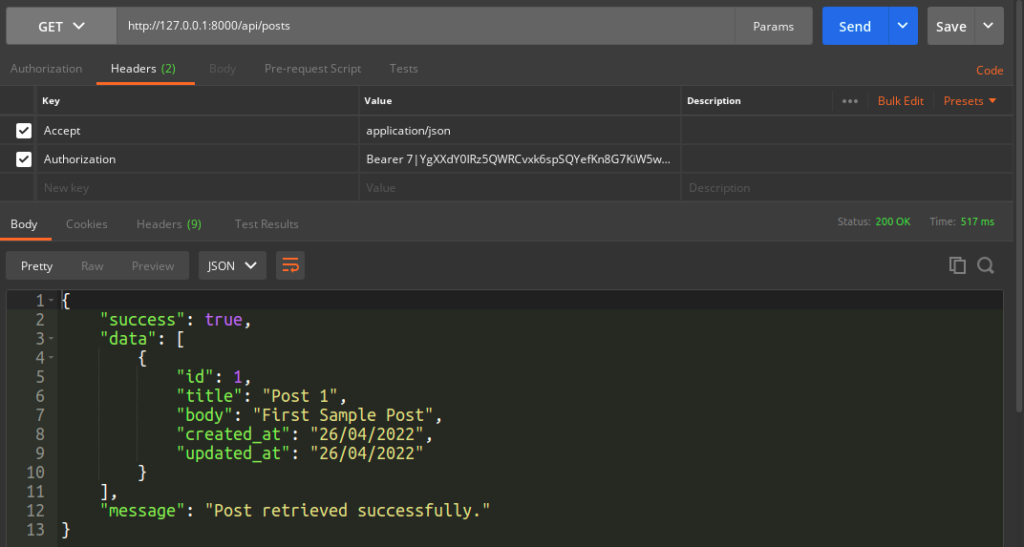
Single Post Detail API
URL – http://127.0.0.1:8000/api/posts/1
Method – GET
Header –
Authorization:Bearer <token>
Accept:application/json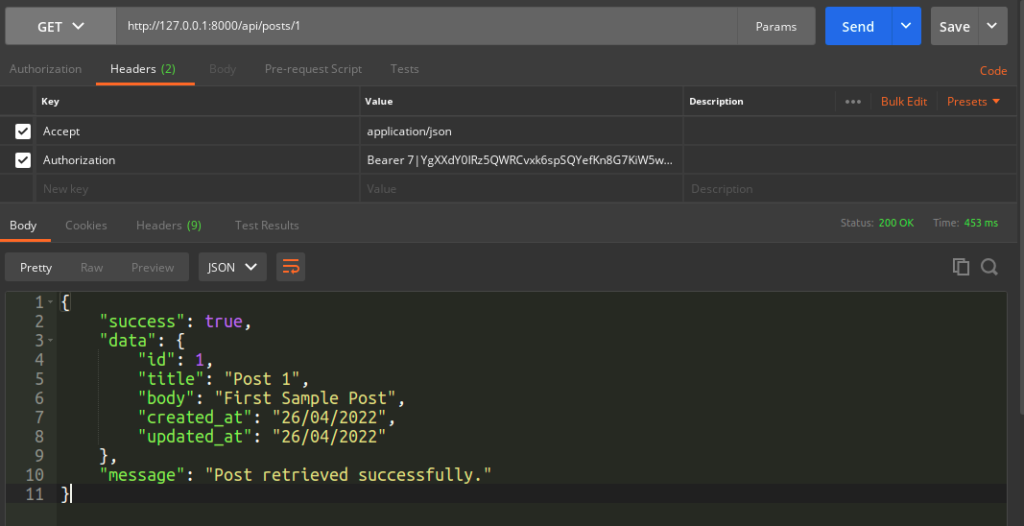
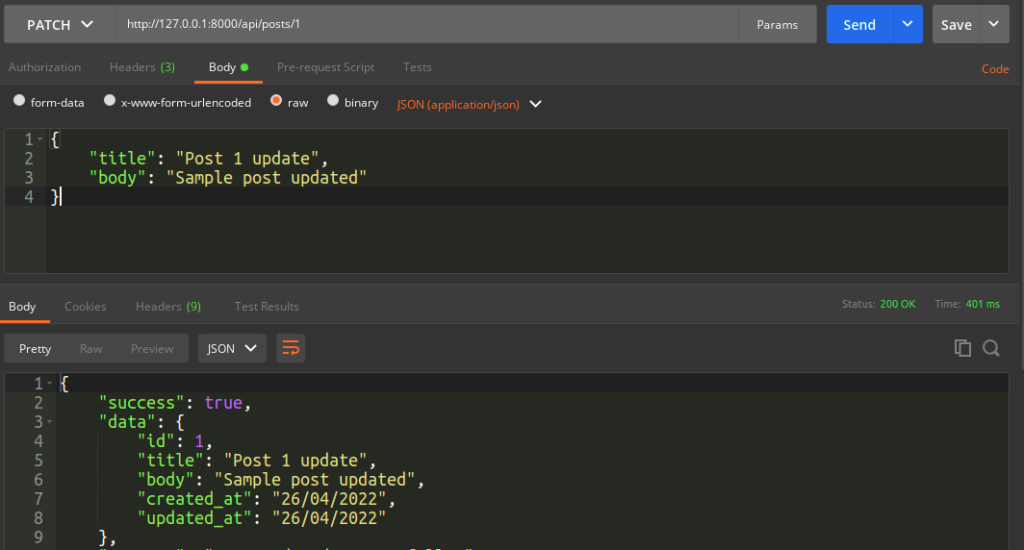
Update Post API
URL – http://127.0.0.1:8000/api/posts/1
Method – PATCH
Header –
Content-Type:application/json
Authorization:Bearer <token>
Accept:application/json
Body –
{
	"title": "Post 1 update",
	"body": "Sample post updated"
}
Delete Post API
URL – http://127.0.0.1:8000/api/posts/1
Method – DELETE
Header –
Authorization:Bearer <token>
Accept:application/json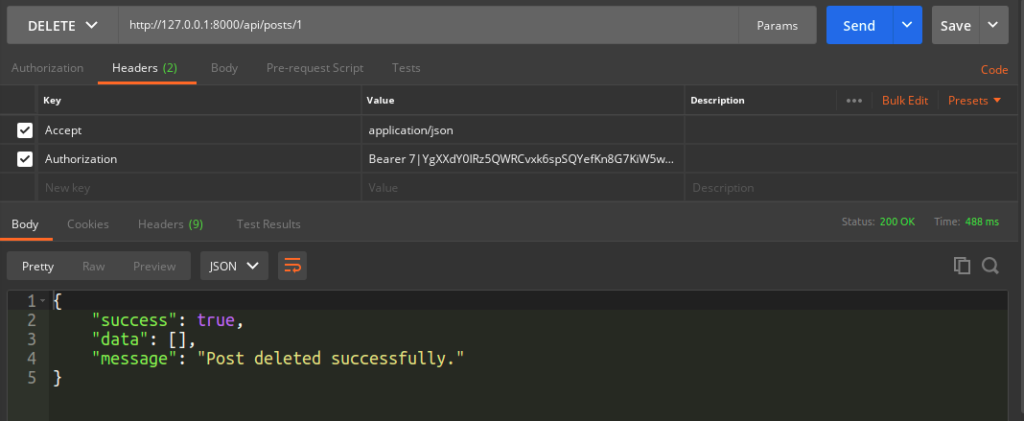
We hope this article helped you to learn about Laravel 9 REST API Development Using Sanctum Tutorial in a very detailed way.
Online Web Tutor invites you to try Skillshike! Learn CakePHP, Laravel, CodeIgniter, Node Js, MySQL, Authentication, RESTful Web Services, etc into a depth level. Master the Coding Skills to Become an Expert in PHP Web Development. So, Search your favourite course and enroll now.
If you liked this article, then please subscribe to our YouTube Channel for PHP & it’s framework, WordPress, Node Js video tutorials. You can also find us on Twitter and Facebook.
