Inside this article we will learn one more important concept of laravel i.e Laravel 9 REST API Development Using Passport. This will be step by step guide to create restful services from scratch.
REpresentational State Transfer (REST) is an architectural style that defines a set of constraints to be used for creating web services. REST API is a way of accessing web services in a simple and flexible way without having any processing.
In this article we will create a secure set of rest apis using laravel using Passport. Passport is a laravel composer package.
What we will do in this article –
- User Register API
- Login API
- Profile API
- Logout API
- Create Blog
- List Blog
- Single Blog details
- Update Blog
- Delete Blog
Above are the apis, we will create using passport authentication.
Learn More –
- Laravel 9 REST API Development Using Sanctum Tutorial
- Laravel 9 REST API Development Using JWT Authentication
- Laravel 9 YajraBox Server Side Datatable Tutorial
- Laravel 9 Stub Customization Step By Step Tutorial
Let’s get started.
Laravel Installation
Open terminal and run this command to create a laravel project.
composer create-project laravel/laravel myblogIt will create a project folder with name myblog inside your local system.
To start the development server of laravel –
php artisan serveURL: http://127.0.0.1:8000
Assuming laravel already installed inside your system.
Create Database & Connect
To create a database, either we can create via Manual tool of PhpMyadmin or by means of a mysql command.
CREATE DATABASE laravel_app;
To connect database with application, Open .env file from application root. Search for DB_ and update your details.
DB_CONNECTION=mysql
DB_HOST=127.0.0.1
DB_PORT=3306
DB_DATABASE=laravel_app
DB_USERNAME=root
DB_PASSWORD=root
Install And Configure Laravel Passport
Laravel Passport package provides a full 0Auth2 server implementation for Laravel applications. By using it, we can easily generate a personal access token to uniquely identify a currently authenticated user. This token will then be attached to every request allowing each user access to protected routes.
Open project into terminal and run this command.
<meta http-equiv="content-type" content="text/html; charset=utf-8">$ composer require laravel/passport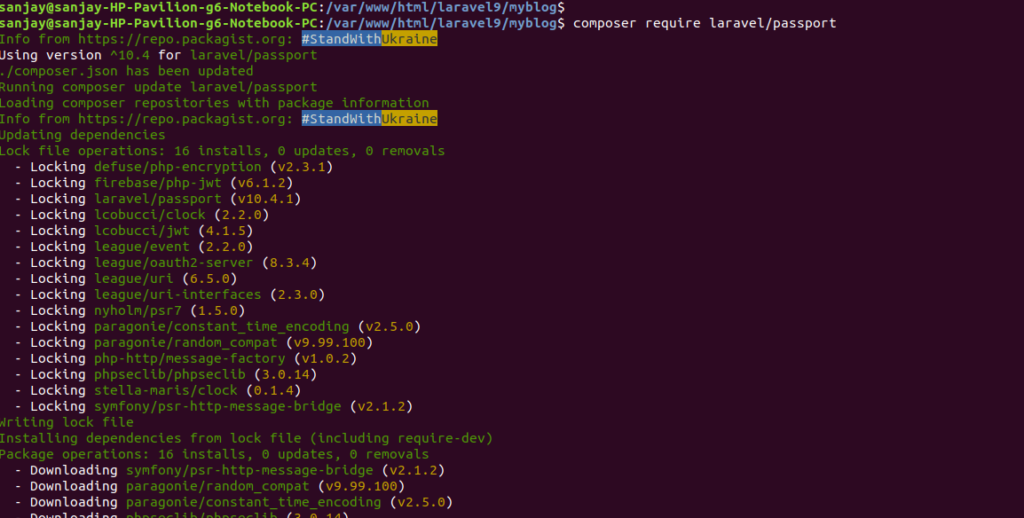
After installation of package, it will create a set of migration files which provides a scheme to store clients and access tokens
Next, we need to migrate files.
$ php artisan migrate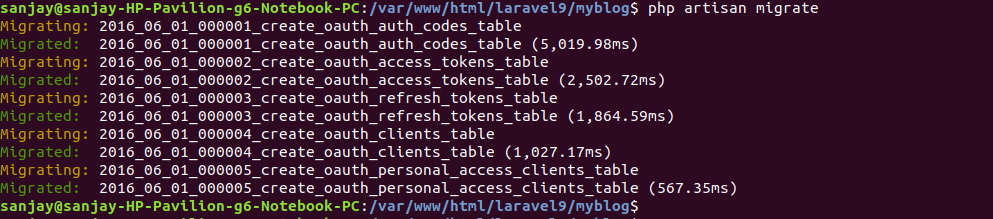
To create client tokens which needs to be generate for secured access tokens, run this given command
$ php artisan passport:install
Update User Model
When we install laravel setup, by default we get a model User.php inside /app/Models folder.
use Laravel\Passport\HasApiTokens; // Add this line

...

use HasApiTokens;
Open User.php and update by this code.
<?php

namespace App\Models;

use Illuminate\Contracts\Auth\MustVerifyEmail;
use Illuminate\Database\Eloquent\Factories\HasFactory;
use Illuminate\Foundation\Auth\User as Authenticatable;
use Illuminate\Notifications\Notifiable;
use Laravel\Passport\HasApiTokens;

class User extends Authenticatable
{
    use HasApiTokens, HasFactory, Notifiable;

    /**
     * The attributes that are mass assignable.
     *
     * @var array<int, string>
     */
    protected $fillable = [
        'name',
        'email',
        'password',
    ];

    /**
     * The attributes that should be hidden for serialization.
     *
     * @var array<int, string>
     */
    protected $hidden = [
        'password',
        'remember_token',
    ];

    /**
     * The attributes that should be cast.
     *
     * @var array<string, string>
     */
    protected $casts = [
        'email_verified_at' => 'datetime',
    ];
}
Update auth Config File
Open auth.php from /config folder. Search for guards into that file and update it.
//...

'guards' => [

       //...

        'api' => [
            'driver' => 'passport', // set this to passport
            'provider' => 'users',
        ],
    ],

//...
Create Model & Migration For Blog
Open project into terminal and run this artisan command.
$ php artisan make:model Blog -m-m to create migration file as well.
Above command will generate two files. One is Model and second is migration file.
Model – Blog.php inside /app/Models folder
Migration – 2022_03_20_040948_create_blogs_table.php inside /database/migrations
Open Blog.php and write this code into it.
<?php

namespace App\Models;

use Illuminate\Database\Eloquent\Factories\HasFactory;
use Illuminate\Database\Eloquent\Model;

class Blog extends Model
{
    use HasFactory;

    public $timestamps = false;

    protected $fillable = [
        'user_id', 'title', 'description'
    ];
}
Open Migration file 2022_03_20_040948_create_blogs_table.php and write this code.
<?php

use Illuminate\Database\Migrations\Migration;
use Illuminate\Database\Schema\Blueprint;
use Illuminate\Support\Facades\Schema;

return new class extends Migration
{
    /**
     * Run the migrations.
     *
     * @return void
     */
    public function up()
    {
        Schema::create('blogs', function (Blueprint $table) {
            $table->id();
            $table->integer("user_id")->unsigned();
            $table->string("title", 80);
            $table->text("description");
        });
    }

    /**
     * Reverse the migrations.
     *
     * @return void
     */
    public function down()
    {
        Schema::dropIfExists('blogs');
    }
};
Run Migration
Back to terminal and run this command to migrate.
$ php artisan migrateCreate Controllers
Back to terminal and run these artisan commands to create.
Authentication Controller
$ php artisan make:controller API/AuthControllerThis command will create a file AuthController.php inside /app/Http/Controllers/API folder. API is the folder which will be created to store API controller files.
Blog Controller
$ php artisan make:controller API/BlogController --api --model=BlogThis command will create a BlogController.php file inside /app/Http/Controllers/API folder.
Open AuthController.php and write this code.
<?php

namespace App\Http\Controllers\API;

use App\Http\Controllers\Controller;
use App\Models\User;
use Illuminate\Http\Request;

class AuthController extends Controller
{
    public function register(Request $request)
    {
        $validatedData = $request->validate([
            'name' => 'required|max:55',
            'email' => 'email|required|unique:users',
            'password' => 'required|confirmed'
        ]);

        $validatedData['password'] = bcrypt($request->password);

        $user = User::create($validatedData);

        $accessToken = $user->createToken('authToken')->accessToken;

        return response(['user' => $user, 'access_token' => $accessToken]);
    }

    public function login(Request $request)
    {
        $loginData = $request->validate([
            'email' => 'email|required',
            'password' => 'required'
        ]);

        if (!auth()->attempt($loginData)) {
            return response(['message' => 'Invalid Credentials']);
        }

        $accessToken = auth()->user()->createToken('authToken')->accessToken;

        return response(['user' => auth()->user(), 'access_token' => $accessToken]);
    }

    public function profile()
    {
        $user_data = auth()->user();

        return response()->json([
            "status" => true,
            "message" => "User data",
            "data" => $user_data
        ]);
    }

    public function logout(Request $request)
    {
        // get token value
        $token = $request->user()->token();

        // revoke this token value
        $token->revoke();

        return response()->json([
            "status" => true,
            "message" => "User logged out successfully"
        ]);
    }
}
Open BlogController.php and write this code.
<?php

namespace App\Http\Controllers\API;

use App\Models\Blog;
use App\Http\Controllers\Controller;
use App\Http\Resources\BlogResource;
use Illuminate\Http\Request;
use Illuminate\Support\Facades\Validator;

class BlogController extends Controller
{
    /**
     * Display a listing of the resource.
     *
     * @return \Illuminate\Http\Response
     */
    public function index()
    {
        $blogs = Blog::all();
        return response([ 'blogs' => BlogResource::collection($blogs), 'message' => 'Retrieved successfully'], 200);
    }

    /**
     * Store a newly created resource in storage.
     *
     * @param  \Illuminate\Http\Request  $request
     * @return \Illuminate\Http\Response
     */
    public function store(Request $request)
    {
        $data = $request->all();

        $validator = Validator::make($data, [
            'title' => 'required|max:80',
            'description' => 'required'
        ]);

        if($validator->fails()){
            return response(['error' => $validator->errors(), 'Validation Error']);
        }

        $user_id = auth()->user()->id;

        $data["user_id"] = $user_id;

        $blog = Blog::create($data);

        return response([ 'blog' => new BlogResource($blog), 'message' => 'Created successfully'], 200);
    }

    /**
     * Display the specified resource.
     *
     * @param  \App\Models\Blog $blog
     * @return \Illuminate\Http\Response
     */
    public function show(Blog $blog)
    {
        return response([ 'blog' => new BlogResource($blog), 'message' => 'Retrieved successfully'], 200);

    }

    /**
     * Update the specified resource in storage.
     *
     * @param  \Illuminate\Http\Request  $request
     * @param  \App\Models\Blog $blog
     * @return \Illuminate\Http\Response
     */
    public function update(Request $request, Blog $blog)
    {

        $blog->update($request->all());

        return response([ 'blog' => new BlogResource($blog), 'message' => 'Retrieved successfully'], 200);
    }

    /**
     * Remove the specified resource from storage.
     *
     * @param \App\Models\Blog $blog
     * @return \Illuminate\Http\Response
     * @throws \Exception
     */
    public function destroy(Blog $blog)
    {
        $blog->delete();

        return response(['message' => 'Deleted']);
    }
}
Create Eloquent API Resource
Laravel Eloquent resources allow you to convert your models and collections into JSON format.
Open terminal and write this command
$ php artisan make:resource BlogResourceIt will create a file BlogResource.php inside /app/Http/Resources folder.
Open BlogResource.php and write this code.
<?php

namespace App\Http\Resources;

use Illuminate\Http\Resources\Json\JsonResource;

class BlogResource extends JsonResource
{
    /**
     * Transform the resource into an array.
     *
     * @param  \Illuminate\Http\Request  $request
     * @return array
     */
    public function toArray($request)
    {
        return parent::toArray($request);
    }
}
Add API Routes
Open api.php from /routes folder. Add these routes into it.
//...
use App\Http\Controllers\API\AuthController;
use App\Http\Controllers\API\BlogController;

//...
Route::post('register', [AuthController::class, "register"]);
Route::post('login', [AuthController::class, "login"]);

Route::group(["middleware" => ["auth:api"]], function(){

    Route::get("profile", [AuthController::class, "profile"]);
    Route::post("logout", [AuthController::class, "logout"]);
});

Route::apiResource('blog', BlogController::class)->middleware('auth:api');
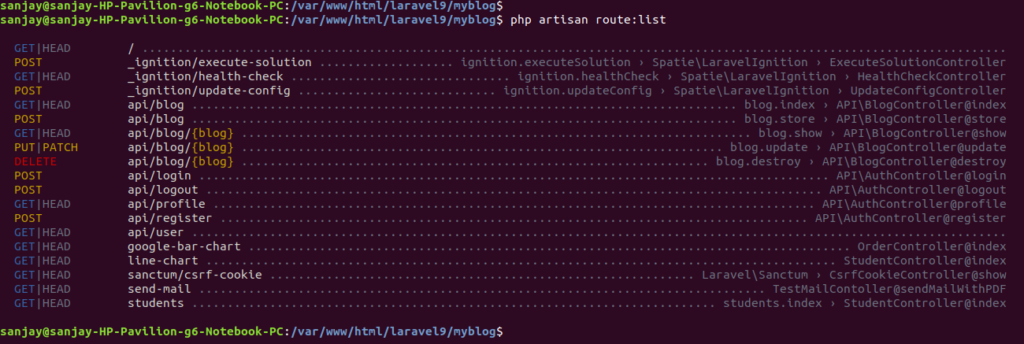
Open terminal and run this artisan command to see all available routes.
Application Testing
Run this command into project terminal to start development server,
php artisan serveRegister API
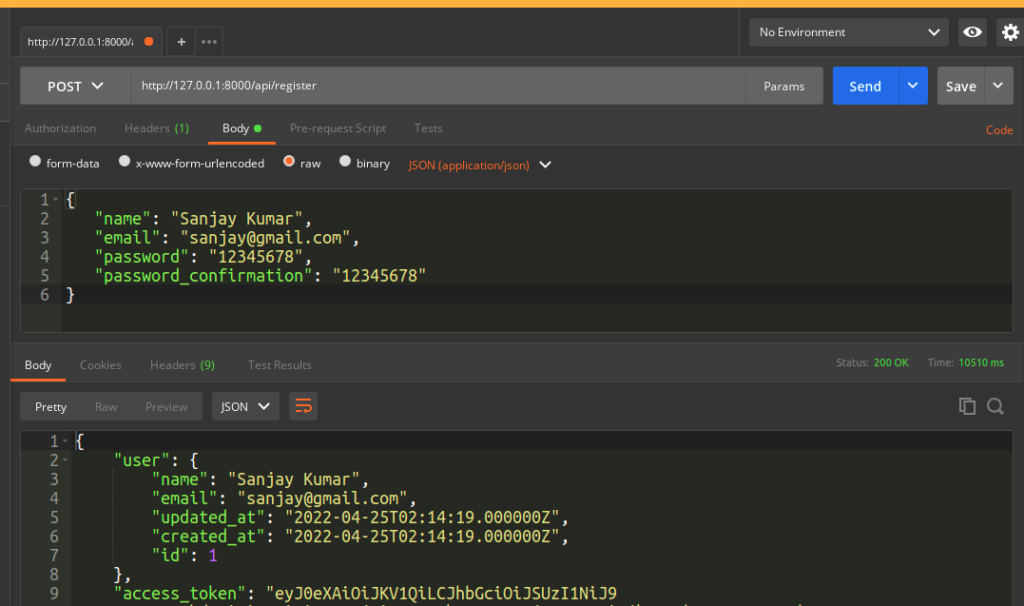
URL – http://127.0.0.1:8000/api/register
Method – POST
Header –
Content-Type:application/json
<meta http-equiv="content-type" content="text/html; charset=utf-8">Accept:application/json
Body –
{
   "name": "Sanjay Kumar",
   "email": "sanjay@gmail.com",
   "password": "12345678",
   "password_confirmation": "12345678"
}
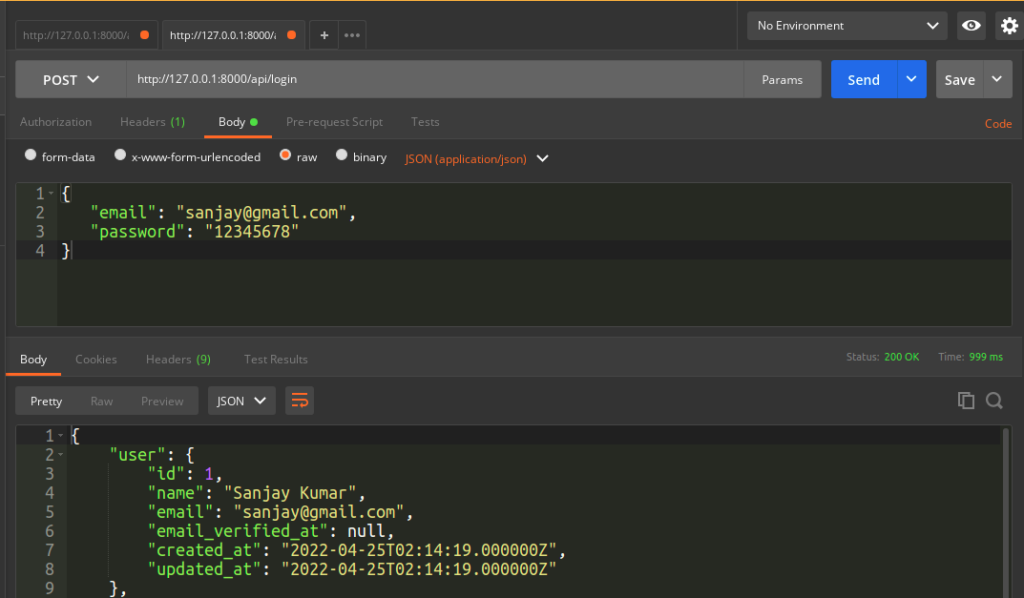
Login API
URL – http://127.0.0.1:8000/api/login
Method – POST
Header –
Content-Type:application/json
<meta http-equiv="content-type" content="text/html; charset=utf-8">Accept:application/json
Body –
{
   "email": "sanjay@gmail.com",
   "password": "12345678"
}
Profile API
URL – http://127.0.0.1:8000/api/profile
Method – GET
Header –
Authorization:Bearer <token>
Accept:application/json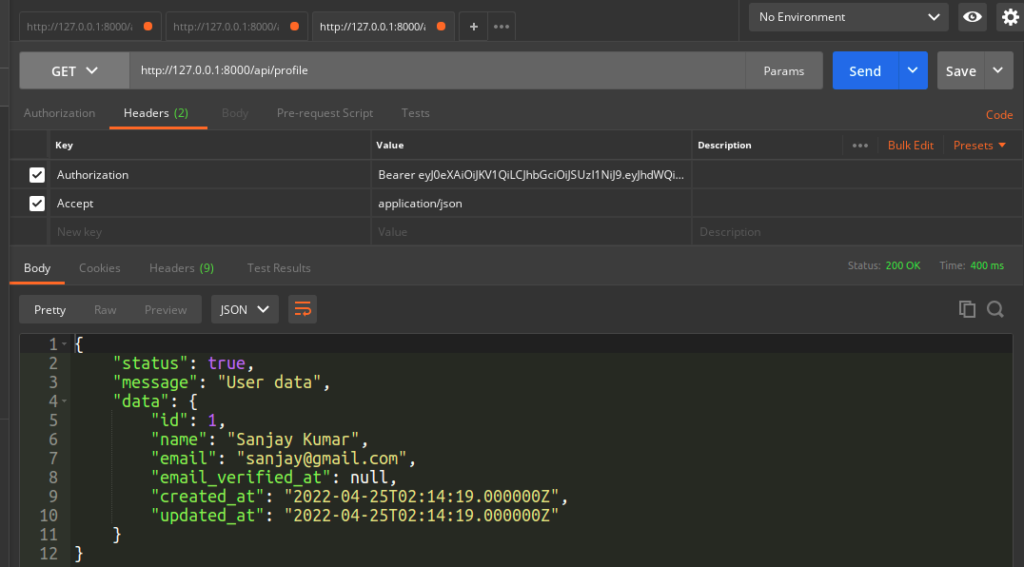
Logout API
URL – http://127.0.0.1:8000/api/logout
Method – POST
Header –
Content-Type:application/json
Accept:application/json
Authorization:Bearer <token>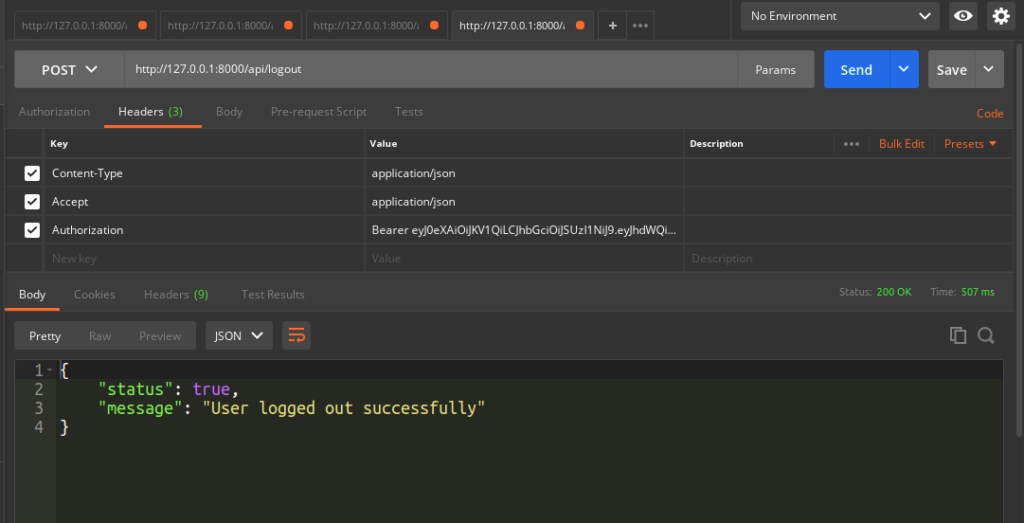
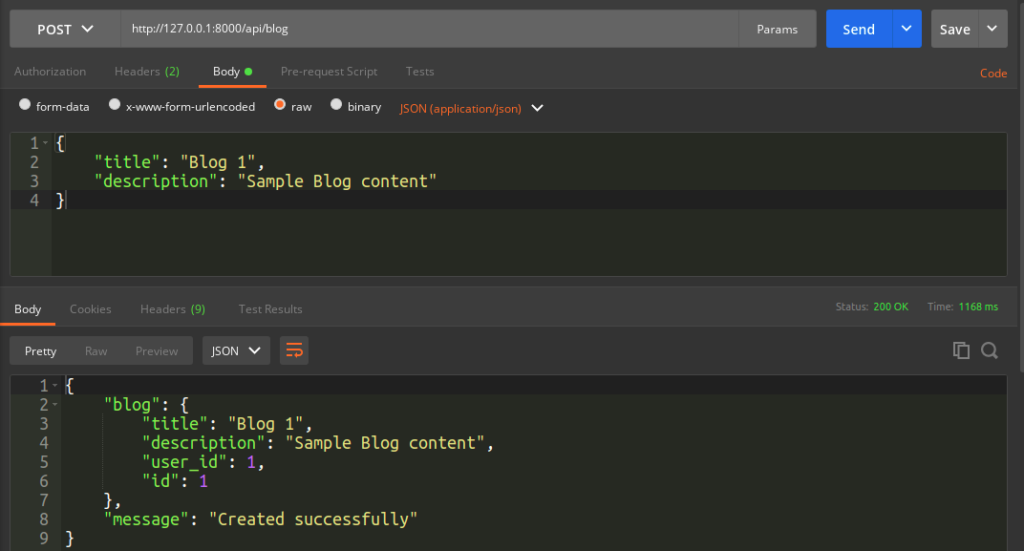
Create Blog API
URL – http://127.0.0.1:8000/api/blog
Method – POST
Header –
Content-Type:application/json
<meta http-equiv="content-type" content="text/html; charset=utf-8">Authorization:Bearer <token>
<meta http-equiv="content-type" content="text/html; charset=utf-8">Accept:application/json
Body –
{
    "title": "Blog 1",
    "description": "Sample Blog content"
}
List Blog API
URL – http://127.0.0.1:8000/api/blog
Method – GET
Header –
Authorization:Bearer <token>
Accept:application/json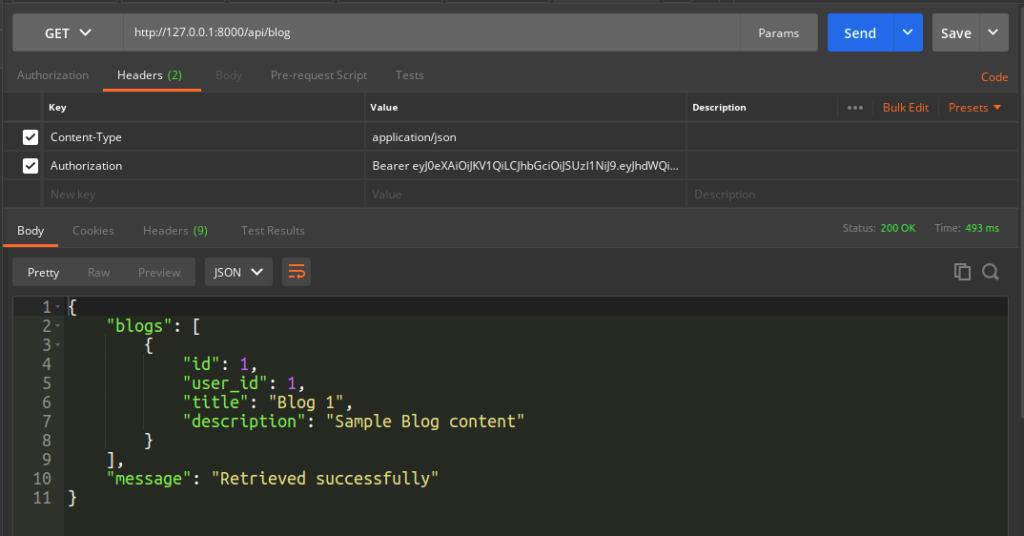
Single Blog Detail API
URL – http://127.0.0.1:8000/api/blog/1
Method – GET
Header –
Authorization:Bearer <token>
Accept:application/json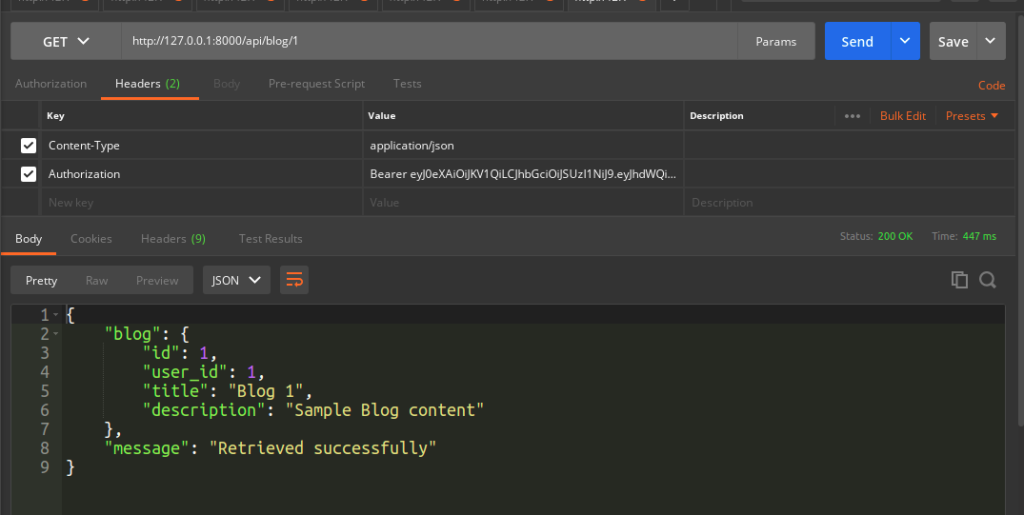
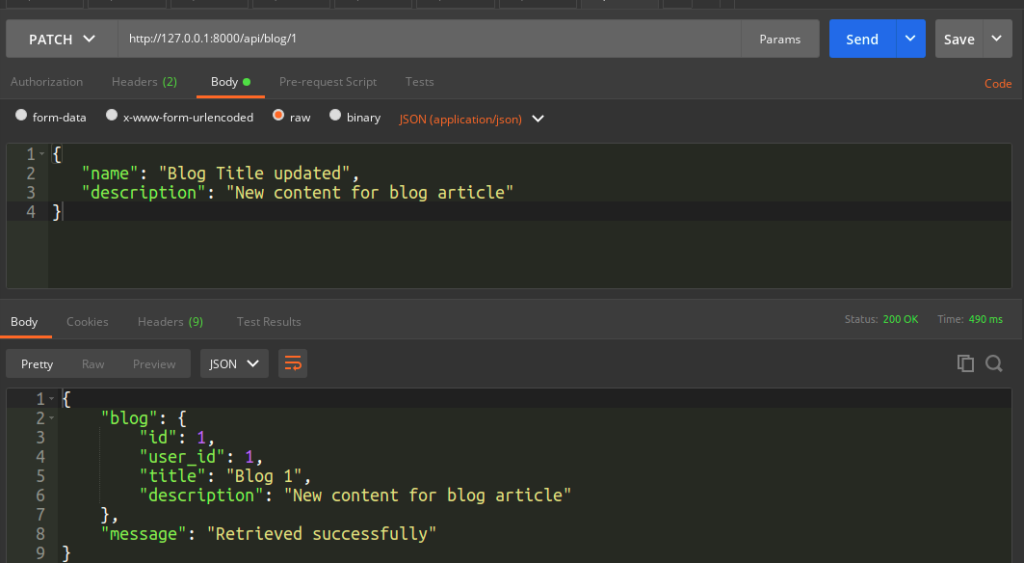
Update Blog API
URL – http://127.0.0.1:8000/api/blog/1
Method – PATCH
Header –
Content-Type:application/json
Authorization:Bearer <token>
Body –
{
   "name": "Blog Title updated",
   "description": "New content for blog article"
}
Delete Blog API
URL – http://127.0.0.1:8000/api/blog/1
Method – DELETE
Header –
Content-Type:application/json
Authorization:Bearer <token>
<meta http-equiv="content-type" content="text/html; charset=utf-8">Accept:application/json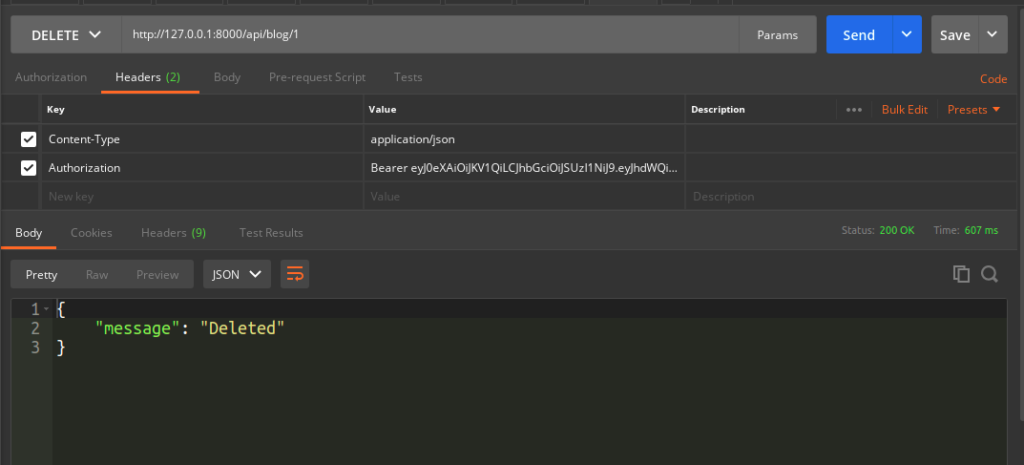
We hope this article helped you to learn about Laravel 9 REST API Development Using Passport Tutorial in a very detailed way.
If you liked this article, then please subscribe to our YouTube Channel for PHP & it’s framework, WordPress, Node Js video tutorials. You can also find us on Twitter and Facebook.
Read more