Creating RESTful APIs with JSON Web Tokens (JWT) authentication in CodeIgniter 4 opens up a world of possibilities for building secure and scalable web applications.
CodeIgniter, a robust PHP framework, provides a solid foundation for developing APIs and integrating authentication mechanisms like JWT, ensuring data security and seamless communication between your application and clients.
RESTful APIs serve as a standard for enabling communication between different systems over HTTP, allowing clients to access and manipulate resources. JWT, on the other hand, offers a secure method for authentication by generating tokens that verify the identity of users or clients.
We will create these following APIs in this tutorial,
- Login API
- Register API
- Profile API
- Logout API
Read More: How To Work with CodeIgniter 4 Database Queries Tutorial
Let’s get started.
CodeIgniter 4 Installation
To create a CodeIgniter 4 setup run this given command into your shell or terminal. Please make sure composer should be installed.
composer create-project codeigniter4/appstarter codeigniter-4Assuming you have successfully installed application into your local system.
Environment (.env) Setup
When we install CodeIgniter 4, we will have env file at root. To use the environment variables means using variables at global scope we need to do env to .env
Either we can do via renaming file as simple as that. Also we can do by terminal command.
Open project in terminal
cp env .envAbove command will create a copy of env file to .env file. Now we are ready to use environment variables.
Enable Development Mode
CodeIgniter starts up in production mode by default. You need to make it in development mode to see any error if you are working with application.
Open .env file from root.
# CI_ENVIRONMENT = production

 // Do it to

CI_ENVIRONMENT = development
Now application is in development mode.
Create Database
To create a database, either we can create via Manual tool of PhpMyadmin or by means of a mysql command.
We will use MySQL command to create database. Run this command into Sql tab of PhpMyAdmin.
CREATE DATABASE codeigniter4_app;Successfully, we have created a database.
Create Database Table
Next, we need to create a table inside database.
CREATE TABLE `users` (
 `id` int(11) NOT NULL AUTO_INCREMENT,
 `name` varchar(120) DEFAULT NULL,
 `email` varchar(120) DEFAULT NULL,
 `phone_no` varchar(30) DEFAULT NULL,
 `password` varchar(120) DEFAULT NULL,
 `created_at` timestamp NOT NULL DEFAULT CURRENT_TIMESTAMP,
 PRIMARY KEY (`id`)
) ENGINE=InnoDB DEFAULT CHARSET=latin1;
Database Connection
Open .env file from project root.
Search for DATABASE. You should see the connection environment variables into it. Put your updated details of database connection string values.
#--------------------------------------------------------------------
# DATABASE
#--------------------------------------------------------------------

database.default.hostname = localhost
database.default.database = codeigniter4_app
database.default.username = admin
database.default.password = admin
database.default.DBDriver = MySQLi
database.default.DBPrefix =
database.default.port = 3306
Now, database successfully connected with the application.
Read More: CodeIgniter 4 How To Work with Spark CLI Tutorial
Install JWT Composer Package
Open project into terminal and run this composer command to install JWT package.
composer require firebase/php-jwtIt will install jwt package into /vendor folder inside project root.
Create Routes
Open Routes.php from /app/Config folder. Add these routes into it.
//...

$routes->group("api", function ($routes) {

    $routes->post("register", "User::register");
    $routes->post("login", "User::login");
    $routes->get("profile", "User::details");
});

//...
Next, we need a model file.
Create Model
Back to terminal and run this spark command to create a model file.
php spark make:model User --suffixThis command will creates UserModel.php file at /app/Models folder.
Open file and write this complete code into it,
<?php

namespace App\Models;

use CodeIgniter\Model;

class UserModel extends Model
{
	protected $DBGroup              = 'default';
	protected $table                = 'users';
	protected $primaryKey           = 'id';
	protected $useAutoIncrement     = true;
	protected $insertID             = 0;
	protected $returnType           = 'array';
	protected $useSoftDelete        = false;
	protected $protectFields        = true;
	protected $allowedFields        = [
		"name",
		"email",
		"phone_no",
		"password"
	];

	// Dates
	protected $useTimestamps        = false;
	protected $dateFormat           = 'datetime';
	protected $createdField         = 'created_at';
	protected $updatedField         = 'updated_at';
	protected $deletedField         = 'deleted_at';

	// Validation
	protected $validationRules      = [];
	protected $validationMessages   = [];
	protected $skipValidation       = false;
	protected $cleanValidationRules = true;

	// Callbacks
	protected $allowCallbacks       = true;
	protected $beforeInsert         = [];
	protected $afterInsert          = [];
	protected $beforeUpdate         = [];
	protected $afterUpdate          = [];
	protected $beforeFind           = [];
	protected $afterFind            = [];
	protected $beforeDelete         = [];
	protected $afterDelete          = [];
}
Create Controller
Again, Back to terminal and run this spark command to create a controller file.
php spark make:controller User --restfulIt will creates User.php file inside /app/Controllers folder.
Open file and write this complete code into it,
<?php

namespace App\Controllers;

use App\Models\UserModel;
use CodeIgniter\RESTful\ResourceController;
use Exception;
use \Firebase\JWT\JWT;

class User extends ResourceController
{
    public function register()
    {
        $rules = [
            "name" => "required",
            "email" => "required|valid_email|is_unique[users.email]|min_length[6]",
            "phone_no" => "required",
            "password" => "required",
        ];

        $messages = [
            "name" => [
                "required" => "Name is required"
            ],
            "email" => [
                "required" => "Email required",
                "valid_email" => "Email address is not in format"
            ],
            "phone_no" => [
                "required" => "Phone Number is required"
            ],
            "password" => [
                "required" => "password is required"
            ],
        ];

        if (!$this->validate($rules, $messages)) {

            $response = [
                'status' => 500,
                'error' => true,
                'message' => $this->validator->getErrors(),
                'data' => []
            ];
        } else {

            $userModel = new UserModel();

            $data = [
                "name" => $this->request->getVar("name"),
                "email" => $this->request->getVar("email"),
                "phone_no" => $this->request->getVar("phone_no"),
                "password" => password_hash($this->request->getVar("password"), PASSWORD_DEFAULT),
            ];

            if ($userModel->insert($data)) {

                $response = [
                    'status' => 200,
                    "error" => false,
                    'messages' => 'Successfully, user has been registered',
                    'data' => []
                ];
            } else {

                $response = [
                    'status' => 500,
                    "error" => true,
                    'messages' => 'Failed to create user',
                    'data' => []
                ];
            }
        }

        return $this->respondCreated($response);
    }

    private function getKey()
    {
        return "my_application_secret";
    }

    public function login()
    {
        $rules = [
            "email" => "required|valid_email|min_length[6]",
            "password" => "required",
        ];

        $messages = [
            "email" => [
                "required" => "Email required",
                "valid_email" => "Email address is not in format"
            ],
            "password" => [
                "required" => "password is required"
            ],
        ];

        if (!$this->validate($rules, $messages)) {

            $response = [
                'status' => 500,
                'error' => true,
                'message' => $this->validator->getErrors(),
                'data' => []
            ];

            return $this->respondCreated($response);

        } else {
            $userModel = new UserModel();

            $userdata = $userModel->where("email", $this->request->getVar("email"))->first();

            if (!empty($userdata)) {

                if (password_verify($this->request->getVar("password"), $userdata['password'])) {

                    $key = $this->getKey();

                    $iat = time(); // current timestamp value
                    $nbf = $iat + 10;
                    $exp = $iat + 3600;

                    $payload = array(
                        "iss" => "The_claim",
                        "aud" => "The_Aud",
                        "iat" => $iat, // issued at
                        "nbf" => $nbf, //not before in seconds
                        "exp" => $exp, // expire time in seconds
                        "data" => $userdata,
                    );

                    $token = JWT::encode($payload, $key);

                    $response = [
                        'status' => 200,
                        'error' => false,
                        'messages' => 'User logged In successfully',
                        'data' => [
                            'token' => $token
                        ]
                    ];
                    return $this->respondCreated($response);
                } else {

                    $response = [
                        'status' => 500,
                        'error' => true,
                        'messages' => 'Incorrect details',
                        'data' => []
                    ];
                    return $this->respondCreated($response);
                }
            } else {
                $response = [
                    'status' => 500,
                    'error' => true,
                    'messages' => 'User not found',
                    'data' => []
                ];
                return $this->respondCreated($response);
            }
        }
    }

    public function details()
    {
        $key = $this->getKey();
        $authHeader = $this->request->getHeader("Authorization");
        $authHeader = $authHeader->getValue();
        $token = $authHeader;

        try {
            $decoded = JWT::decode($token, $key, array("HS256"));

            if ($decoded) {

                $response = [
                    'status' => 200,
                    'error' => false,
                    'messages' => 'User details',
                    'data' => [
                        'profile' => $decoded
                    ]
                ];
                return $this->respondCreated($response);
            }
        } catch (Exception $ex) {

            $response = [
                'status' => 401,
                'error' => true,
                'messages' => 'Access denied',
                'data' => []
            ];
            return $this->respondCreated($response);
        }
    }
}
We have all methods available like for login, register and all.
Read More: CodeIgniter 4 How To Upload Image with Form data Tutorial
How to Log Out when using JWT
JWT helps to manage authentication without storing the authentication state in any storage be it a session or a database.
So, basically whenever a token is created, it can be used forever, or until it is expired. JWT generator can get an option to invalidate the token after a specified time.
When using JWT authentication, the client side stores the token somewhere and attaches it to every request that needs authentication. This is how the request processes with JWT.
Now, to expire a token and or make it invalid we need to set expiration time while creating tokens.
 $iat = time();
 $nbf = $iat + 10;
 $exp = $iat + 3600;

 $payload = array(
     "iss" => "The_claim",
     "aud" => "The_Aud",
     "iat" => $iat,
     "nbf" => $nbf,
     "exp" => $exp,
     "data" => $userdata,
 );

 $token = JWT::encode($payload, $key);
As, in the above code we can see we are creating JWT in which we are setting expiration time. So you need to set your own time for that. After that period token will not be used. It will become invalid.
Application Testing
Open project terminal and start development server via command:
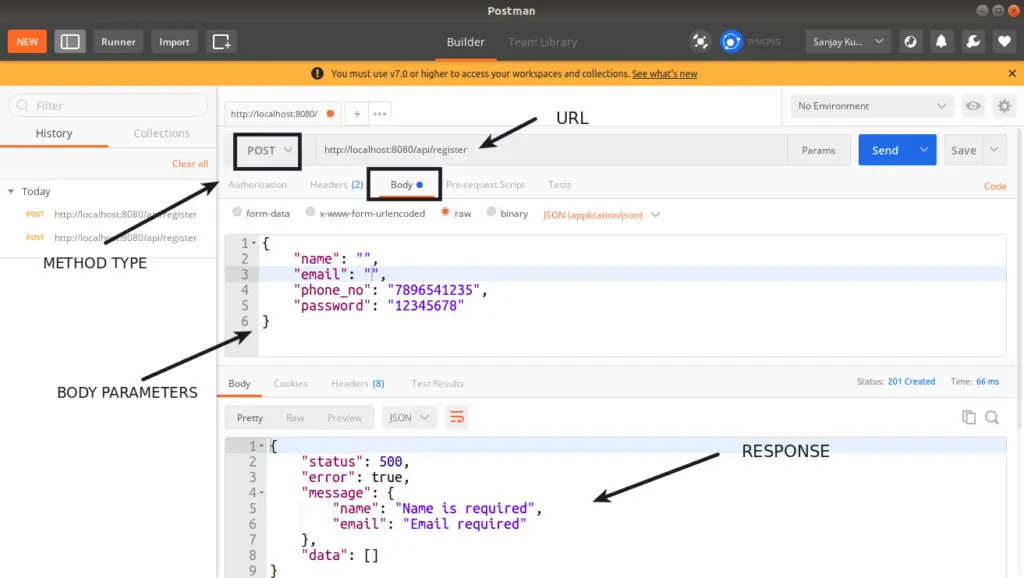
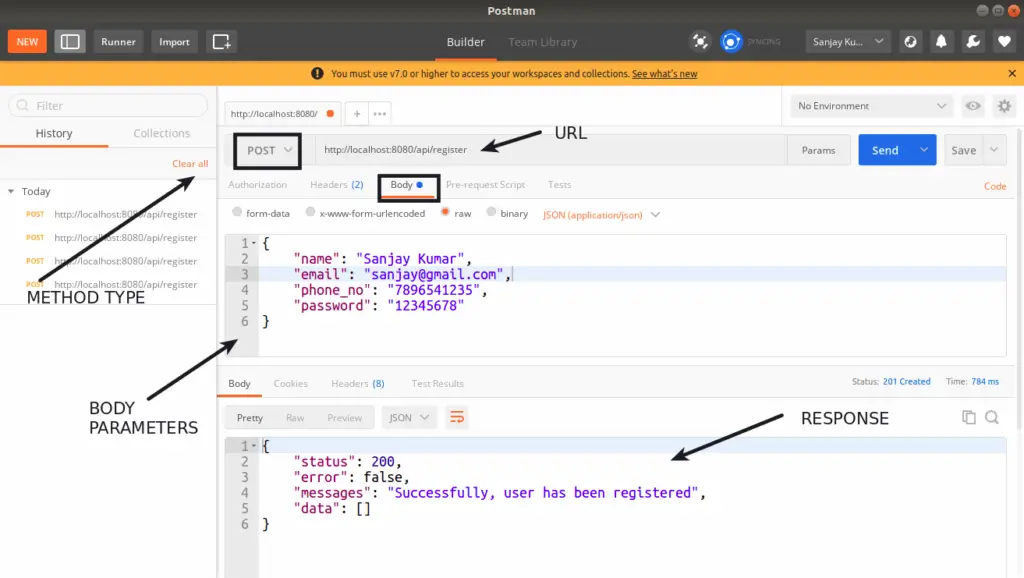
php spark serveREGISTER API
URL: http://localhost:8080/api/register
METHOD: POST
HEADERS:
Content-Type:application/json
Accept:application/json
HANDLER: \App\Controllers\User::register
API Data Validation
API Call with Data
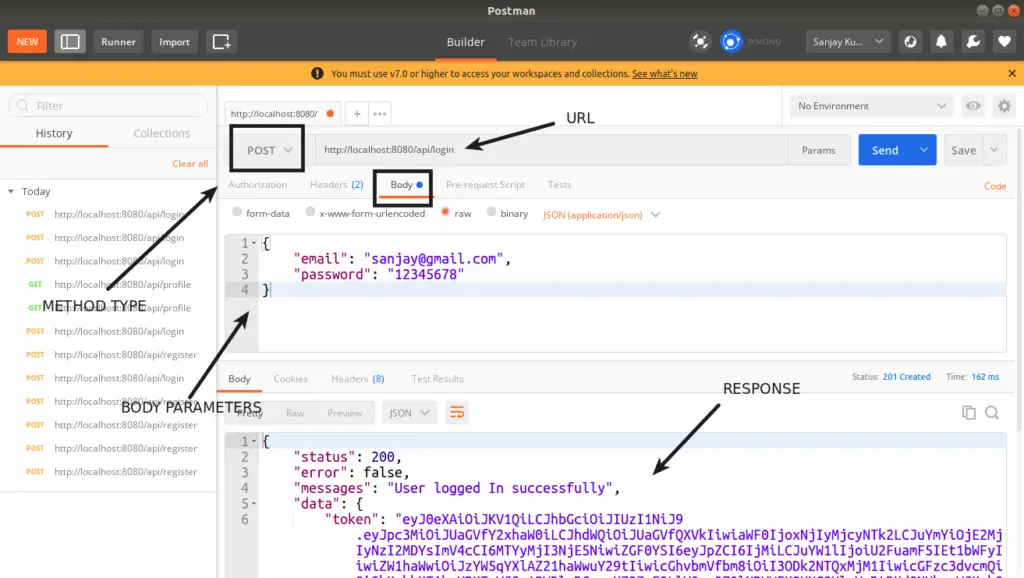
LOGIN API
URL: http://localhost:8080/api/login
METHOD: POST
HEADERS:
Content-Type:application/json
Accept:application/json
HANDLER: \App\Controllers\User::login
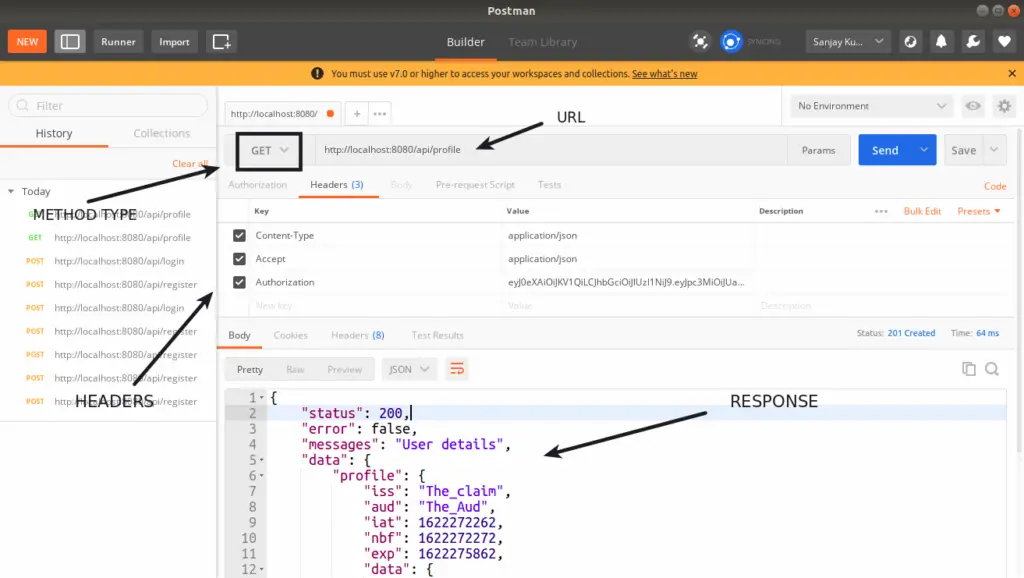
PROFILE API
URL: http://localhost:8080/api/profile
METHOD: GET
HEADERS:
Content-Type:application/json
Accept:application/json
Authorization:<TOKEN>
HANDLER: \App\Controllers\User::details
To learn about CodeIgniter 4 RESTful Resource controller, click here.
That’s it.
We hope this article helped you to learn about RESTful APIs Development Using JWT in CodeIgniter 4 in a very detailed way.
If you liked this article, then please subscribe to our YouTube Channel for PHP & it’s framework, WordPress, Node Js video tutorials. You can also find us on Twitter and Facebook.
Read more
Why is the getkey function public? It will be seen in browser. It should be secret.
Yes, good. We have updated the code. Thanks
Please upload a full video of this.
Sure
Hi, how can i implement this in frontend login page?
Hi Ana,
This article giving you idea about apis. What basically you want to do by frontend. Please can you explain.
I’m making a RBAC system in codeigniter 4.1.1 using adminlte3 as frontend template.
i mean, should I develop the system non-rest as in another tutorial in which you teach us how to make a role-based system and apply the restful jwt later in CRUD operations?
i’m sorry for my dumb questions
🙂 thx
Sure.
where is the logout function? how to destroy the token?
Ok we forgot to add. We’ll update this article.
pls make a complete video of this and post it
Ok sure.