Inside this article we will see the concept i.e PHP & MySQL Drag and drop file upload using dropzonejs jquery plugin. Article contains the classified information about uploading file via drag and drop function.
When we create any application and provide a form where user can upload file using drag and drop method then application will be highly flexible to use and more creative it will be.

For this Drag and drop tutorial we will use DropzoneJs a jQuery plugin. Once we drag files and upload then inside mysql database we will save uploaded files. In this we will upload a single file only but you can use it to upload more than that.
Learn More –
- How To work with MySQL Joins Tutorial
- How To Add Logo Watermark To Image in PHP Tutorial
- How To Add Watermark Text To Image in PHP Tutorial
- How to Add Year to Date in PHP Tutorial
Let’s get started.
Create PHP Project
Go to your localhost directory.
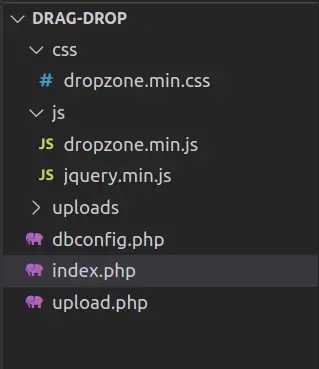
Create a folder named as drag-drop. Create files inside it. Files are –
- dbconfig.php -> Database connection file. We will store mysql db details here.
- index.php -> In this file we will create layout for dropzone to drag and drop files.
- upload.php -> File which uploads file to folder and also saves data into database table. This file is linked with index.php inside ajax request.
- uploads/ -> This will be folder to store image files. Also make sure this folder should have all sufficient permission to read and write files into it.
- css/ -> Folder to store application css.
- js/ -> Folder to store application js.
Folder structure will be like this –

Download Dropzonejs Files
Here, is the link to download the plugin files for dropzonejs.
It downloads a zipped folder. Inside that folder you will get a jQuery plugin, Dropzone Js, Dropzone CSS files.
You need to place these files in css/, js/ folder of this application.
Create Database & Table
To create a database, either we can create via Manual tool of PhpMyadmin or by means of a mysql command.
CREATE DATABASE sample_app;Inside this database, we need to create a table.
Next,
Table: files
CREATE TABLE `files` (
 `id` int(11) NOT NULL AUTO_INCREMENT,
 `file_name` varchar(255) NOT NULL,
 `uploaded_on` datetime NOT NULL,
 PRIMARY KEY (`id`)
) ENGINE=InnoDB DEFAULT CHARSET=utf8;
Application Programming
Write all code for this application step by step.
Step #1 – dbconfig.php
Open dbconfig.php file and write this code into it. This file will connect with your database.
<?php
// Database configuration
$host   = "localhost";
$dbuser = "admin";
$dbpass = "Admin@123";
$dbname = "sample_app";

// Create database connection
$conn = new mysqli($host, $dbuser, $dbpass, $dbname);

// Check connection
if ($conn->connect_error) {
    die("Connection failed: " . $conn->connect_error);
}
Next,
Step #2 – index.php
Let’s open index.php and write this code into it.
<html>

<head>
    <title>Drag and Drop File Upload using DropzoneJS, PHP & MySQL</title>
    <link href="https://maxcdn.bootstrapcdn.com/bootstrap/3.3.7/css/bootstrap.min.css" rel="stylesheet" media="screen">
    <link rel="stylesheet" type="text/css" href="css/dropzone.min.css" />
</head>

<body>

    <div class="container" style="margin-top:50px;">
        <div class="row">
            <div class="panel panel-primary">
                <div class="panel-heading">Drag and Drop File Upload using DropzoneJS, PHP & MySQL</div>
                <div class="panel-body">
                    <div class="image_upload_div">
                        <form action="upload.php" class="dropzone" enctype="multipart/form-data">
                            <div class="dz-message">
                                Drop files here or click to upload.<br>
                                <span class="note">(This is for demo purpose. Selected files are not actually uploaded.)</span>
                            </div>

                        </form>
                        <button id="startUpload" class="btn btn-success">UPLOAD</button>
                    </div>
                </div>
            </div>
        </div>
    </div>

    <script type="text/javascript" src="js/jquery.min.js"></script>
    <script type="text/javascript" src="js/dropzone.min.js"></script>
    <script>
        //Disabling autoDiscover
        Dropzone.autoDiscover = false;

        $(function() {
            //Dropzone class
            var myDropzone = new Dropzone(".dropzone", {
                url: "upload.php",
                paramName: "file",
                maxFilesize: 2,
                maxFiles: 10,
                acceptedFiles: "image/*,application/pdf",
                autoProcessQueue: false
            });

            $('#startUpload').click(function() {
                myDropzone.processQueue();
            });
        });
    </script>
    </div>
</body>

</html>
Step #3 – upload.php
Open upload.php file and write this code into it.
<?php
if (!empty($_FILES)) {
    // Include the database configuration file
    require 'dbconfig.php';

    // File path configuration
    $uploadDir = "uploads/";
    $fileName = basename($_FILES['file']['name']);
    $uploadFilePath = $uploadDir . $fileName;

    // Upload file to server
    if (move_uploaded_file($_FILES['file']['tmp_name'], $uploadFilePath)) {
        // Insert file information in the database
        $sql = "INSERT INTO files (file_name, uploaded_on) VALUES ('" . $fileName . "', NOW())";
        $insert = $conn->query($sql);

        echo json_encode(array(
            "status" => true,
            "message" => "File uploaded successfully"
        ));
    } else {
        echo json_encode(array(
            "status" => false,
            "message" => "Failed to upload"
        ));
    }
}
Application Testing
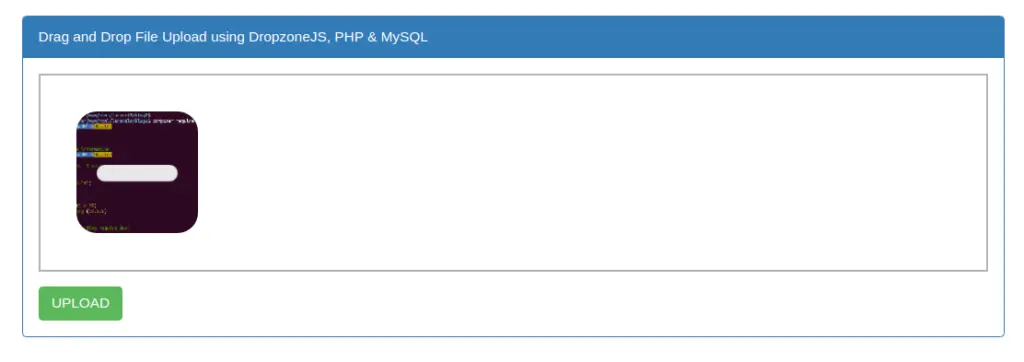
Open application into browser.
URL: http://localhost/drag-drop/
It will execute index.php and opens application as

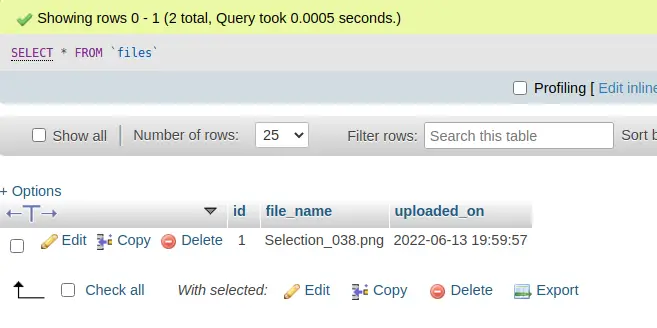
When click on “Upload”, it will save file into uploads/ folder and also save data into database table.

We hope this article helped you to learn PHP & MySQL Drag and Drop File Upload Using DropzoneJS Tutorial in a very detailed way.
If you liked this article, then please subscribe to our YouTube Channel for PHP & it’s framework, WordPress, Node Js video tutorials. You can also find us on Twitter and Facebook.
Read more