
Ratchet is a loosely connected PHP toolkit that allows developers to create real-time, bi-directional applications that communicate between clients and servers through WebSockets.
You can use it’s composer installation into your PHP project and enjoy the websockets ride with it.
Ratchet Installation via Composer
$ composer require cboden/ratchetProject Setup
Create a folder with name say ratchet-webchat into your project folder.
Subfolders Setup
Inside this folder create two sub-folders: /bin and /src.
Files Setup
- bin/chat-server.php: The file which starts chat server with host and a port.
- src/Chat.php: A class which handles events like of onMessage, onOpen, onClose, etc.
- index.php: The file at project root which is for client.
- composer.json: Auto generated composer file which keep track of project dependencies and autoload.
Code Settings for “Chat.php”
Application’s Chat class will be our application logic. This basic application will listen for 4 events:
- onOpen – Called when a new client has Connected
- onMessage – Called when a message is received by a Connection
- onClose – Called when a Connection is closed
- onError – Called when an error occurs on a Connection
Open Chat.php from /src folder and write this following code into it.
<?php
namespace MyApp;

use Ratchet\ConnectionInterface;
use Ratchet\MessageComponentInterface;

class Chat implements MessageComponentInterface
{
    protected $clients;

    public function __construct()
    {
        $this->clients = new \SplObjectStorage;
    }

    public function onOpen(ConnectionInterface $conn)
    {
        // Store the new connection to send messages to later
        $this->clients->attach($conn);

        echo "New connection! ({$conn->resourceId})\n";
    }

    public function onMessage(ConnectionInterface $from, $msg)
    {
        $numRecv = count($this->clients) - 1;
        echo sprintf('Connection %d sending message "%s" to %d other connection%s' . "\n"
            , $from->resourceId, $msg, $numRecv, $numRecv == 1 ? '' : 's');

        foreach ($this->clients as $client) {
            if ($from !== $client) {
                // The sender is not the receiver, send to each client connected
                $client->send($msg);
            }
        }
    }

    public function onClose(ConnectionInterface $conn)
    {
        // The connection is closed, remove it, as we can no longer send it messages
        $this->clients->detach($conn);

        echo "Connection {$conn->resourceId} has disconnected\n";
    }

    public function onError(ConnectionInterface $conn, \Exception $e)
    {
        echo "An error has occurred: {$e->getMessage()}\n";

        $conn->close();
    }
}
Next, we’re going to add shell script. This is the script/file we will call from the command line to launch our application.
Code Settings for “chat-server.php”
Open chat-server.php from /bin folder and write this following code into it.
<?php
use MyApp\Chat;
use Ratchet\Http\HttpServer;
use Ratchet\Server\IoServer;
use Ratchet\WebSocket\WsServer;

require dirname(__DIR__) . '/vendor/autoload.php';

$server = IoServer::factory(
    new HttpServer(
        new WsServer(
            new Chat()
        )
    ),
    8080
);

$server->run();
Above, you’ll see we created an I/O (Input/Output) server class.
It stores all the established connections, mediates data sent between each client and our Chat application, and catches errors.
The new instance of Chat class then wraps the I/O Server class. Finally, we tell the server to enter an event loop, listening for any incoming requests on port 8080.
Code Settings for “index.php”
This file is for client from where they can send messages to websocket.
Open index.php and write this following code into it.
<h3>Welcome To Ratchet Chat</h3>

<script>
var conn = new WebSocket('ws://localhost:8080');
conn.onopen = function(e) {
    console.log("Connection established!");
};

conn.onmessage = function(e) {
    console.log(e.data);
};
</script>
Update Composer
Open composer.json file and add these lines of code into it.
"autoload": {
    "psr-4": {
        "MyApp\\": "src"
    }
}
We updating application’s /src path to MyApp. We are doing this only for any security concerns.
Complete file will be look like this:
{
    "autoload": {
        "psr-4": {
            "MyApp\\": "src"
        }
    },
    "require": {
        "cboden/ratchet": "^0.4.4"
    }
}
Once you add given lines, run this command to your project terminal:
$ composer updateEverything is now set! Ready for application execution now …
Application Testing
Open project into terminal.
Now, we can run it with the following command:
$ php bin/chat-server.phpIt will start chat server.
Open index.php to browser…
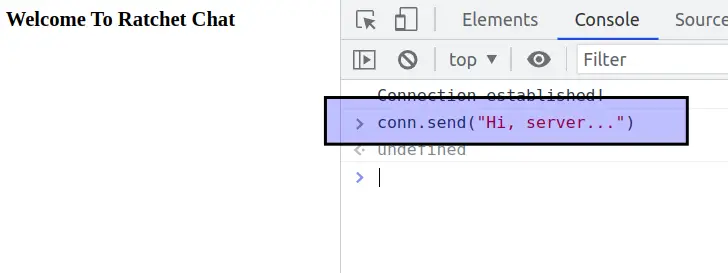
Send message from client to server, code used:
conn.send("Your message to server");Server is reading message from socket:

Successfully, you have integrated ratchet websocket library of PHP in application. By using this concept you can create a chat application.
If you liked this article, then please subscribe to our YouTube Channel for PHP & it’s framework, WordPress, Node Js video tutorials. You can also find us on Twitter and Facebook.
Read more