Email communication remains a fundamental aspect of web applications for disseminating information, notifications, or updates to multiple users simultaneously.
In CodeIgniter 4, implementing the functionality to send emails to multiple recipients streamlines communication and engagement with a broader audience efficiently.
In this tutorial, we’ll see the comprehensive process of sending emails to multiple users using CodeIgniter 4. This functionality empowers developers to craft and dispatch emails to a group of recipients
We will use setTo() method to set To emails.
Read More: CodeIgniter 4 Drag and Drop Reorder Items with jQuery
Let’s get started.
What is Email Class in CodeIgniter 4?
Email class is a in-built library. There are several features available by the help of which we configure emails. CodeIgniter 4 email class have all these features
- Multiple Protocols: Mail, Sendmail, and SMTP
- TLS and SSL Encryption for SMTP
- Multiple recipients
- CC and BCCs
- HTML or Plaintext email
- Attachments
- Word wrapping
- Priorities
- BCC Batch Mode, enabling large email lists to be broken into small BCC batches.
- Email Debugging tools
CodeIgniter 4 Installation
To create a CodeIgniter 4 setup run this given command into your shell or terminal. Please make sure composer should be installed.
composer create-project codeigniter4/appstarter codeigniter-4Assuming you have successfully installed application into your local system.
Environment (.env) Setup
When we install CodeIgniter 4, we will have env file at root. To use the environment variables means using variables at global scope we need to do env to .env
Either we can do via renaming file as simple as that. Also we can do by terminal command.
Open project in terminal
cp env .envAbove command will create a copy of env file to .env file. Now we are ready to use environment variables.
Enable Development Mode
CodeIgniter starts up in production mode by default. You need to make it in development mode to see any error if you are working with application.
Open .env file from root.
# CI_ENVIRONMENT = production

 // Do it to

CI_ENVIRONMENT = development
Now application is in development mode.
Email Library Class
To use Email library class in codeigniter 4 application, we need to do some email configuration inside Email.php file of /app/Config folder
It’s a class file, where we set some values to class member variables.
After doing all needed configuration settings, we load in application like this before use.
$email = \Config\Services::email();

//... rest code for email
Read More: CodeIgniter 4 How To Integrate Ckeditor Example Tutorial
Email Settings Configuration
For email configuration settings, we can use any sending email protocol like mail, sendmail or smtp.
Here, we will use SMTP and use Host as Gmail.
Open up the Email.php file from /app/Config folder.
<?php

namespace Config;

use CodeIgniter\Config\BaseConfig;

class Email extends BaseConfig
{
    /**
     * @var string
     */
    public $fromEmail = "xxxxx@gmail.com";

    /**
     * @var string
     */
    public $fromName = "Online Web Tutor Support";

    /**
     * @var string
     */
    public $recipients;

    /**
     * The "user agent"
     *
     * @var string
     */
    public $userAgent = 'CodeIgniter';

    /**
     * The mail sending protocol: mail, sendmail, smtp
     *
     * @var string
     */
    public $protocol = 'smtp';

    /**
     * The server path to Sendmail.
     *
     * @var string
     */
    public $mailPath = '/usr/sbin/sendmail';

    /**
     * SMTP Server Address
     *
     * @var string
     */
    public $SMTPHost = "smtp.gmail.com";

    /**
     * SMTP Username
     *
     * @var string
     */
    public $SMTPUser = "xxxxx@gmail.com";

    /**
     * SMTP Password
     *
     * @var string
     */
    public $SMTPPass = "xxxxxxx";

    /**
     * SMTP Port
     *
     * @var integer
     */
    public $SMTPPort = 587;

    /**
     * SMTP Timeout (in seconds)
     *
     * @var integer
     */
    public $SMTPTimeout = 60;

    /**
     * Enable persistent SMTP connections
     *
     * @var boolean
     */
    public $SMTPKeepAlive = false;

    /**
     * SMTP Encryption. Either tls or ssl
     *
     * @var string
     */
    public $SMTPCrypto = 'tls';

    /**
     * Enable word-wrap
     *
     * @var boolean
     */
    public $wordWrap = true;

    /**
     * Character count to wrap at
     *
     * @var integer
     */
    public $wrapChars = 76;

    /**
     * Type of mail, either 'text' or 'html'
     *
     * @var string
     */
    public $mailType = 'text';

    /**
     * Character set (utf-8, iso-8859-1, etc.)
     *
     * @var string
     */
    public $charset = 'UTF-8';

    /**
     * Whether to validate the email address
     *
     * @var boolean
     */
    public $validate = false;

    /**
     * Email Priority. 1 = highest. 5 = lowest. 3 = normal
     *
     * @var integer
     */
    public $priority = 3;

    /**
     * Newline character. (Use "\r\n" to comply with RFC 822)
     *
     * @var string
     */
    public $CRLF = "\r\n";

    /**
     * Newline character. (Use "\r\n" to comply with RFC 822)
     *
     * @var string
     */
    public $newline = "\r\n";

    /**
     * Enable BCC Batch Mode.
     *
     * @var boolean
     */
    public $BCCBatchMode = false;

    /**
     * Number of emails in each BCC batch
     *
     * @var integer
     */
    public $BCCBatchSize = 200;

    /**
     * Enable notify message from server
     *
     * @var boolean
     */
    public $DSN = false;
}
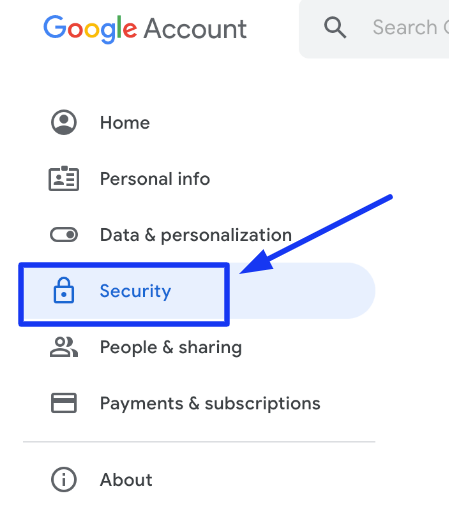
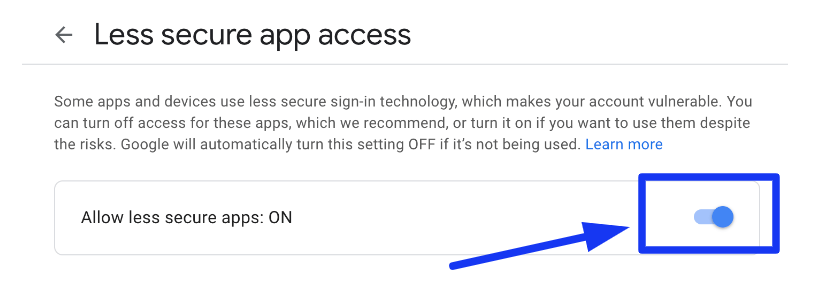
Here, inside this file we have configured all basic settings for sending emails. But one more thing before setting your email address and password to a SMTP details. You need to make it as for LESS SECURE APPS AT YOUR GOOGLE ACCOUNT.
When you go at your given email account settings. You will find a Security Tab. When you click into it –
Next, we need to create a method in controller and call Email service.
Read More: CodeIgniter 4 Redirection with Form Inputs Example Tutorial
Add Route
Open Routes.php from /app/Config folder. Add given route into it.
//...

$routes->get("send-mail", "UserController::sendMail");

//...
Use & Send Email Using Library
We need to create a controller.
Controller Setup
Open project into terminal and run this spark command to create controller.
php spark make:controller User --suffixIt will create a file UserController.php inside /app/Controllers folder.
Open file and write this code.
<?php

namespace App\Controllers;

use App\Controllers\BaseController;

class UserController extends BaseController
{
    public function sendMail()
    {
        $email = \Config\Services::email(); // loading for use

        // Send to Users
        $email->setTo([
            "xxxxx@gmail.com",
            "yyyyy@gmail.com"
        ]);

        $email->setSubject("Email to Multiple Users");
        $email->setMessage("This is a test mail sent to Multiple Users");

        // Send email
        if ($email->send()) {
            echo 'Email successfully sent, please check.';
        } else {
            $data = $email->printDebugger(['headers']);
            print_r($data);
        }
    }
}
Concept to Add Multiple Users for Email
// Send to Users
$email->setTo([
   "xxxxx@gmail.com",
   "yyyyy@gmail.com"
]);
Application Testing
Open project terminal and start development server via command:
php spark serveURL: http://localhost:8080/send-mail
Output
Email successfully sent, please check.
Each user will receive this email.
That’s it.
We hope this article helped you to learn about How To send Send Email to Multiple Users in CodeIgniter 4 Tutorial in a very detailed way.
If you liked this article, then please subscribe to our YouTube Channel for PHP & it’s framework, WordPress, Node Js video tutorials. You can also find us on Twitter and Facebook.
Read more