
Inside this article we will see how to create custom theme in wordpress. This article is from scratch which starts with zero files and from zero files of written code. If we need to understand the complete basics of wordpress theme development then only the way to go and learn from it’s basics and move step by step to it’s advance level.
In theme development, there are several files that actually we need, will cover while going to development steps.
Learn More –
- How to use WordPress Global Database Object?
- Learn WordPress CRUD Tutorial with wpdb Object
- How to Use & Work with jQuery UI in WordPress
- Do you Know About WordPress WP CLI Command Line?
Let’s get started in WordPress Theme Development Tutorial.
Prerequisites of Theme Development
In the development of wordpress theme we need followings:
- WordPress should be installed.
Working in theme development we need a wordpress installation. Also we need a HTML basic theme so that we can convert it’s pages into theme files.
2. To download the HTML theme Click here.
An Introduction of Custom Theme Setup in WordPress?
In order to work with theme development our scope of work will be inside /wp-content folder. In wp content folder we should have themes folder.
Step by step we will set custom theme here.
Step #1 – Create Folder
We need to create a custom theme folder with any name what we want to be. This folder should be created inside /wp-content/themes/<custom-theme>
For Example – “my-blog-theme” I have created.
Step #2 – Theme Introduction
We have created now a theme folder to work. So, according to theme convention in wordpress we need basic files, at first stage of development. These basic set of codes introduce theme to wordpress. Let’s create these files –
Theme Introduction Files
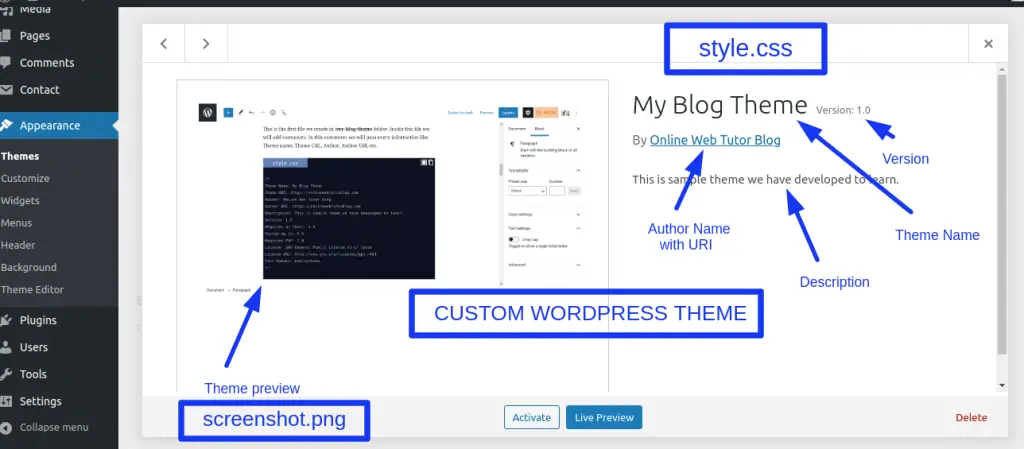
Stylesheet ( style.css )
This is the first file we create in /my-blog-theme folder. Inside this file we will add comments. In this comments we will pass every information like Theme name, Theme URL, Author, Author URI, etc.
/*
Theme Name: My Blog Theme
Theme URI: https://onlinewebtutorblog.com
Author: Online Web Tutor Blog
Author URI: https://onlinewebtutorblog.com
Description: This is sample theme we have developed to learn.
Version: 1.0
Requires at least: 4.5
Tested up to: 5.5
Requires PHP: 7.0
License: GNU General Public License v3 or later
License URI: http://www.gnu.org/licenses/gpl.html
Text Domain: myblogtheme
*/
Next,
Theme Preview (screenshot.png)
We will place a theme preview file. WordPress by default takes an image file named as screenshot.png which is a preview file for a theme. I am placing a dummy image with the name screenshot.png.
After placing these two files – style.css & screenshot.png, get back to wordpress admin panel
Login To WP Admin >> Appearance >> Themes >> Click on [Custom-Theme]
All we have done upto theme introduction to wordpress. Now we need to create theme functional files.
Theme Index ( index.php ) –
If you have downloaded the HTML theme from the previous given link, then you should see that it contains a file called index.html at root.
Create a index.php file inside custom theme folder. Copy all the content from index.html and paste to index.php.
Next,
File index.php can be further divided into header.php & footer.php. Page structure be like this.
<!– header.php –>
Page Contents
<!– footer.php –>
We will call partial files by help of some helper functions in wordpress.
Header File ( header.php )
This file contains all header part code. It includes like title tag, head tag, meta tags etc.
<!DOCTYPE html>
<html <?php echo language_attributes() ?>>

<head>
  <meta charset="<?php echo bloginfo('charset') ?>">
  <!-- Other meta tags-->
  <title><?php echo bloginfo('title') ?></title>
  <?php wp_head() ?>

</head>
<body>
  <!-- Navigation -->
  <nav class="navbar navbar-expand-lg navbar-dark bg-dark fixed-top">
    <div class="container">
      <a class="navbar-brand" href="#"><?php echo bloginfo('title') ?></a>
      <button class="navbar-toggler" type="button" data-toggle="collapse" data-target="#navbarResponsive" aria-controls="navbarResponsive" aria-expanded="false" aria-label="Toggle navigation">
        <span class="navbar-toggler-icon"></span>
      </button>
      <div class="collapse navbar-collapse" id="navbarResponsive">
         <!-- Navigation -->
      </div>
    </div>
  </nav>
Inside header.php file code you can see we have used many helper functions of helper – language_attributes(), bloginfo(‘charset’), bloginfo(‘title’), wp_head().
- language_attributes() – This function is for site language.
- bloginfo(‘charset’) – Echo character set value used for site like utf8;
- bloginfo(‘title’) – Echo site title.
- wp_head() – Function which registers scripts at head tag.
There are several other wordpress helpers functions we can use into theme development of wordpress.
Footer File (footer.php)
This file contains all footer code.
<!-- Footer -->
<footer class="py-5 bg-dark">
<div class="container">
<p class="m-0 text-center text-white">Copyright © My Blog Theme 2020</p>
</div>
<!-- /.container -->
</footer>
<?php wp_footer(); ?>
</body>
</html>Inside above footer code, we have called wp_footer() function. This is a wordpress function which echo or includes all the scripts registration at footer.
Now, finally index.php is divided into some files. Contents of this file is separated.
To include these partial files header.php and footer.php into index we have some helper functions. get_header() is for header.php & get_footer() is for footer.php.
Complete code for index.php file –
<?php get_header(); ?>
<!-- Page Content -->
<div class="container">
<div class="row">
<!-- Post Content Column -->
<?php
if (have_posts()) {
while (have_posts()) {
the_post();
$url = wp_get_attachment_url(get_post_thumbnail_id(get_the_ID(), "thumbnail"));
?>
<!-- Blog Post -->
<div class="card mb-4">
<img class="card-img-top" src="<?php echo $url ?>" alt="Card image cap">
<div class="card-body">
<h2 class="card-title"><?php the_title(); ?></h2>
<p class="card-text"><?php the_content(); ?></p>
<a href="<?php the_permalink() ?>" class="btn btn-primary">Read More →</a>
</div>
</div>
<?php
}
}
?>
</div>
<!-- /.row -->
</div>
<!-- /.container -->
<?php echo get_footer(); ?>As, in the above code you can see we have complete index.php file code. Inside this file we have included get_header which includes header.php and get_footer includes footer.php.
Apart from file inclusion we should see a post loop also used. This loop is wordpress standard Post Loop. Loop reads all the post or page contents of any page or post. Have a look Post Loop in a separate code snippet.
 if (have_posts()) {

   while (have_posts()) {

     the_post(); // post incremental

     the_title(); // to get title of current post

     the_content(); // get content of current post
   }

}
So, finally now we have several files in custom theme directory. Files are –
- style.css – Theme introduction comments
- screenshot.png – Theme preview
- index.php – Main file
- header.php – Code contains header portion (partial file for header)
- footer.php – Code contains footer portion (footer partial file)
Concept of WordPress Template Hierarchy
In wordpress, every file is well managed by slug, ID, default callback etc. There is a strong and logical template hierarchy. By default index.php callback file is for all templates. But when we create all templates in respective manner then files will work.
Calling procedure of pages in wordpress –
page-{page-slug}.php << page-{page-ID}.php << page.php << index.php
For example,
When we create a page in wordpress. Admin Login >> Pages >> Add New
Each page creates a slug with ID. Let’s create a page named as “About Us”. It’s slug by default will be about-us, we can also change it if we want. And it’s ID will be auto generated value of wordpress. So, suppose it will like ID = 20.
Now, in order of template hierarchy – About Us page searches for about-us.php if not exists, then it will look for page-20.php, if not exists search for page.php, not exists then finally it will call index.php file to render about us page.
Next,
We have other important templates as – sidebar.php, search.php, category.php, 404.php, single.php, functions.php
- sidebar.php – This file is to include sidebar contents. If your theme supports sidebars then you need to create this file and write your content there. To call sidebar into wordpress templates we will use get_sidebar()
- search.php – WordPress default has a search layout in it’s own. But in some cases if we want to customize the search layout like adding an ID, adding some classes, apply some styling etc. We need to create search.php file individually. get_search_form() is used to call it.
- category.php – When we create any category in admin and view in browser, the templates which is responsible to render as – catgory-{category-slug}.php << category-{category-ID}.php << category.php << index.php
- 404.php – This is for the page not found error file. WordPress has it’s own default layout for this. But in case when we want to add some images like Not found, Under Construction, In Progess etc, then we can create this 404.php and use it.
- single.php – Template is used to display single post contents. Post also has their own template hierarchy as – single-{post-slug}.php << single-{post-ID}.php << single.php << singular.php << index.php.
- functions.php – Important functional file in wordpress theme. By the help of this theme we can do several settings via calling action hooks, filter hooks, register theme settings etc.
Registering Scripts – WordPress Custom Theme
As we have seen previously i.e functions.php is the main functional file which operates any theme in wordpress. So here, we also create a functions.php file.
We will register some scripts like adding some stylesheets, some javascripts via this functions.php. After adding scripts linking we need to call by a action hook to attach into theme.
Have a look into the code snippet of functions.php –
function simple_load_scripts()
{
    // css files
    wp_enqueue_style("sample", get_template_directory_uri() . "/assets/css/sample.css", array(), "1.0", "all");

    wp_enqueue_style("style", get_stylesheet_uri(), array(), "1.0", "all");

    // js files
    wp_enqueue_script("sample", get_template_directory_uri() . "/assets/vendor/bootstrap/js/sample.js", array("jquery"), "1.0", true);
}

add_action("wp_enqueue_scripts", "simple_load_scripts");
In this piece of code we have few helper functions used like – get_template_directory_uri(), get_stylesheet_uri() and a action hook- wp_enqueue_scripts.
- get_template_directory_uri() – It returns the path of theme directory
- get_stylesheet_uri() – style.css file path returned by this function.
- wp_enqueue_scripts – Action hook i.e used to register scripts to theme.
How to register a Menu Locations in WordPress Theme
For any site menus and their locations are very important. As we in daily life use many sites to visit and collect some data. Site contains or have many different different sidebars – Footer sidebar, Left sidebar, Top header, Right etc.
So, to register menus in wordpress theme we need menus locations. We need to register them first.
Code snippet to register theme menus locations –
// register nav menu
function simple_bootstrap_theme_nav_config()
{

    register_nav_menus(array(
        "sbt_primary_menu_id" => "SBT Primary Menu(Top Menu)",
        "sbt_secondary_menu_id" => "SBT Sidebar",
    ));
}

add_action("after_setup_theme", "simple_bootstrap_theme_nav_config");
Here, to register theme locations for menus we used the helper function –register_nav_menus. In this function we need to pass menus into key value pairs. Like Menu Id and Menu name. We simply registered two menus locations – Primary Menu and Sidebar.
To Call Menu Location at Template
As, we have done the registration and created some menus from admin panel. How can we call to templates ? To call wordpress has simple function to use –
wp_nav_menu(array(
  "theme_location" => "sbt_primary_menu_id", // Menu location ID
  "container" => false,
  "items_wrap" => '<ul class="navbar-nav ml-auto">%3$s</ul>'
));
We hope this article helped you to learn about How To Start with Basics of WordPress Theme Development in a very detailed way.
If you liked this article, then please subscribe to our YouTube Channel for PHP & it’s framework, WordPress, Node Js video tutorials. You can also find us on Twitter and Facebook.
Read more