Inside this article we will develop a Basic Widget Plugin in WordPress. We already discussed about the core class to register a widget. Additionally, we also discussed about core class methods that we need.
WordPress widgets are the useful container which provide information to the user. Site owner can add several types of informative contents to their website either it will be inside the body content, post content or even it can placed at right left top sidebars.
Learn More –
- Create and Call MySQL Stored Procedure
- Basics Overview of MySQL Stored Procedures
- Complete Basics Overview of WordPress Widget
Let’s get started.
Settings up WordPress Widget Plugin – Step 1
WordPress a PHP based CMS comes with a built-in Widget class. Each widget of wordpress extends the wp widget class as a parent class. In widget class we have 18 methods provided as per wordpress official developer documentation that can be used while creating custom widget.
But not going through all the methods, we only need few methods which is most important to create a basic widget.
We are going to create a wordpress plugin by the help of which we will create/register a widget and settings up the methods of WP_Widget class.
In the last session we have some points which we need to keep in our mind while developing this widget plugin. Those points are:
- Inherit or extend WP_Widget class
- Override method form() – Which is responsible to outputs the widget settings at admin level. Admin layout of any widget if we are getting this is due to form() method.
- Override method update() – Which is responsible to save or update widget instance settings. If we save any data or setting from widget form then update() will work and update the widget instance.
- Override method widget() – Responsible to display widgets information or data settings to end users. It outputs the widget information box to front end / site.
Declaring WordPress Widget Plugin
In wordpress, to define a plugin we need to create a plugin folder into /wp-content/plugins directory. Now, what I will do ? I will create a wp-widget-plugin named folder inside plugins directory. Have a look,
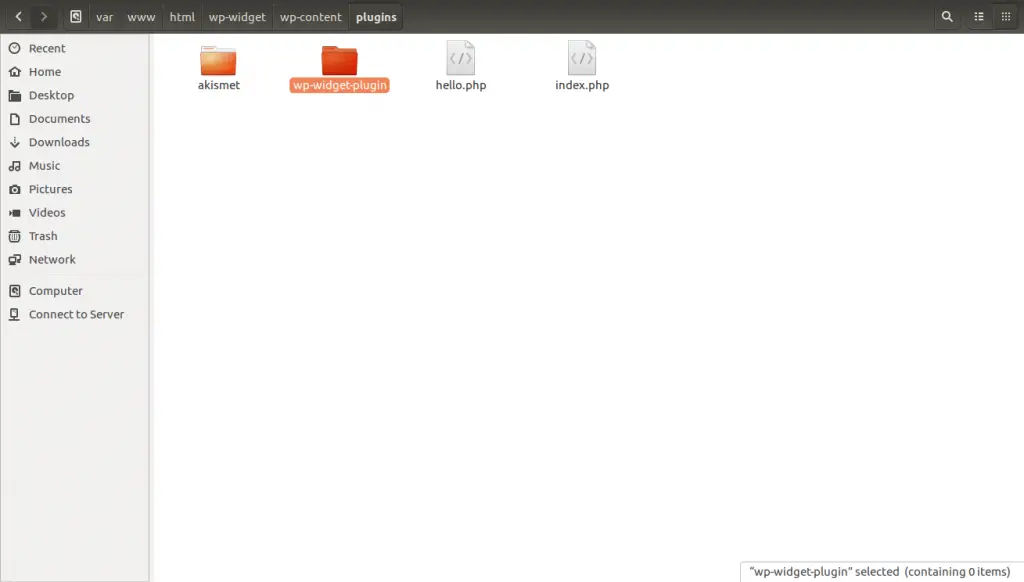
I have created plugin folder. Next we need to create plugin files into plugin directory. We have created our first plugin file i.e /wp-widget-plugin/wp-widget-plugin.php
Adding some comments into plugin file so that we can introduce plugin to wordpress. Here we have added the comments as you can see
<?php
/*
Plugin Name: WP Widget Plugin
Description: This is a sample plugin to learn custom widget development
Version: 1.0
Author: Online Web Tutor
*/
After putting these lines we are now introducing plugin to wordpress. Here we have specified few fields of plugin introduction like Plugin Name, Description, Version, Author also we have Author URI, Plugin URI etc. If you need you can provide these details as well.
When we go WordPress Admin Panel > Plugins > Installed Plugins.

Great ! finally step by step we have done the plugin settings into wordpress. Let’s see about using WP_Widget class into our custom plugin. Because we are going to register a widget by this plugin.
Settings of WordPress Widget Class to Plugin – Step 2
As we have already discussed that WP_Widget class is the parent class which helps to register a widget into wordpress. There are some methods we need to override and do settings as per our requirement.
At first stage of this session we done things ready for plugin. Next we need to create a class which inherit or extend WP_Widget core wordpress class. I have added the code into wp-widget-plugin.php, have a look the code snippet.
// ADDING CODE TO THE PLUGIN FILE

class WP_Widget_Plugin extends WP_Widget{

	public function __construct(){}

	public function form($instance){}

	public function widget($args, $instance ){}

	public function update($new_instance, $old_instance){}
}
You can see, we have created a custom class name WP_Widget_Plugin you can choose your own name and extends WP_Widget core class. After extending core class we are now able to use the available widget methods like form(), widget() & update().
Inside WP_Widget_Plugin class we have methods, Again let’s define these methods one more time to recall the things.
- construct() – Constructor method which helps to initializes widget name, id or other attributes of widget settings.
- form() – Handling admin panel settings for widget
- widget() – Handling end user layout for widget. Widget view at front end.
- update() – It updates the widget instance.
And finally we need to create a instance of this class.
We have now the final code of wp-widget-plugin.php file as –
<?php
/*
Plugin Name: WP Widget Plugin
Description: This is a sample plugin to learn custom widget development
Version: 1.0
Author: Online Web Tutor
*/

class WP_Widget_Plugin extends WP_Widget{

	public function __construct(){

		// It initializes widget name, id or other attributes
	}

	public function form($instance){

		// Used for creating admin panel layouts of widget
	}

	public function widget($args, $instance ){

		// Used to create front-end layout settings of widget
	}

	public function update($new_instance, $old_instance){

		// updates the widget instance
	}
}

$wp_plugin_widget_object = new WP_Widget_Plugin();
Let’s see about __construct() methods settings.
Widgets Constructor Method – Step 3
Constructor method in PHP allows us to create & use the class modules. Not going into the deep of constructor here, it’s not of discussion. If we open up the code what we have written for wp-widget-plugin.php.
Inside this plugin class we can see that we have a __construct() method. We can define the widget settings into the __construct() method. As we know in terms of widget settings we need to pass Widget ID, Widget Title, Widget description.
public function __construct(){

  // initialize widget name, id or other attributes
  parent::__construct("owt-wp-widget", "WP Widget Plugin", array(
  	 "description" => "Sample Widget Plugin created for learning"
  ));
  add_action("widgets_init", function(){
    register_widget("WP_Widget_Plugin");
  });

}
Explanation of syntax
owt-wp-widget – Widget ID , WP Widget Plugin – Widget Title , description – Widget Description
Here, we have defined the widgets attributes inside this __construct() method. These attributes will introduce our widget to wordpress widget section.
Also we have used add_action() method. It’s because we need to bind widget registration with widgets_init action hook. widgets_init hook triggers when wordpress widgets initializes. So the second value what we have passed in add_action() is basically a anonymous function. This function will fire when widgets init.
add_action(“widgets_init”, function(){
register_widget(“WP_Widget_Plugin”);
});
register_widget is a wordpress helper function which is used to register widget. Function name itself making a sense to register a widget. Inside that function we have passed the Class name. Keep in mind WP_Widget_Plugin is class name of Wp widget plugin.
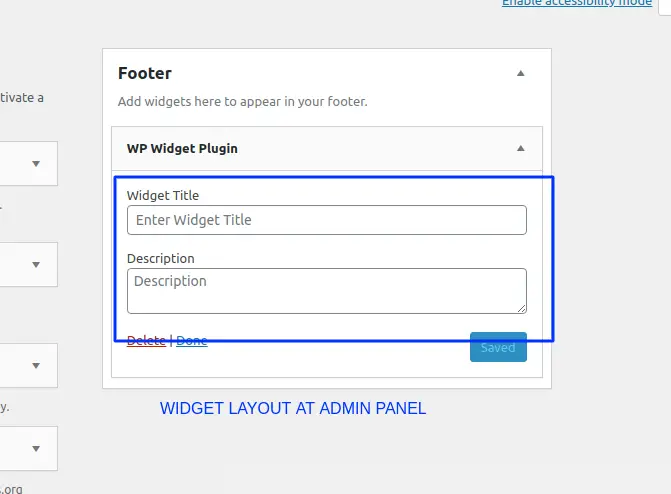
Back to wordpress admin panel -> Appearances -> Widgets

Now, we need to create layout of widget.
Form Method – Create Admin Layout – Step 4
As we already discussed form() method is used to give a layout of widget at wordpress admin. Upto what development so far we did this is for widgets initialization.
Now, let’s create a admin structure for widget.
public function form($instance){
		// admin panel layout
		$title = !empty($instance['title']) ? $instance['title'] : "";
		$description = !empty($instance['description']) ? $instance['description'] : "";
	?>
		<p>
			<label for="<?php echo $this->get_field_id('txt_title') ?>">Widget Title</label>
			<input type="text" name="<?php echo $this->get_field_name('txt_title') ?>" id="<?php echo $this->get_field_id('txt_title') ?>" placeholder="Enter Widget Title" value="<?php echo $title; ?>" class="widefat" />
		</p>

		<p>
			<label for="<?php echo $this->get_field_id('description') ?>">Description</label>
			<textarea class="widefat" id="<?php echo $this->get_field_id('description') ?>" name="<?php echo $this->get_field_name('description') ?>" placeholder="Description" ><?php echo $description; ?></textarea>
		</p>
	<?php
}
Here, inside this form method we have added two input fields – Title & Description.
Explanation
$title = !empty($instance[‘title’]) ? $instance[‘title’] : “”;
$description = !empty($instance[‘description’]) ? $instance[‘description’] : “”;
These are for checking the existing value of widget instance. For Example: we have saved some value to database via widget form. So while reload we need to pre field the input fields with saved value. That’s why we are checking.
get_field_id() – This method is used to generate field ID dynamically. WordPress inbuilt methods.
get_field_name() – This method is used to get the dynamic field name. WordPress inbuilt methods.
Back to wordpress admin panel -> Appearances -> Widgets

It’s really great, we are developing widget in a very easy step by step.
Now, let’s see how can we save widget settings.
Save or Update WordPress Widget Settings – Step 5
If you have remembered the definition of update() method, they sure you have the idea about it. Update method is used to update widget instance value. If we are saving widget value first time then it will add values into instance but from next time it updates the instance value.
First let’s see the widget layout at admin panel and it’s input fields. We have taken two input fields like for Title & Description. with name attribute as txt_title and description
When we submit data by filling input values for title and description. Then it will trigger update() method.
We have written the code for update method, have a look
public function update($new_instance, $old_instance){
  // save or update widget instance value
  $instance = array();
  $instance['title'] = isset($new_instance['txt_title']) ? strip_tags($new_instance['txt_title']) : "";
  $instance['description'] = isset($new_instance['description']) ? strip_tags($new_instance['description']) : "";

  return $instance;
}
Here, we can see inside update() method, we are creating instance array() variable.
$instance[‘title’] = isset($new_instance[‘txt_title’]) ? strip_tags($new_instance[‘txt_title’]) : “”;
Getting value of new_instance means Widget Title and assigning into title key of instance variable.
$instance[‘description’] = isset($new_instance[‘description’]) ? strip_tags($new_instance[‘description’]) : “”;
Assigning value of description into instance key. After all the widget data will now save into database. update() method is mediator to pass data before save.
Complete code of wp-widget-plugin.php is
<?php
/*
Plugin Name: WP Widget Plugin
Description: This is a sample plugin to learn custom widget development
Version: 1.0
Author: Online Web Tutor
*/

class WP_Widget_Plugin extends WP_Widget{

	public function __construct(){
		// initialize widget name, id or other attributes
		parent::__construct("owt-wp-widget", "WP Widget Plugin", array(
		  	 "description" => "Sample Widget Plugin created for learning"
		  ));
		  add_action("widgets_init", function(){
		    register_widget("WP_Widget_Plugin");
		  });
	}

	public function form($instance){

		// Used for creating admin panel layouts of widget
		$title = !empty($instance['title']) ? $instance['title'] : "";
		$description = !empty($instance['description']) ? $instance['description'] : "";
		?>
		<p>
			<label for="<?php echo $this->get_field_id('txt_title') ?>">Widget Title</label>
			<input type="text" name="<?php echo $this->get_field_name('txt_title') ?>" id="<?php echo $this->get_field_id('txt_title') ?>" placeholder="Enter Widget Title" value="<?php echo $title; ?>" class="widefat" />
		</p>

		<p>
			<label for="<?php echo $this->get_field_id('description') ?>">Description</label>
			<textarea class="widefat" id="<?php echo $this->get_field_id('description') ?>" name="<?php echo $this->get_field_name('description') ?>" placeholder="Description" ><?php echo $description; ?></textarea>
		</p>
		<?php
	}

	public function widget($args, $instance ){

		// Used to create front-end layout settings of widget
	}

	public function update($new_instance, $old_instance){

		// save or update widget instance value
		$instance = array();
		$instance['title'] = isset($new_instance['txt_title']) ? strip_tags($new_instance['txt_title']) : "";
		$instance['description'] = isset($new_instance['description']) ? strip_tags($new_instance['description']) : "";

		return $instance;
	}
}

$wp_plugin_widget_object = new WP_Widget_Plugin();
Now, when we run widget plugin what we have developed so far. Then this will save widget data to database. And when we reload our page we should see the saved value to the input fields. This is because we have added two lines of code if you have remembered into form() method.
// Used for creating admin panel layouts of widget
$title = !empty($instance[‘title’]) ? $instance[‘title’] : “”;
$description = !empty($instance[‘description’]) ? $instance[‘description’] : “”;
This code populates the existing value or old value of instance what we have stored in update() method.
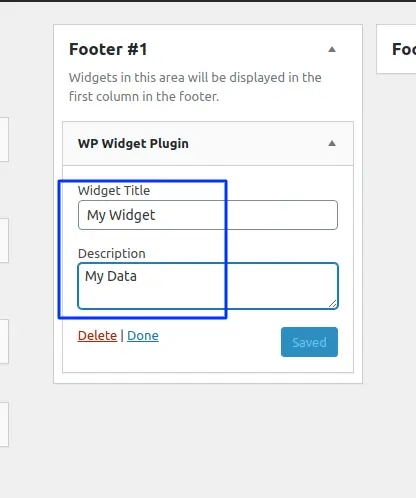
Combine Output of form() & update()
We can now see the output. Have a look,
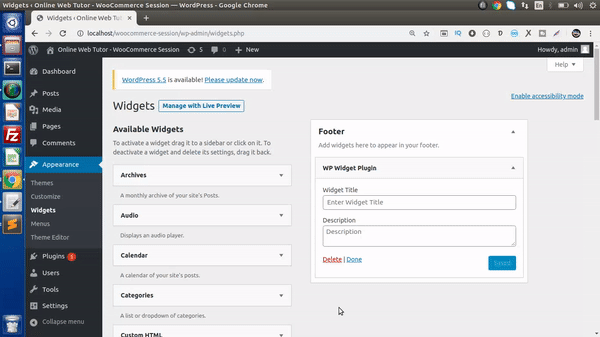
This gif image explains that we are saving widget values to database and values are now rendering to input fields when we reload page. This is all about of form() & update() method.
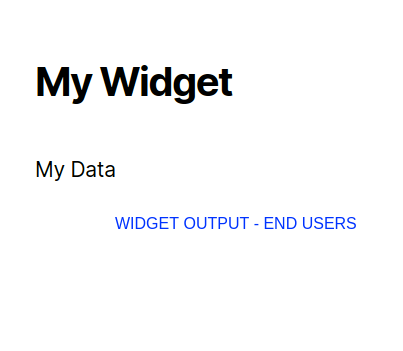
At final we need to widget method to override. Widget method will display widget settings to end users.
Widget Method – Display Settings – Step 6
Now, we have last and important method i.e widget() responsible to present UI or data of widget to end users of the site. Have a look the widget method,
// Show widget settings to end users
public function widget($args, $instance){

	global $wpdb;

	echo $args["before_title"];

	if(!empty($instance["title"])){

		echo $instance["title"];
	}

	echo $args["after_title"];

	echo $args["before_widget"];

	if(!empty($instance["description"])){

		echo $instance["description"];
	}

	echo $args["after_widget"];
}
Syntax Explanation
Inside this syntax, we can see that method takes 2 parameters i.e $args, $instance. $args have pre-defined keywords as array index. Defined keys are before_title, after_title, before_widget & after_widget.
These indexes creates the wrapper elements of HTML which prints Widget title and widget data. Let me share a source code view of widget with created wrapper elements,

$args[“before_title“] & $args[“after_title“] creates the wrapper of Widget title. It normally contains opening of h2 and closing of h2 tag, whereas the other $args indexes like $args[“before_widget“] & $args[“after_widget“] responsible to define wrapper of widget contents. It creates div element with class widget-content.
If you see the second parameter of widget method i.e $instance, this is used to get the widget settings value. Remember we have set this instance variable in update() method. It’s an array we had defined and used to get the indexes of title and desctiption.
If suppose we don’t want to use these indexes to print the widget output, also we can remove that. It will not create any wrapper elements like any div or any h2 element.
WordPress Widget Basic Plugin – Complete Code
Basic widget plugin extends the WP_Widget class. We have overridden 3 methods and also added some settings into construct method. Methods are – form(), update() & widget().
Finally, we have now completed the widget development course articles. Have a look the complete code of widget,
<?php
/*
Plugin Name: WP Widget Plugin
Description: This is a sample plugin to learn custom widget development
Version: 1.0
Author: Online Web Tutor
 */

class WP_Widget_Plugin extends WP_Widget
{
    public function __construct()
    {
        // initialize widget name, id or other attributes
        parent::__construct("owt-wp-widget", "WP Widget Plugin", array(
            "description" => "Sample Widget Plugin created for learning",
        ));
        add_action("widgets_init", function () {
            register_widget("WP_Widget_Plugin");
        });
    }

    public function form($instance)
    {
        // Used for creating admin panel layouts of widget
        $title = !empty($instance['title']) ? $instance['title'] : "";
        $description = !empty($instance['description']) ? $instance['description'] : "";
        ?>
		<p>
			<label for="<?php echo $this->get_field_id('txt_title') ?>">Widget Title</label>
			<input type="text" name="<?php echo $this->get_field_name('txt_title') ?>" id="<?php echo $this->get_field_id('txt_title') ?>" placeholder="Enter Widget Title" value="<?php echo $title; ?>" class="widefat" />
		</p>

		<p>
			<label for="<?php echo $this->get_field_id('description') ?>">Description</label>
			<textarea class="widefat" id="<?php echo $this->get_field_id('description') ?>" name="<?php echo $this->get_field_name('description') ?>" placeholder="Description" ><?php echo $description; ?></textarea>
		</p>
		<?php
    }

    public function widget($args, $instance)
    {
        // Used to create front-end layout settings of widget
        global $wpdb;

        echo $args["before_title"];

        if (!empty($instance["title"])) {

            echo $instance["title"];
        }

        echo $args["after_title"];

        echo $args["before_widget"];

        if (!empty($instance["description"])) {

            echo $instance["description"];
        }

        echo $args["after_widget"];
    }

    public function update($new_instance, $old_instance)
    {
        // save or update widget instance value
        $instance = array();

        $instance['title'] = isset($new_instance['txt_title']) ? strip_tags($new_instance['txt_title']) : "";

        $instance['description'] = isset($new_instance['description']) ? strip_tags($new_instance['description']) : "";

        return $instance;
    }
}

$wp_plugin_widget_object = new WP_Widget_Plugin();
Simply, you need to copy this code and paste inside either functions.php or create a plugin for this. Already we have followed to create this as a basic plugin.
We hope this article helped you to learn about Basic WordPress Widget Plugin Development in a very detailed way.
If you liked this article, then please subscribe to our YouTube Channel for PHP & it’s framework, WordPress, Node Js video tutorials. You can also find us on Twitter and Facebook.
Read more