
Running background processes in application of any technologies is very common. Sometimes we need those for sending emails to subscribers, sometimes for notifications. Also in case of database reporting to admin dashboards, we calculate by using these processes.
Background process which runs behind the screen in a certain specific time interval to complete some task is termed as Cron Jobs.
Inside this article we will see about an ultimate guide for developing CakePHP 4 Cron Jobs.
Let’s get started.
CakePHP 4 Installation
To create a CakePHP project, run this command into your shell or terminal. Make sure composer should be installed in your system.
$ composer create-project --prefer-dist cakephp/app:~4.0 mycakephp
Above command will creates a project with the name called mycakephp.
What is a Cron Job ?
Cron Jobs are the scheduling tasks which runs into the server. These are commonly used for automated system maintenance and/or administration.
In web application development, we need these for certain tasks to run periodically. Cron jobs or background process are set to run in certain time interval. We will set to run either for specific time period or with a specific day or even after some hour intervals.
We have a proper syntax while setting any background process in CakePHP 4.
Let’s create a CakePHP 4 background process.
Configure CakePHP 4 Cron Jobs
We configure crons in CakePHP 4 by using shell commands. Shell commands are the console commands which we create and run via bake console environment.
How can we create a Shell command ?
A CakePHP 4 application contains src/Command directory that contain its shell command files and tasks. If you ware wondering about the directory structure of CakePHP 4 application or it’s installation, you can check out this article.
Open up cakephp 4 application at terminal or command prompt. Type command $ bin/cake. We should see the list of bake commands provided for operating application via terminal. Have a look,
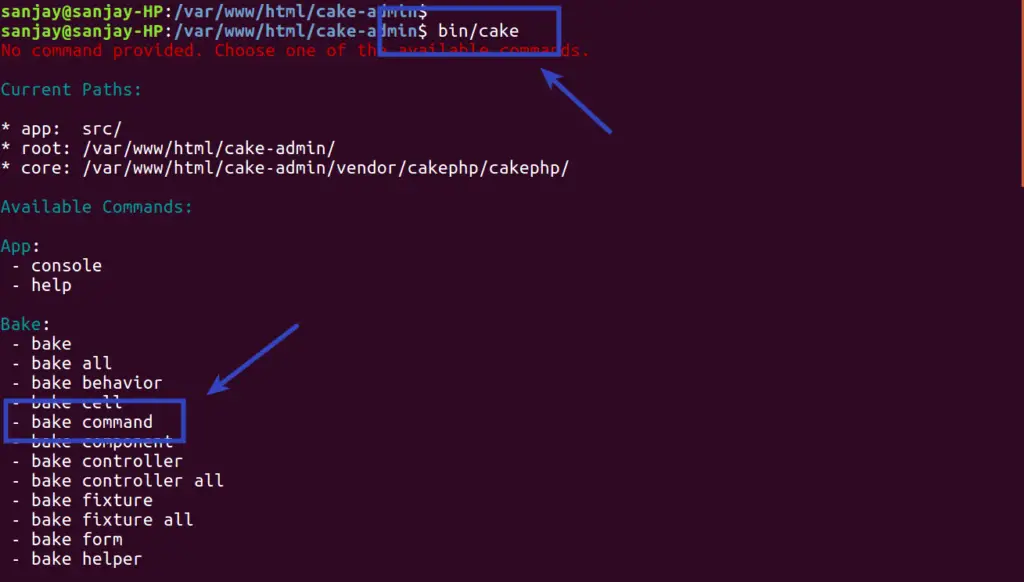
Here, as we can see we have several commands. So inside this list we have a bake command which is used to create a command file. Now let’s create that file –
$ bin/cake bake command CronJob
When we run this command at CakePHP 4 application setup, we should see this type of output –
Output
Creating file /var/www/html/cake-admin/src/Command/CronJobCommand.php Wrote/var/www/html/cake-admin/src/Command/CronJobCommand.phpBaking test case for App\Command\CronJobCommand … Creating file /var/www/html/cake-admin/tests/TestCase/Command/CronJobCommandTest.php Wrote/var/www/html/cake-admin/tests/TestCase/Command/CronJobCommandTest.php
Back to /src/Command directory, we will have a command file named as CronJobCommand.php
This is a class file class CronJobCommand extends Command{ }. We need to add our code inside execute() method. Actually we can make use of all two methods available inside class file.
Now, we are going to write the code snippet in cron job which will do data insertion in table whenever we call it.
Source code /src/Command/CronJobCommand.php
<?php

declare(strict_types=1);

namespace App\Command;

use Cake\Console\Arguments;
use Cake\Command\Command;
use Cake\Console\ConsoleIo;
use Cake\Console\ConsoleOptionParser;

/**
 * Cronjob command.
 */
class CronjobCommand extends Command
{
    public $modelClass = "Books"; // Loading Book Model

    public function buildOptionParser(ConsoleOptionParser $parser): ConsoleOptionParser
    {
        $parser = parent::buildOptionParser($parser);

        return $parser;
    }

    public function execute(Arguments $args, ConsoleIo $io)
    {
        $bookEntity = $this->Books->newEmptyEntity();

        $bookEntity->name = "Sample Book";
        $bookEntity->publication = "Sample publication";
        $bookEntity->author = "Sample author";
        $bookEntity->amount = 100;

        $this->Books->save($bookEntity);

        $io->out("Book created successfully");
    }
}- Loading model public $modelClass = “Books”; This model indicates the table. Table contains the column name, publication, author & amount.
- $bookEntity = $this->Books->newEmptyEntity(); Creating an entity to for insert data
- $bookEntity->name, $bookEntity->publication, … Assigning values to entity keys.
- $this->Books->save($bookEntity); Save entity data into database table
- $io->out(“Book created successfully”); This is a output message after operation.
Next, we need to set to application for run.
To set cron jobs, we need to fix a time period when our created cron job will be triggered. Let’s say we need to schedule the cron to run after every 5th minute, so syntax will be –
*/5 * * * * cd /var/www/html/[cakephp_project_folder] && bin/cake cronjob
- */5 * * * * – It indicates time scheduling
- /var/www/html/[cakephp_project_folder] – CakePHP project folder name
- bin/cake cronjob – To run shell command
If you are wondering how to set time intervals you can also check here Set Cron Tab Time.
Shell Command Execution
Successfully, from above steps we have developed a cron job. Now, we need to set to the server so that it will execute on the scheduled time what we have set.
Setting Cron to server via Terminal
Open server terminal via SSH. Type command
$ crontab -l
This command will display all cron jobs set to the server.
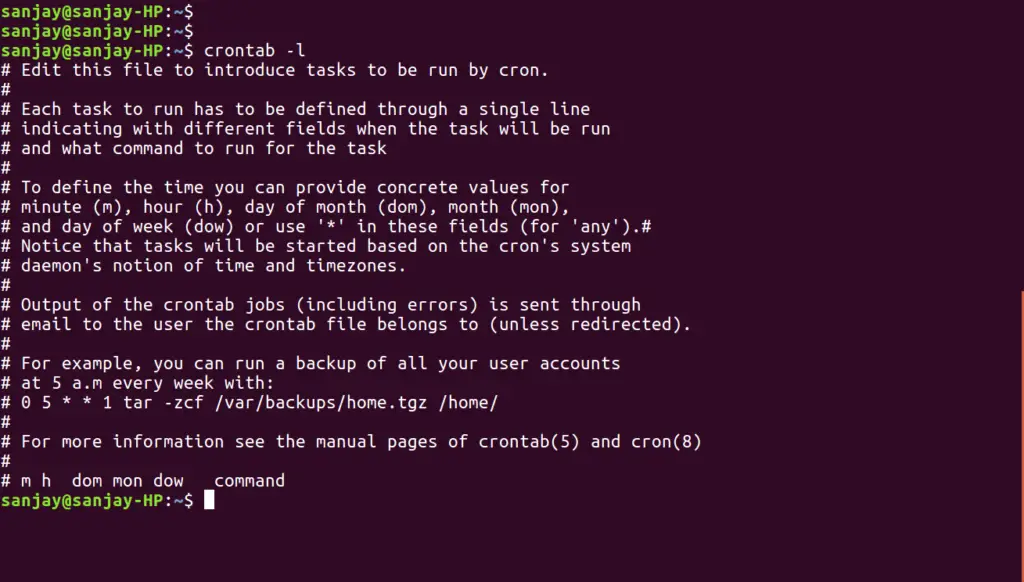
As we we can see inside this image all lines are commented, because of # symbol. So to set type command
$ crontab -e
It will open the into editor mode and then we will put our cron job command there.
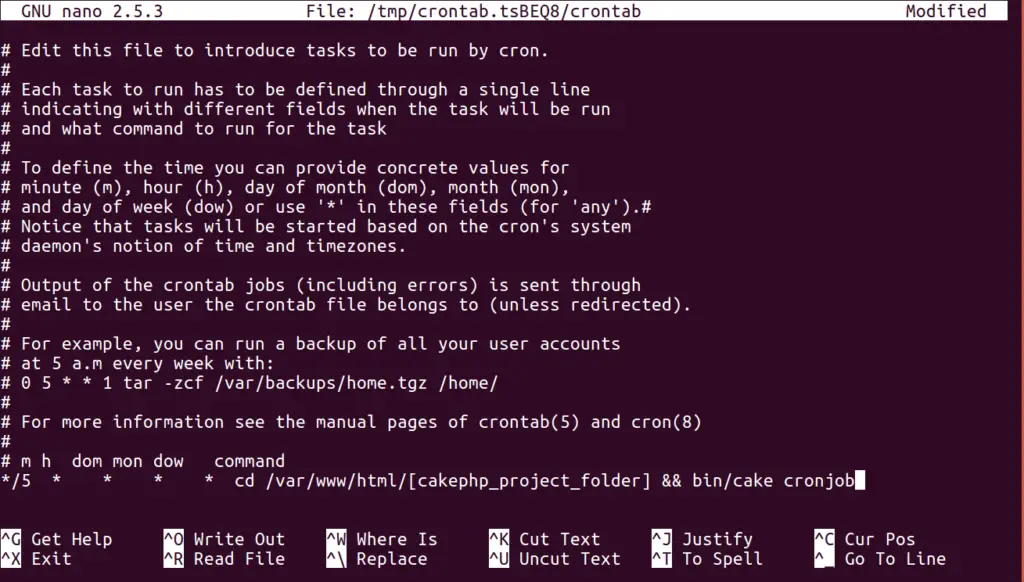
The last line you can see we have added our cron command. Now to save, press Ctrl + X and then press Y.
After save, if you press again $ crontab -l, it will show you the command of cron job what you have saved at server.
We hope this article helped you to learn about CakePHP 4 Cron Jobs in a very detailed way.
If you liked this article, then please subscribe to our YouTube Channel for PHP & it’s framework, WordPress, Node Js video tutorials. You can also find us on Twitter and Facebook.
Read more