Inside this article we will understand CakePHP 4 Run Migrations in Non Shell Environment. Article contains classified information about generating migration files for database table schema.
Non Shell Environment means executing functions without using shell / terminal etc.
Migrations are those files which creates table schema for application. In CakePHP 4, we have a class available Migrations. We will use methods of this class to run migrations in non shell environment.
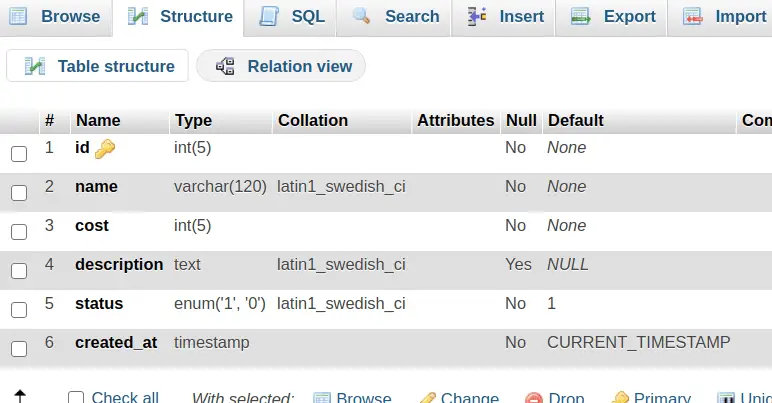
In this article we will create a table schema for products. Product table will have the columns and their attributes as –
- id [INTEGER]
- name [STRING]
- cost [INTEGER]
- description [TEXT]
- status [ENUM]
- created_at [TIMESTAMP]
use Migrations\Migrations;Above class of CakePHP 4 we will use to run migrations in non shell environment.
Learn More –
- CakePHP 4 How To Seed Data in Database Table Tutorial
- CakePHP 4 How To Seed Specific Database Seeder Tutorial
- CakePHP 4 Installation Database Error – Missing Datasource
- CakePHP 4 Remove Column From Table Using Migration
Let’s get started.
CakePHP 4 Installation
To create a CakePHP project, run this command into your shell or terminal. Make sure composer should be installed in your system.
$ composer create-project --prefer-dist cakephp/app:~4.0 mycakephp
Above command will creates a project with the name called mycakephp.
Database Connection
Open app_local.php file from /config folder. Search for Datasources. Go to default array of it.
You can add your connection details here to connect with your database. It will be like this –
//...

'Datasources' => [
        'default' => [
            'host' => 'localhost',
            /*
             * CakePHP will use the default DB port based on the driver selected
             * MySQL on MAMP uses port 8889, MAMP users will want to uncomment
             * the following line and set the port accordingly
             */
            //'port' => 'non_standard_port_number',

            'username' => 'root',
            'password' => 'sample@123',

            'database' => 'mydatabase',
            /*
             * If not using the default 'public' schema with the PostgreSQL driver
             * set it here.
             */
            //'schema' => 'myapp',

            /*
             * You can use a DSN string to set the entire configuration
             */
            'url' => env('DATABASE_URL', null),
        ],

     //...

//...
You can pass host, username, password and database.
Successfully, you are now connected with the database.
Create & Run Migration
Open project into terminal and run this command
$ bin/cake bake migration CreateProductsThis command will create a migration file inside /config/Migrations folder. File name will be prefixed with the timestamp value and look like 20220225023139_CreateProducts.php
Open migration file and write this code into it to create “products” table schema.
<?php

declare(strict_types=1);

use Migrations\AbstractMigration;

class CreateProducts extends AbstractMigration
{
    /**
     * Change Method.
     *
     * More information on this method is available here:
     * https://book.cakephp.org/phinx/0/en/migrations.html#the-change-method
     * @return void
     */
    public function change()
    {
        $table = $this->table('products', ['id' => false, 'primary_key' => ['id']]);

        $table->addColumn('id', 'integer', [
            'autoIncrement' => true,
            'limit' => 5
        ]);
        $table->addColumn('name', 'string', [
            'limit' => 120,
            'null' => false,
        ]);
        $table->addColumn('cost', 'integer', [
            'limit' => 5,
            'null' => false,
        ]);
        $table->addColumn('description', 'text', [
            'null' => true,
        ]);
        $table->addColumn('status', 'enum', [
            'values' => [1, 0],
            'default' => 1
        ]);
        $table->addColumn('created_at', 'timestamp', [
            'default' => 'CURRENT_TIMESTAMP',
            'null' => false,
        ]);

        $table->addPrimaryKey("id");
        $table->create();
    }
}
By default when we create any migration, it takes id column as a primary key. We don’t need to define into code as well. Automatically it will create an “id” column into database table.
But in case if you want your own primary key for table, then this way you can write your code for it.
First you need to disable auto creation of an “id” column to table,
$table = $this->table('products', ['id' => false, 'primary_key' => ['id']]);Run Migrations
To Run migrations in non shell environment, follow these steps.
- Use & Load Migrations Class
- Call Migrations Methods
Use & Load Migrations Class
Inside you controller or wherever you are running migrations, you can import this class.
use Migrations\Migrations;Next, we need to create an instance / object of this class to use it’s methods.
$migrations = new Migrations();Call Migration Methods
To check migration’s status like they executed or not, we have a status() method. It returns an array of all migrations and their status.
There are two types of status flags in migrations.
“up” status means migration migrated and will be available in phinxlog table. “down” status means migration rollback and table removed from database.
$status = $migrations->status();To Migrate Migrations file we use migrate() method.
$migrate = $migrations->migrate();It will return true if success. If an error occurred, an exception will be thrown. When it executes we should see “products” table in database.
We hope this article helped you to learn about CakePHP 4 Run Migrations in Non Shell Environment in a very detailed way.
If you liked this article, then please subscribe to our YouTube Channel for PHP & it’s framework, WordPress, Node Js video tutorials. You can also find us on Twitter and Facebook.
Read more