Exporting data from a MySQL database table into a CSV (Comma-Separated Values) file is a common requirement in web applications, facilitating easy data exchange and analysis. In CodeIgniter 4, implementing this functionality allows developers to seamlessly export MySQL table data into a CSV file for further processing or storage.
In this tutorial, we’ll see the comprehensive process of exporting MySQL table data into a CSV file using CodeIgniter 4.
We will consider table employees. Employees table will have the columns and their attributes as –
- id [INTEGER]
- name [STRING]
- email [STRING]
- mobile [STRING]
Read More: Step by Step How To Setup Cron Jobs in CodeIgniter 4 Tutorial
Let’s get started.
CodeIgniter 4 Installation
To create a CodeIgniter 4 setup run this given command into your shell or terminal. Please make sure composer should be installed.
composer create-project codeigniter4/appstarter codeigniter-4Assuming you have successfully installed application into your local system.
Environment (.env) Setup
When we install CodeIgniter 4, we will have env file at root. To use the environment variables means using variables at global scope we need to do env to .env
Either we can do via renaming file as simple as that. Also we can do by terminal command.
Open project in terminal
cp env .envAbove command will create a copy of env file to .env file. Now we are ready to use environment variables.
Enable Development Mode
CodeIgniter starts up in production mode by default. You need to make it in development mode to see any error if you are working with application.
Open .env file from root.
# CI_ENVIRONMENT = production

 // Do it to

CI_ENVIRONMENT = development
Now application is in development mode.
Read More: CodeIgniter 4 Send Email with Attachments Tutorial
Create Database
To create a database, either we can create via Manual tool of PhpMyadmin or by means of a mysql command.
We will use MySQL command to create database. Run this command into Sql tab of PhpMyAdmin.
CREATE DATABASE codeigniter4_app;Successfully, we have created a database.
Database Connection
Open .env file from project root.
Search for DATABASE. You should see the connection environment variables into it. Put your updated details of database connection string values.
#--------------------------------------------------------------------
# DATABASE
#--------------------------------------------------------------------

database.default.hostname = localhost
database.default.database = codeigniter4_app
database.default.username = admin
database.default.password = admin
database.default.DBDriver = MySQLi
database.default.DBPrefix =
database.default.port = 3306
Now, database successfully connected with the application.
Create Migration
To create table, we will create a migration file. Open project into terminal and run this spark command.
php spark make:migration create_employees_tableIt will create a file with name xxx_CreateEmployeesTable.php inside /app/Database/Migrations folder.
Open migration file and write this code into it.
<?php

namespace App\Database\Migrations;

use CodeIgniter\Database\Migration;

class CreateEmployeesTable extends Migration
{
	public function up()
	{
		$this->forge->addField([
			'id' => [
				'type' => 'INT',
				'constraint' => 5,
				'unsigned' => true,
				'auto_increment' => true,
			],
			'name' => [
				'type' => 'VARCHAR',
				'constraint' => '100',
				'null' => false
			],
			'email' => [
				'type' => 'VARCHAR',
				'constraint' => '50',
				'null' => false
			],
			'mobile' => [
				'type' => 'VARCHAR',
				'constraint' => '30',
				'null' => false
			]
		]);
		$this->forge->addPrimaryKey('id');
        $this->forge->createTable('employees');
	}

	public function down()
	{
		$this->forge->dropTable('employees');
	}
}
Run Migration
Back to terminal and run this command to migrate it.
php spark migrateIt will create employees table in database.
Let’s consider Test data into table.
Read More: How To Read CSV File in CodeIgniter 4 Tutorial
Sample Data Rows
We will insert some fake rows into table. There are multiple ways to insert fake rows – Using Seeder, Using Raw Query.
We will dump fake employees using a mysql query into employees table.
--
-- Dumping data for table `employees`
--

INSERT INTO `employees` (`id`, `name`, `email`, `mobile`) VALUES
(1, 'Sanjay Kumar', 'sanjay@gmail.com', '1234567895'),
(2, 'Ashish Kumar', 'ashish@gmail.com', '7412589635'),
(3, 'Vijay Kumar', 'vijay@gmail.com', '9632587410'),
(4, 'Dhananjay Negi', 'dj@gmail.com', '8529637410'),
(5, 'Ajit Kumar', 'ajit@gmail.com', '9658741230'),
(6, 'Suman Yadav', 'suman@gmail.com', '2635897410'),
(7, 'Mandeep Singh', 'mandeep@gmail.com', '8526937410'),
(8, 'Sourav Sukhla', 'sukhla.sourav@gmail.com', '8974563210'),
(9, 'Raman Singh', 'raman001@gmail.com', '8596347158'),
(10, 'Suneel Rana', 'suneel@gmail.com', '1547896304'),
(11, 'Vikram Singh', 'vikram@gmail.com', '8526934710');
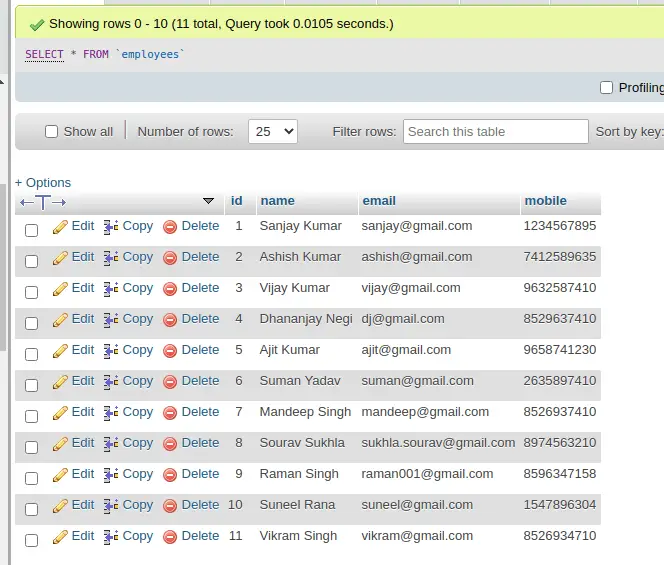
You will see, table will look like this after successful insertion.

Now, we need to dump these data into CSV format. You can consider your own data in application.
Create Model
To create a model, run this spark command into terminal.
php spark make:model Employee --suffixIt will create EmployeeModel.php inside /app/Models folder. Open file and write this complete code into it.
<?php

namespace App\Models;

use CodeIgniter\Model;

class EmployeeModel extends Model
{
	protected $DBGroup              = 'default';
	protected $table                = 'employees';
	protected $primaryKey           = 'id';
	protected $useAutoIncrement     = true;
	protected $insertID             = 0;
	protected $returnType           = 'array';
	protected $useSoftDelete        = false;
	protected $protectFields        = true;
	protected $allowedFields        = [
		'name',
		'email',
		'mobile'
	];

	// Dates
	protected $useTimestamps        = false;
	protected $dateFormat           = 'datetime';
	protected $createdField         = 'created_at';
	protected $updatedField         = 'updated_at';
	protected $deletedField         = 'deleted_at';

	// Validation
	protected $validationRules      = [];
	protected $validationMessages   = [];
	protected $skipValidation       = false;
	protected $cleanValidationRules = true;

	// Callbacks
	protected $allowCallbacks       = true;
	protected $beforeInsert         = [];
	protected $afterInsert          = [];
	protected $beforeUpdate         = [];
	protected $afterUpdate          = [];
	protected $beforeFind           = [];
	protected $afterFind            = [];
	protected $beforeDelete         = [];
	protected $afterDelete          = [];
}
Create Controller
Next, we need to create a controller file
php spark make:controller Data --suffixIt will create a file DataController.php at /app/Controllers folder.
Open file and write this complete code into it.
<?php

namespace App\Controllers;

use App\Controllers\BaseController;
use App\Models\EmployeeModel;

class DataController extends BaseController
{
	public function downloadCSVReport()
	{
		$empObject = new EmployeeModel();

		$employees = $empObject->findAll();

		header('Content-Type: text/csv; charset=utf-8');
		header('Content-Disposition: attachment; filename=employees-' . date("Y-m-d-h-i-s") . '.csv');
		$output = fopen('php://output', 'w');

		fputcsv($output, array('Id', 'Name', 'Email', 'Mobile'));

		if (count($employees) > 0) {

			foreach ($employees as $employee) {

				$employee_row = [
					$employee['id'],
					ucfirst($employee['name']),
					$employee['email'],
					$employee['mobile']
				];

				fputcsv($output, $employee_row);
			}
		}
	}
}
Read More: How To Read XML Data to JSON in CodeIgniter 4
Add Route
Open Routes.php from /app/Config folder and add this route into it.
//...

$routes->get('download-csv','DataController::downloadCSVReport');

//...
Application Testing
Open project terminal and start development server via command:
php spark serveURL: http://localhost:8080/download-csv
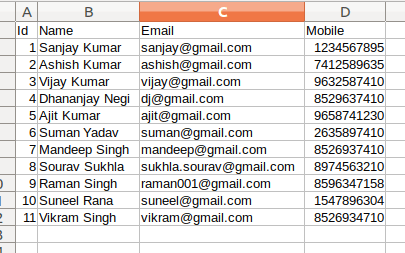
When you hit above URL, it will download a CSV file with name employees-{datetime}.csv

That’s it.
We hope this article helped you to learn about CodeIgniter 4 Export MySQL Table Data into CSV File Tutorial in a very detailed way.
Online Web Tutor invites you to try Skillshike! Learn CakePHP, Laravel, CodeIgniter, Node Js, MySQL, Authentication, RESTful Web Services, etc into a depth level. Master the Coding Skills to Become an Expert in PHP Web Development. So, Search your favourite course and enroll now.
If you liked this article, then please subscribe to our YouTube Channel for PHP & it’s framework, WordPress, Node Js video tutorials. You can also find us on Twitter and Facebook.
