Inside this article we will see the concept i.e CodeIgniter 4 How To Generate PDF From Data Tutorial. Article contains the classified information about CodeIgniter 4 Generate PDF Report.
Most of the developers get stuck while converting HTML data into a PDF document. dompdf is the library which converts HTML to PDF. It will be very interesting to learn and easy to implement.
We will include few queries which fetch data from database, render to HTML page and then download that HTML data into PDF format.
Learn More –
- Compare Dates and Times in CodeIgniter 4 Tutorial
- Complete CodeIgniter 4 Basics Tutorial
- Complete CodeIgniter 4 Generators Tutorial
- Complete CodeIgniter 4 Model Events Tutorial
Let’s get started.
CodeIgniter 4 Installation
To create a CodeIgniter 4 setup run this given command into your shell or terminal. Please make sure composer should be installed.
composer create-project codeigniter4/appstarter codeigniter-4Assuming you have successfully installed application into your local system.
Environment (.env) Setup
When we install CodeIgniter 4, we will have env file at root. To use the environment variables means using variables at global scope we need to do env to .env
Either we can do via renaming file as simple as that. Also we can do by terminal command.
Open project in terminal
cp env .envAbove command will create a copy of env file to .env file. Now we are ready to use environment variables.
Enable Development Mode
CodeIgniter starts up in production mode by default. You need to make it in development mode to see any error if you are working with application.
Open .env file from root.
# CI_ENVIRONMENT = production

 // Do it to

CI_ENVIRONMENT = development
Now application is in development mode.
Now, we need to download and setup DomPDF library to CodeIgniter 4 application.
Install & Configure DOMPdf to CodeIgnter 4
To install DOMPdf in application, we will use composer.
Back to the terminal, open application setup and run this command.
$ composer require dompdf/dompdf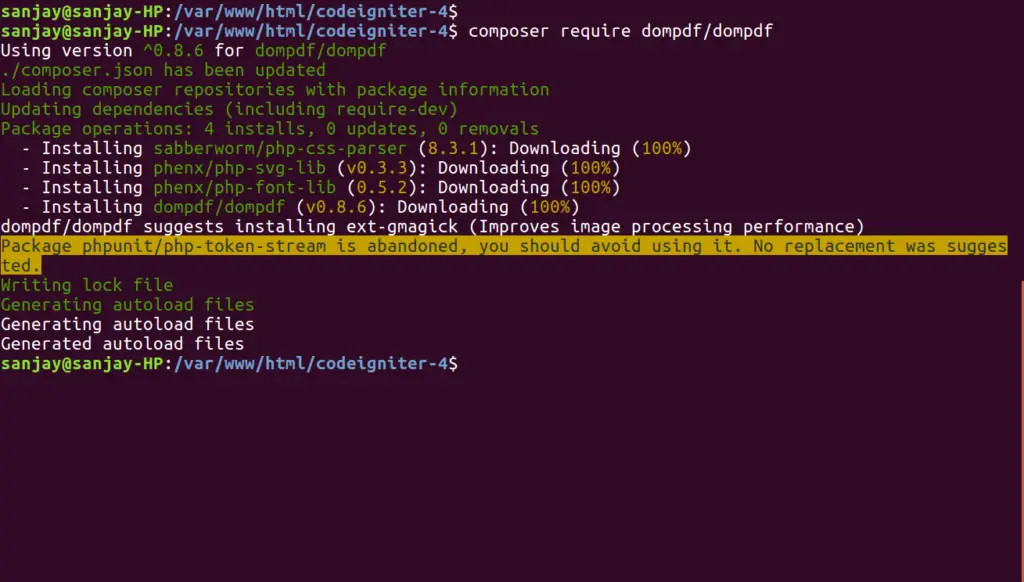
Successfully, we have installed DOMPdf library to setup.
Next, we need to do configuration to application.
Back to folder structure and open up the file Autoload.php from /app/Config folder. It’s a class file used to autoload the files.
Search for $psr4 array. Update with this given code.
//...

$psr4 = [
	    APP_NAMESPACE => APPPATH,                // For custom app namespace
	   'Config'      => APPPATH . 'Config',
       'Dompdf'      => APPPATH . 'ThirdParty/dompdf/src', // adding this
];

//...
Create Database
To create a database, either we can create via Manual tool of PhpMyadmin or by means of a mysql command.
We will use MySQL command to create database. Run this command into Sql tab of PhpMyAdmin.
CREATE DATABASE codeigniter4_app;Successfully, we have created a database.
Create Database Table
Next, we need a table. That table will be responsible to store data.
Let’s create table with some columns.
CREATE TABLE tbl_students (
    id int(11) NOT NULL AUTO_INCREMENT,
    name varchar(120) DEFAULT NULL,
    email varchar(120) DEFAULT NULL,
    mobile varchar(45) DEFAULT NULL,
    PRIMARY KEY (id)
) ENGINE=InnoDB DEFAULT CHARSET=latin1;
Successfully, we have created a table. Next, need to dump test data into it.
--
-- Dumping data for table `tbl_students`
--

INSERT INTO `tbl_students` (`id`, `name`, `email`, `mobile`) VALUES
(1, 'Sanjay Kumar', 'sanjay@gmail.com', '9632587410'),
(2, 'Vijay Kumar', 'vijay@gmail.com', '7418529630'),
(3, 'Rakesh Kumar', 'rakesh@gmail.com', '8527410963'),
(4, 'Kavita Singh', 'kavita@gmail.com', '8529647130'),
(5, 'Ashish Kumar', 'ashish@gmail.com', '7410852963'),
(6, 'Dhananjay Negi', 'dhananjay_negi@gmail.com', '7896541230'),
(7, 'Pradeep Goyal', 'pradeep_kumar@gmail.com', '1234567890'),
(8, 'Nilu Singh', 'nilu@gmail.com', '7026358941');
Run this query to created database, it will insert these dummy data into tbl_students table.
Database Connection
Open .env file from project root.
Search for DATABASE. You should see the connection environment variables into it. Put your updated details of database connection string values.
#--------------------------------------------------------------------
# DATABASE
#--------------------------------------------------------------------

database.default.hostname = localhost
database.default.database = codeigniter4_app
database.default.username = admin
database.default.password = admin
database.default.DBDriver = MySQLi
database.default.DBPrefix =
database.default.port = 3306
Now, database successfully connected with the application.
Add Routes
Open Routes.php from /app/Config folder. Add these routes into it.
//...

$routes->get("list-student", "Student::listStudent");
$routes->get("generate-pdf", "Student::generatePDF");

//...
To remove /public/index.php from URL, you can find it’s complete resource here at this link.
Create Controller
Loading url Helper
Open BaseController.php from /app/Controllers folder.
Search for $helpers, inside this helpers array simply add this url helper.
protected $helpers = ["url"];This url helper will load base_url() and site_url() functions.
$ php spark make:controller StudentIt will creates Student.php file at /app/Controllers folder.
Open Student.php and write this complete code into it.
<?php

namespace App\Controllers;

use App\Controllers\BaseController;

class Student extends BaseController
{
    public $db;

    public function __construct()
    {
        $this->db = \Config\Database::connect();
    }

    public function listStudent()
    {
        // Sending data to view file
        $data = $this->db->table("tbl_students")->get()->getResult();
        // Calling view file
        return view('list-student', [
            "students" => $data
        ]);
    }

    function generatePDF(){

        $dompdf = new \Dompdf\Dompdf();

        $data = $this->db->table("tbl_students")->get()->getResult();
        // Sending data to view file
        $dompdf->loadHtml(view('pdf/template-students', ["students" => $data]));
        // setting paper to portrait, also we have landscape
        $dompdf->setPaper('A4', 'portrait');
        $dompdf->render();
        // Download pdf
        $dompdf->stream();
        // to give pdf file name
        // $dompdf->stream("myfile");

        return redirect()->to(base_url('list-student'));
    }
}
Let’s create view file.
Create View Layouts
We need to create 2 view files –
- To List all data
- PDF HTML view
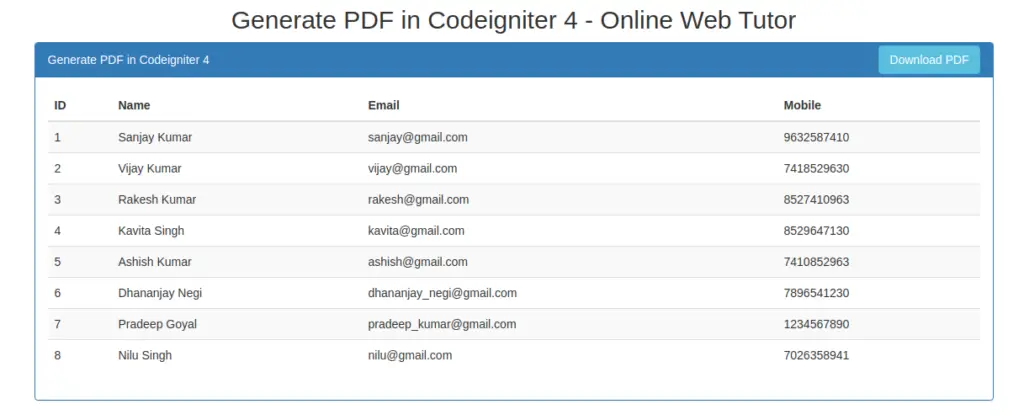
Create list-student.php inside /app/Views folder.
Open list-student.php and write this complete code into it.
<!DOCTYPE html>
<html lang="en">
<head>
  <title>Generate PDF in Codeigniter 4</title>
  <meta charset="utf-8">
  <meta name="viewport" content="width=device-width, initial-scale=1">
  <link rel="stylesheet" href="https://maxcdn.bootstrapcdn.com/bootstrap/3.4.1/css/bootstrap.min.css">
</head>
<body>

<div class="container">
  <h2 style="text-align: center;">Generate PDF in Codeigniter 4 - Online Web Tutor</h2>
  <div class="panel panel-primary">
    <div class="panel-heading">
        Generate PDF in Codeigniter 4
        <a href="<?php echo base_url('generate-pdf') ?>" class="btn btn-info pull-right" style="margin-top:-7px">
        Download PDF
      </a>
    </div>
    <div class="panel-body">
        <table class="table table-striped">
            <thead>
                <tr>
                    <th>ID</th>
                    <th>Name</th>
                    <th>Email</th>
                    <th>Mobile</th>
                </tr>
            </thead>
            <tbody>
            <?php
                if(count($students) > 0){
                    foreach($students as $index => $student){
                        ?>
                        <tr>
                            <td><?= $student->id ?></td>
                            <td><?= $student->name ?></td>
                            <td><?= $student->email ?></td>
                            <td><?= $student->mobile ?></td>
                        </tr>
                        <?php
                    }
                }
            ?>
            </tbody>
        </table>
    </div>
  </div>
</div>

</body>
</html>
Create PDF template
Create a pdf folder inside /app/Views directory.
Create a file template-students.php inside /app/Views/pdf folder.
Open template-students.php and write this complete code into it.
<!doctype html>
<html lang="en">

<head>
  <meta charset="utf-8">
  <meta name="viewport" content="width=device-width, initial-scale=1">
  <title>Codeigniter 4 PDF Generate Tutorial</title>
  <link rel="stylesheet" href="https://maxcdn.bootstrapcdn.com/bootstrap/3.4.1/css/bootstrap.min.css">
  <style>
    table th {
          background: #0c1c60 !important;
          color: #fff !important;
          border: 1px solid #ddd !important;
          line-height:15px!important;
          text-align:center!important;
          vertical-align:middle!important;

      }
      table td{line-height:15px!important; text-align:center!important;}
  </style>
</head>

<body>
  <div class="container">

    <h2>Generate PDF in Codeigniter 4 - Online Web Tutor</h2>

    <table class="table table-striped">
      <thead>
        <tr>
          <th>ID</th>
          <th>Name</th>
          <th>Email</th>
          <th>Mobile</th>
        </tr>
      </thead>
      <tbody>
        <?php
            if(count($students) > 0){
                foreach($students as $index => $student){
                    ?>
                    <tr>
                        <td><?= $student->id ?></td>
                        <td><?= $student->name ?></td>
                        <td><?= $student->email ?></td>
                        <td><?= $student->mobile ?></td>
                    </tr>
                    <?php
                }
            }
        ?>
      </tbody>
    </table>
  </div>
</body>

</html>
When we click on Download PDF button, above code will be complied and converted into PDF format.
If you want more customization, then you can add or update HTML code.
Application Testing
Open project terminal and start development server via command:
php spark serveURL – http://localhost:8080/list-student
we should get the output as
Learn about Generate Excel Report in CodeIgniter 4, Click here.
We hope this article helped you to learn about CodeIgniter 4 How To Generate PDF From Data Tutorial in a very detailed way.
If you liked this article, then please subscribe to our YouTube Channel for PHP & it’s framework, WordPress, Node Js video tutorials. You can also find us on Twitter and Facebook.
Read more