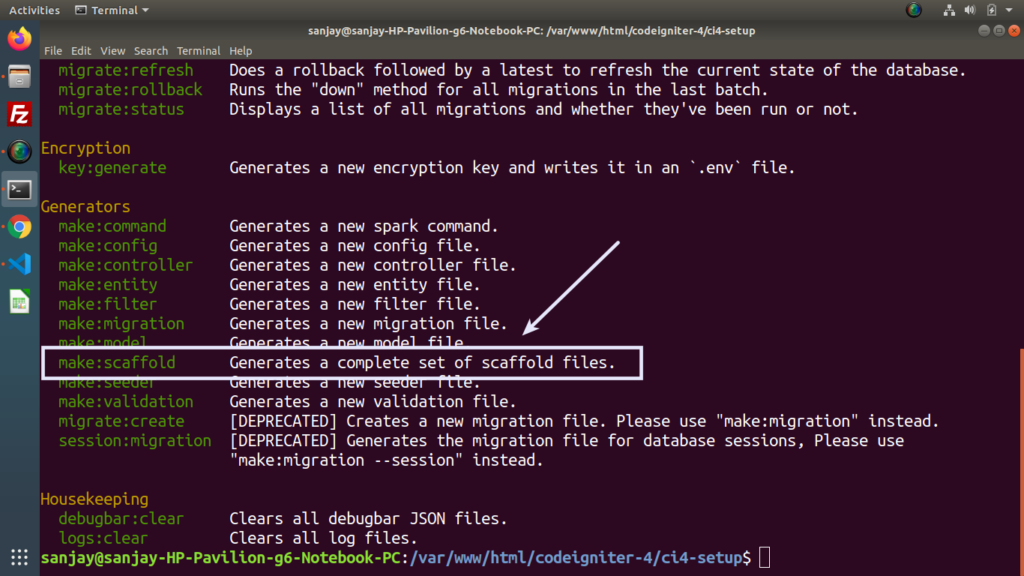
Scaffolding auto generates Controller, Model, Migration & Seeder file inside CodeIgniter 4 application. Click here for CodeIgniter 4 Generators. These are the newest features of CodeIgniter 4.
Inside this article we will see the concept of CodeIgniter 4 scaffolding generator. We will also consider an example to understand it in a very clear way.
How to use CodeIgniter 4 Scaffolding concept, we will see step by step concept. It will be very interesting topic in latest development version of CodeIgniter 4.
Learn More –
- CodeIgniter 4 Route Group Tutorial | Route Grouping
- CodeIgniter 4 Scaffolding Generator Tutorial with Example
- CodeIgniter 4 Send Email with SMTP Tutorial
- CodeIgniter 4 Send Push Notification to IOS Using Firebase
Let’s get started.
CodeIgniter 4 Installation
To create a CodeIgniter 4 setup run this given command into your shell or terminal. Please make sure composer should be installed.
composer create-project codeigniter4/appstarter codeigniter-4Assuming you have successfully installed application into your local system.
Environment (.env) Setup
When we install CodeIgniter 4, we will have env file at root. To use the environment variables means using variables at global scope we need to do env to .env
Either we can do via renaming file as simple as that. Also we can do by terminal command.
Open project in terminal
cp env .envAbove command will create a copy of env file to .env file. Now we are ready to use environment variables.
Enable Development Mode
CodeIgniter starts up in production mode by default. You need to make it in development mode to see any error if you are working with application.
Open .env file from root.
# CI_ENVIRONMENT = production

 // Do it to

CI_ENVIRONMENT = development
Now application is in development mode.
Create Database
To create a database, either we can create via Manual tool of PhpMyadmin or by means of a mysql command.
We will use MySQL command to create database. Run this command into Sql tab of PhpMyAdmin.
CREATE DATABASE codeigniter4_app;Successfully, we have created a database.
Database Connection
Open .env file from project root.
Search for DATABASE. You should see the connection environment variables into it. Put your updated details of database connection string values.
#--------------------------------------------------------------------
# DATABASE
#--------------------------------------------------------------------

database.default.hostname = localhost
database.default.database = codeigniter4_app
database.default.username = admin
database.default.password = admin
database.default.DBDriver = MySQLi
database.default.DBPrefix =
database.default.port = 3306
Now, database successfully connected with the application.
Generating Scaffolding in Application
This is the newest feature in CodeIgniter v4.x. Scaffolding simply means we will have a command by which we can generate a complete set of files which helps in application development.
Here, we will use the concept of php spark to generate scaffolding.

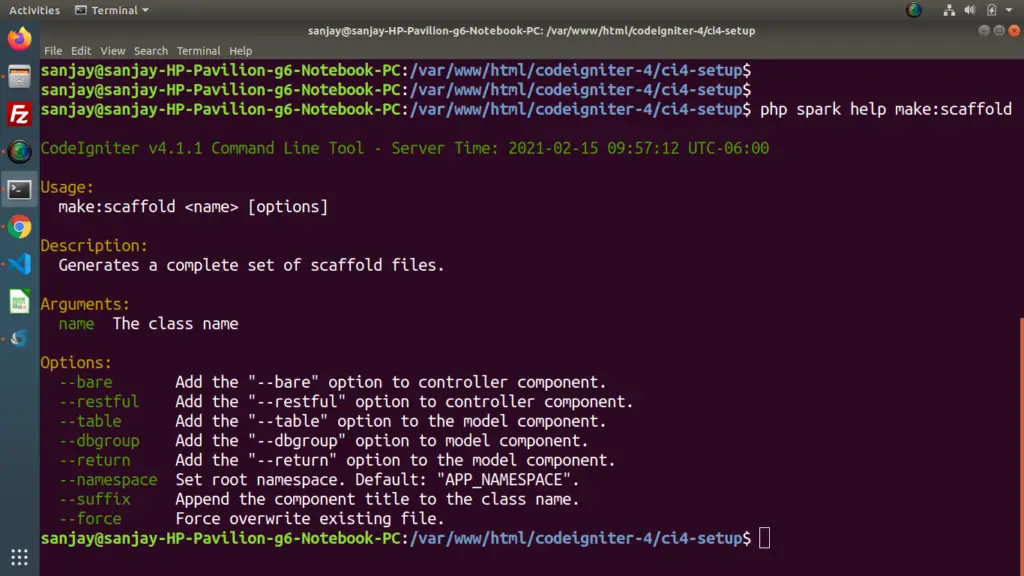
Open project into terminal and type this command. This will open the help manual guide to use make:scaffold command.
$ php spark help make:scaffold

Let’s use this command to create scaffolding files in application.
$ php spark make:scaffold Product --suffix–suffix is used to add Component name with each class name like Controller, Model etc.
It will generate 4 different files.
- Controller File – ProductController.php inside /app/Controllers
- Model File – ProductModel.php inside /app/Models
- Migration File – 2021-02-15-155935_ProductMigration.php at /app/Database/Migrations
- Seeder File – ProductSeeder.php at /app/Database/Seeds
Scaffold – Migration Settings
Open 2021-02-15-155935_ProductMigration.php from /app/Database/Migrations folder.
Copy and paste the given code into that file.
<?php

namespace App\Database\Migrations;

use CodeIgniter\Database\Migration;

class ProductMigration extends Migration
{
	public function up()
	{
		$this->forge->addField([
			"id" => [
				"type" => "INT",
				"auto_increment" => true,
				"unsigned" => true,
				"constraint" => 5
			],
			"name" => [
				"type" => "VARCHAR",
				"constraint" => 50,
				"null" => false
			],
			"description" => [
				"type" => "TEXT",
				"null" => true
			],
			"cost" => [
				"type" => "INT",
				"constraint" => 5,
				"null" => false
			],
			"product_image" => [
				"type" => "VARCHAR",
				"constraint" => 150,
				"null" => true
			]
		]);

		$this->forge->addPrimaryKey("id");
		$this->forge->createTable("products");
	}

	public function down()
	{
		$this->forge->dropTable("products");
	}
}
This file contains the table structure/scheme which we will create to store data.
Migrate Migration File
Open terminal and type this command.
$ php spark migrateIt will create a products table into database.
Scaffold – Seeder Settings
Open ProductSeeder.php from /app/Database/Seeds folder.
Copy and paste the given code into that file.
<?php

namespace App\Database\Seeds;

use CodeIgniter\Database\Seeder;
use \Faker\Factory;

class ProductSeeder extends Seeder
{
    public function run()
    {
		for($i = 0; $i < 50; $i++){
			$this->db->table("products")->insert($this->generateTestProducts());
		}
    }

    public function generateTestProducts()
    {
        $faker = Factory::create();

		return [
			"name" => $faker->sentence(2),
			"description" => $faker->sentence(10),
			"cost" => $faker->numberBetween(100, 250),
			"product_image" => $faker->imageUrl(100, 100)
		];
    }
}
This file is to seed fake data into table.
Run Seeder File to Seed Data
Open terminal and type this command.
$ php spark db:seed ProductSeederIt will seed dummy data into database table products.
Scaffold – Model Settings
Open ProductModel.php from /app/Models folder.
Copy and paste the given code into that file.
<?php

namespace App\Models;

use CodeIgniter\Model;

class ProductModel extends Model
{
	protected $DBGroup              = 'default';
	protected $table                = 'products';
	protected $primaryKey           = 'id';
	protected $useAutoIncrement     = true;
	protected $insertID             = 0;
	protected $returnType           = 'array';
	protected $useSoftDelete        = false;
	protected $protectFields        = true;
	protected $allowedFields        = [
      "name",
      "description",
      "cost",
      "product_image"
    ];

	// Dates
	protected $useTimestamps        = false;
	protected $dateFormat           = 'datetime';
	protected $createdField         = 'created_at';
	protected $updatedField         = 'updated_at';
	protected $deletedField         = 'deleted_at';

	// Validation
	protected $validationRules      = [];
	protected $validationMessages   = [];
	protected $skipValidation       = false;
	protected $cleanValidationRules = true;

	// Callbacks
	protected $allowCallbacks       = true;
	protected $beforeInsert         = [];
	protected $afterInsert          = [];
	protected $beforeUpdate         = [];
	protected $afterUpdate          = [];
	protected $beforeFind           = [];
	protected $afterFind            = [];
	protected $beforeDelete         = [];
	protected $afterDelete          = [];
}
This model file is for communication with products table.
Scaffold – Controller Settings
Open ProductController.php from /app/Controllers folder.
Copy and paste the given code into that file.
<?php

namespace App\Controllers;

use App\Controllers\BaseController;
use App\Models\ProductModel;

class ProductController extends BaseController
{
    public function index()
    {
        $product_obj = new ProductModel();

		// Select all products from table
        $products = $product_obj->findAll();

		// Send this product variable to any view file
		// ...
    }

    public function insertProduct()
    {
		$product_obj = new ProductModel();

		// Insert product row into table
		$product_obj->insert([
			"name" => "New Product",
			"description" => "Product Sample description",
			"cost" => 120,
			"product_image" => "https://product-thumbnail-url.com"
		]);
	}

	public function updateProduct(){
		$product_obj = new ProductModel();

		$product_id = 5; // ID to update

		// Update product information by product id
		$product_obj->update($product_id, [
			"name" => "Update Product",
			"description" => "Product Sample description update",
			"cost" => 50,
			"product_image" => "https://product-thumbnail-url.com"
		]);
	}

	public function deleteProduct(){
		$product_obj = new ProductModel();

		$product_id = 5; // ID to delete

		// Delete product by ID
		$product_obj->delete($product_id);
	}
}
Inside this controller file –
- index() Method – List all data from products table by Model.
- insertProduct() Method – Insert data into products table by Model
- updateProduct() Method – Update data to products table using id by Model
- deleteProduct() Method – Delete data using id by Model
Routes Configurations
Let’s configure routes for methods of Controller.
Open Routes.php from /app/Config folder.
//...

$routes->group("product", function($routes){

	// Call - <url>/product
	$routes->get("/", "ProductController::index");
	// Call - <url>/product/add-product
	$routes->get("add-product", "ProductController::insertProduct");
	// Call - <url>/product/update-product
	$routes->get("update-product", "ProductController::updateProduct");
	// Call - <url>/product/delete-product
	$routes->get("delete-product", "ProductController::deleteProduct");
});

//...
Application Testing
Open project terminal and start development server via command:
php spark serveOpen browser and type these URLs –
- List data – http://localhost:8080/product
- Insert data – http://localhost:8080/product/add-product
- Update data – http://localhost:8080/product/update-product
- Delete data – http://localhost:8080/product/delete-product
We hope this article helped you to learn CodeIgniter 4 Scaffolding Generator Tutorial with Example in a very detailed way.
If you liked this article, then please subscribe to our YouTube Channel for PHP & it’s framework, WordPress, Node Js video tutorials. You can also find us on Twitter and Facebook.
Read more