
Migration gives the structure scheme of database table. If we have an application in Codeigniter 4 in which we need database tables, better is to create tables using migrations. By creating manual database tables, it will be difficult for those cases when we switch the application from one server to another.
Inside this article we will see the complete concept of migration in codeigniter 4 tutorial. This article is totally from scratch and hope it will be very very interesting.
Learn More –
- CodeIgniter 4 PDF Generate Tutorial
- CodeIgniter 4 Database Seeding From CSV File Tutorial
- CodeIgniter 4 Database Seeding From JSON File Tutorial
- CodeIgniter 4 Drag and Drop File Upload Using Dropzone
Let’s get started for Migration in CodeIgniter 4.
CodeIgniter 4 Installation
To create a CodeIgniter 4 setup run this given command into your shell or terminal. Please make sure composer should be installed.
composer create-project codeigniter4/appstarter codeigniter-4Assuming you have successfully installed application into your local system.
Environment (.env) Setup
When we install CodeIgniter 4, we will have env file at root. To use the environment variables means using variables at global scope we need to do env to .env
Either we can do via renaming file as simple as that. Also we can do by terminal command.
Open project in terminal
cp env .envAbove command will create a copy of env file to .env file. Now we are ready to use environment variables.
Enable Development Mode
CodeIgniter starts up in production mode by default. You need to make it in development mode to see any error if you are working with application.
Open .env file from root.
# CI_ENVIRONMENT = production

 // Do it to

CI_ENVIRONMENT = development
Now application is in development mode.
Create Database
To create a database, either we can create via Manual tool of PhpMyadmin or by means of a mysql command.
We will use MySQL command to create database. Run this command into Sql tab of PhpMyAdmin.
CREATE DATABASE codeigniter4_app;Successfully, we have created a database.
Database Connection
Open .env file from project root.
Search for DATABASE. You should see the connection environment variables into it. Put your updated details of database connection string values.
#--------------------------------------------------------------------
# DATABASE
#--------------------------------------------------------------------

database.default.hostname = localhost
database.default.database = codeigniter4_app
database.default.username = admin
database.default.password = admin
database.default.DBDriver = MySQLi
database.default.DBPrefix =
database.default.port = 3306
Now, database successfully connected with the application.
Create Migrations
Basic Migration configurations we do inside /app/Config/Migrations.php file. Inside this file, we can set the values of
- Activate migration feature inside application by using public $enabled = true;
- Default table name which will be created when we migrate migrations into database, public $table = ‘migrations’; // we can change the name of it.
- Migration files when created, timestamp value will be attached with the name. So we can change that format too by public $timestampFormat = ‘Y-m-d-His_’;
In CodeIgniter 4, we have php spark commands available to work with migrations. Migrations are the php files which help us to create table scheme and manage that.
Open codeigniter 4 application into terminal and type
$ php spark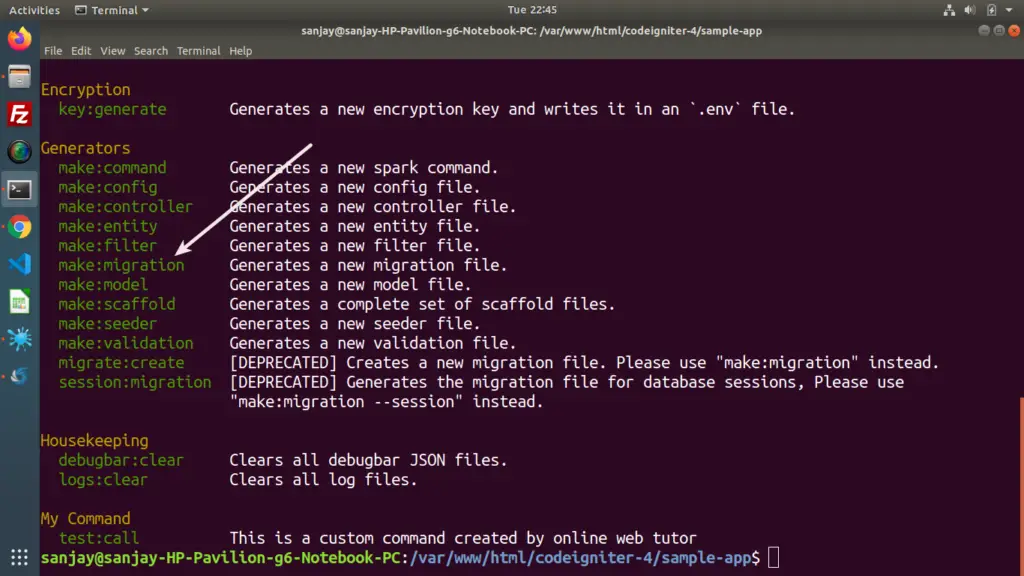
We can see into the list of available commands for migration.
When we create migration file, it will be stored inside /app/Database/Migrations folder.
Preparing Migration Files
Type this given command and hit enter.
Syntax
$ php spark make:migration <migration_name>We need to pass migration name into the command. Let’s say we want to create tables like users and products. So we will create files as add_users and add_products
- add_users, table: users
- add_products, table:products
$ php spark make:migration add_users

$ php spark make:migration add_products
The migration file name will be prefixed with a numeric sequence in the date format of YYYY-MM-DD-HHIISS. Please see the CodeIgniter documentation for a more detailed explanation.
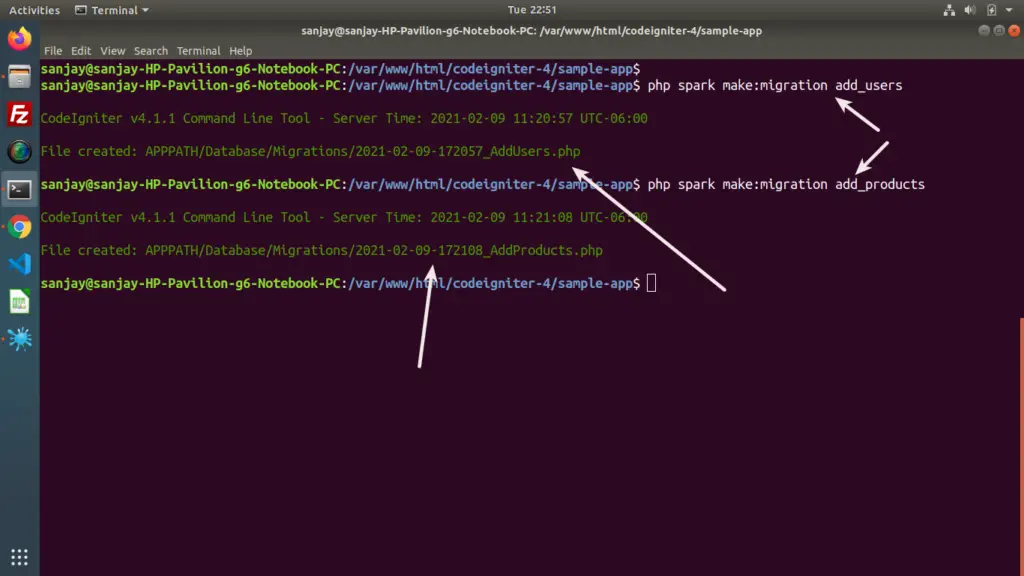
Files created for migrations as –
- 2021-02-09-172057_AddUsers.php
- 2021-02-09-172108_AddProducts.php
Migration File: 2021-02-09-172057_AddUsers.php
Write the following code into it.
<?php

namespace App\Database\Migrations;
use CodeIgniter\Database\Migration;

class AddUsers extends Migration
{
    public function up()
    {
        $this->forge->addField([
            'id' => [
                'type' => 'INT',
                'constraint' => 5,
                'unsigned' => true,
                'auto_increment' => true,
            ],
            'name' => [
                'type' => 'VARCHAR',
                'constraint' => '100',
                'null' => false
            ],
            'email' => [
                'type' => 'VARCHAR',
                'constraint' => '100',
                'null' => false,
                'unique' => true
            ],
            'updated_at' => [
                'type' => 'datetime',
                'null' => true,
            ],
        'created_at datetime default current_timestamp',
        ]);
        $this->forge->addPrimaryKey('id');
        $this->forge->createTable('users');
    }

    public function down()
    {
        $this->forge->dropTable('users');
    }
}
Migration File: 2021-02-09-172108_AddProducts.php
Write the following code into it.
<?php

namespace App\Database\Migrations;
use CodeIgniter\Database\Migration;

class AddProducts extends Migration
{
    public function up()
    {
        $this->forge->addField([
            'id' => [
                'type' => 'INT',
                'constraint' => 5,
                'unsigned' => true,
                'auto_increment' => true,
            ],
            'name' => [
                'type' => 'VARCHAR',
                'constraint' => '100',
                'null' => false
            ],
            'description' => [
                'type' => 'TEXT',
                'null' => true
			],
			'amount' => [
                'type' => 'INT',
                'constraint' => 5,
                'unsigned' => true,
			],
			'status' => [
                'type' => 'ENUM',
                'constraint' => ['1', '0'],
                'default' => '1',
            ],
            'updated_at' => [
                'type' => 'datetime',
                'null' => true,
            ],
        'created_at datetime default current_timestamp',
        ]);
        $this->forge->addPrimaryKey('id');
        $this->forge->createTable('products');
    }

    public function down()
    {
        $this->forge->dropTable('products');
    }
}
Successfully, we have created and updated migration file and their scheme.
Next, we need to migrate into database to create tables. Back to terminal.
$ php spark migrate:statusThis command will give migration status means it is migrated to database or not.
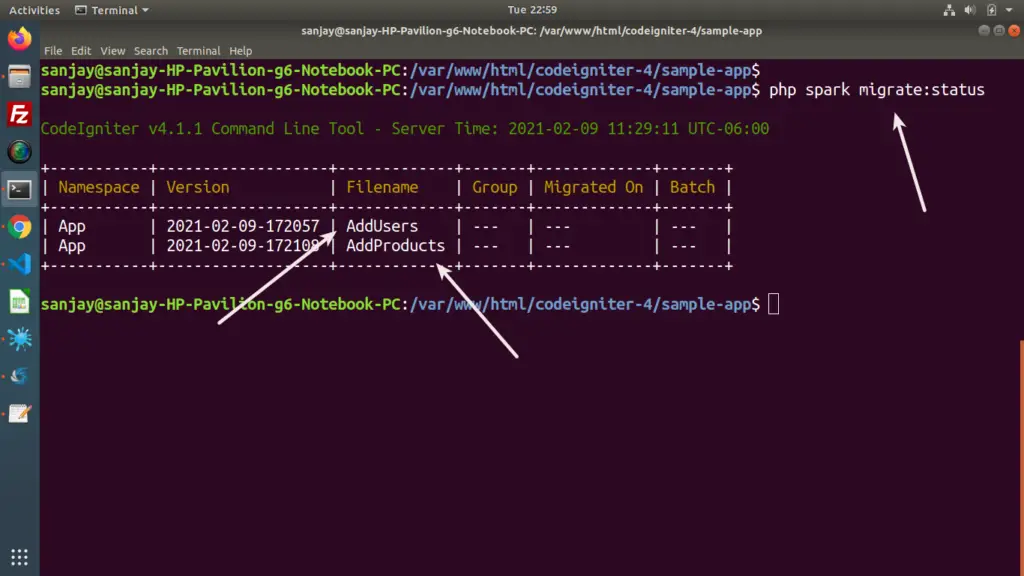
Right now, no tables migrated.
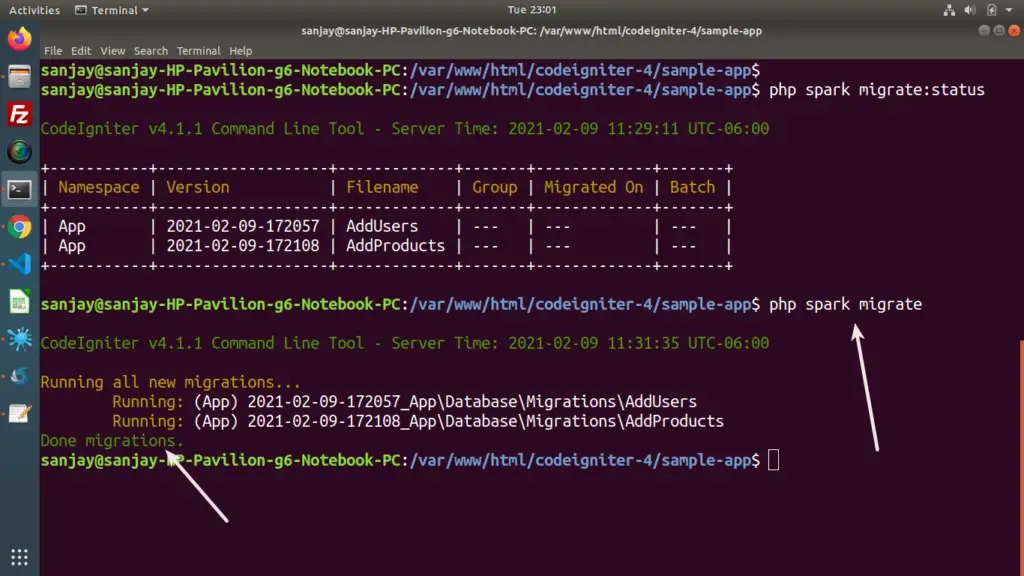
Let’s run the command to migrate.
$ php spark migrateThis command will migrate all pending migrations to database. It will basically runs up() method from each migration file.
Database Tables
Open database and you can see, tables will be created.
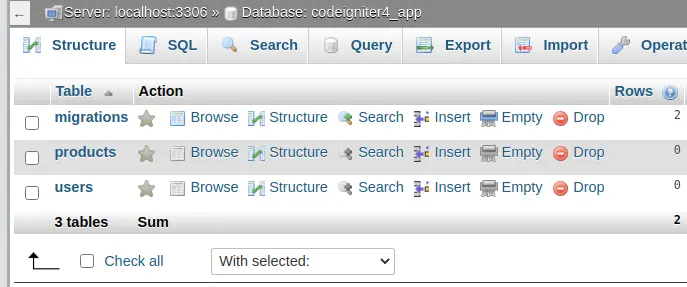
Also we can see, we have one more table in database. Because we have created only 2, so from where migrations table created?
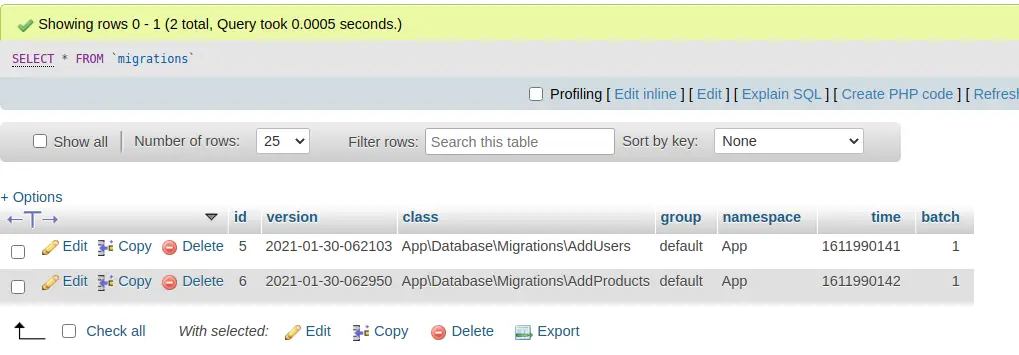
migrations table keeps track of migration file. It is by default created by codeigniter 4 application. Table rows always updates when we execute migrate or migrate:rollback. This table behind the scene helps migrate:stauts command to show the status of migration files. If migration entry is in migrations table then its migrated else it will not migrated.
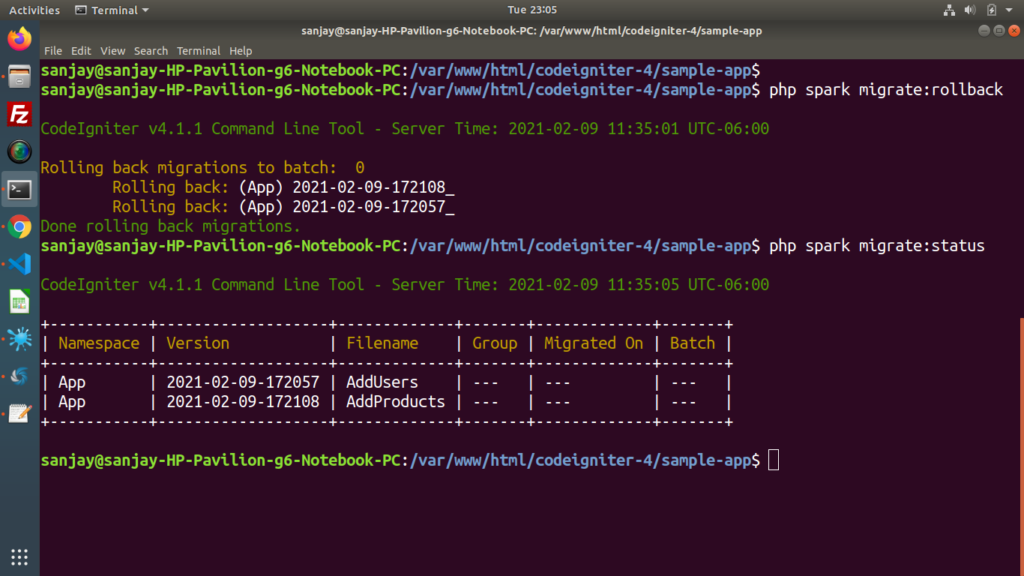
Migration Rollback Concept
This is the feature to rollback the migrations what we have run and created tables. It will drop the created tables from database. It will basically runs down() method from each migration file.
Migration Rollback command
$ php spark migrate:rollbackIt will drop the tables from database.
Migrate Refresh Concept
In the last step we have seen the detail of rollback command. So just think for a second. when we again want to migrate tables then we need to execute the command something like this –
Rollback and then create
$ php spark migrate:rollback

$ php spark migrate
We need to execute two different commands for the process of rolling and creating tables.
Now, we have a perfect solution for this i.e Same thing we will do by using a single command.
$ php spark migrate:refresh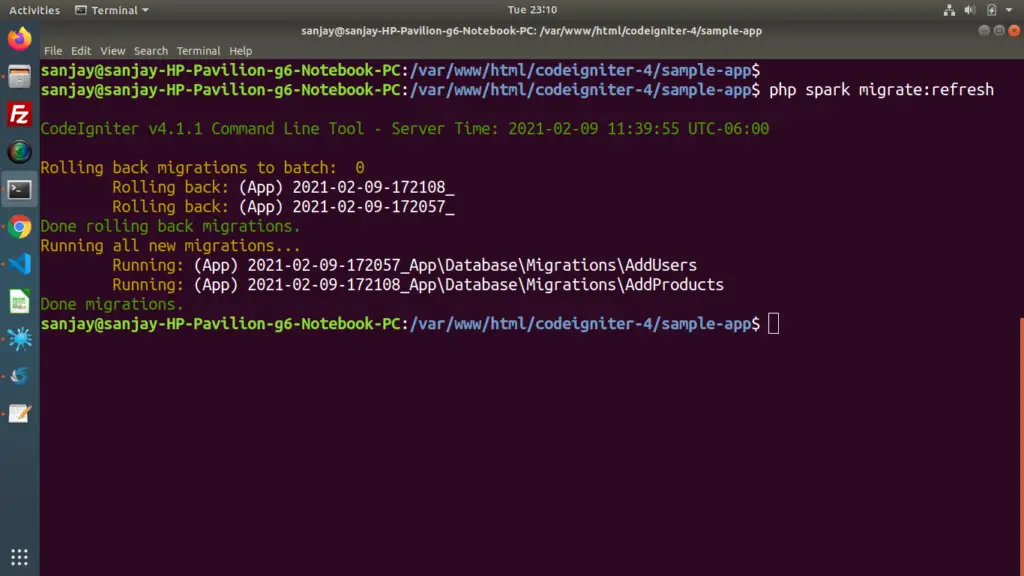
Article Summary
Inside this we have discussed the complete details about migrations in CodeIgniter 4. Now you have the concept of each command.
<strong>make:migration</strong> Creates a new migration file.
<strong>migrate:refresh</strong> Does a rollback followed by a latest to refresh the current state of the database.
<strong>migrate:rollback</strong> Runs the "down" method for all migrations in the last batch.
<strong>migrate:status</strong> Displays a list of all migrations and whether they've been run or not.
We hope this article helped you to learn about Concept of Migration in CodeIgniter 4 Tutorial in a very detailed way.
If you liked this article, then please subscribe to our YouTube Channel for PHP & it’s framework, WordPress, Node Js video tutorials. You can also find us on Twitter and Facebook.
Read more