Developers often encounter scenarios where testing or prototyping applications require interaction with external APIs that might not be available during development. In such cases, creating mock or fake REST APIs within CodeIgniter 4 serves as a valuable approach to simulate API responses, allowing seamless development and testing processes.
In this tutorial, we’ll see the comprehensive process of creating a simulated REST API server using CodeIgniter 4. This functionality empowers developers to construct a mock server that emulates API endpoints and provides simulated responses.
Read More: CodeIgniter 4 How To Read Parse JSON File Tutorial
Let’s get started.
What is CodeIgniter Fake JSON REST APIs Server
This is a kind of codeigniter application which provides you the access of fake rest apis to test and prototype any application. This is entirely free to use.
Generally, this library application is designed to accept and create fake rest apis set by a json file i.e db.json. You need to take care of the steps to create db.json file and place correctly as this tutorial guide you. By using this application you will create fake rest apis for HTTP Methods – GET, POST, PUT, PATCH, DELETE.
Guide To Faker REST APIs Server Installation
To setup this application, firstly this is built in codeigniter 4 framework so you need to install everything what codeigniter 4 requires. CodeIgniter 4 System Requirements.
Clone github repository
You need to clone this github repository to setup the entire application. Here is the command.
Open terminal or command prompt and run it.
git clone https://github.com/owthub/codeigniter-4-fake-json-rest-apis-server-using-json-file.git
Output
Cloning into 'codeigniter-4-fake-json-rest-apis-server-using-json-file'...
remote: Enumerating objects: 3061, done.
remote: Counting objects: 100% (3061/3061), done.
remote: Compressing objects: 100% (2048/2048), done.
remote: Total 3061 (delta 920), reused 3061 (delta 920), pack-reused 0
Receiving objects: 100% (3061/3061), 5.28 MiB | 468.00 KiB/s, done.
Resolving deltas: 100% (920/920), done.
It will download a folder with name codeigniter-4-fake-json-rest-apis-server-using-json-file inside your system.
Open project into terminal and run spark command to start development server
php spark serveURL: http://localhost:8080
Read More: CodeIgniter 4 How To Read Parse CSV File Tutorial
Alternative way,
Open .env file from application root. You will find this line into it.
# app.baseURL = 'SET-YOUR-APPLICATION-URL'Remove # symbol from front to use baseURL and then set your application url here.
Example
app.baseURL = 'http://localhost/codeigniter-4-fake-json-rest-apis-server-using-json-file'Open project in browser, In this case it is –
http://localhost/codeigniter-4-fake-json-rest-apis-server-using-json-fileWhile running, If you get error of permissions then you need to give a proper permission to /writable folder.
You will get welcome page as-
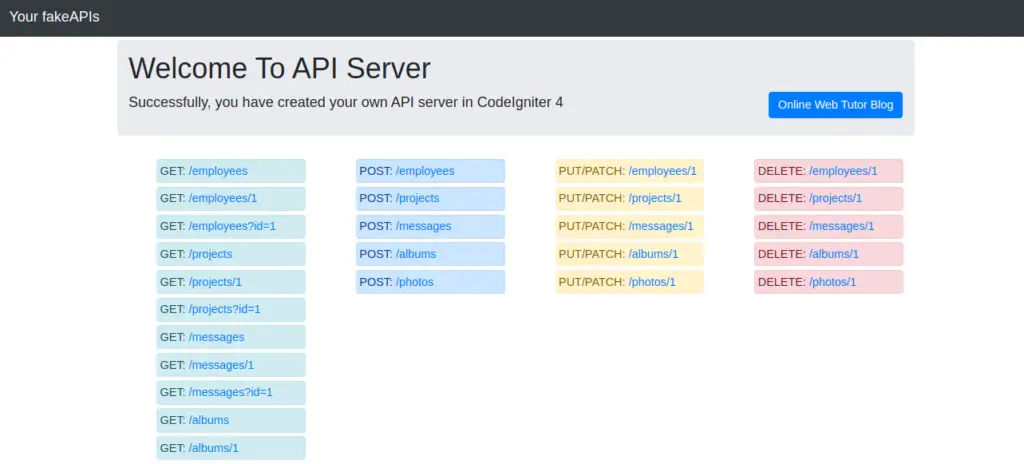
These all routes are scanned and automatically created using a db.json file. This db.json file exists inside /public/json folder of your downloaded setup. You can go and check it.
When you click on any route like /employees
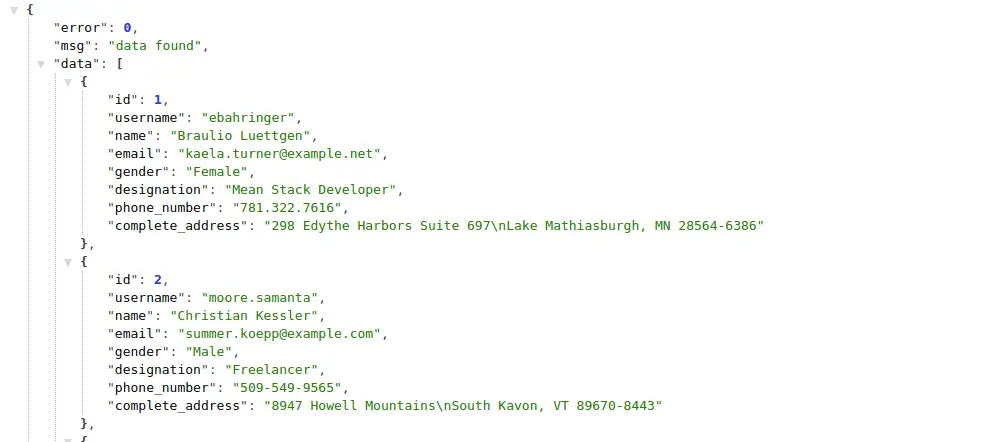
You can use this system for different different HTTP Request Methods like GET, POST, PUT/PATCH, DELETE.
Now, if you are thinking how can we override this existing system with your own data. Trust me it’s very very simple to do.
Let’s see how to setup new apis routes.
To setup new api routes you need to only replace with new db.json file.
Read More: CodeIgniter 4 How To Read XML Data to JSON Tutorial
Create db.json File
When you clone setup, you will find a file db.json inside /public/json folder. If you want something different data other than this then you need a updated db.json file. Other wise you can also work with the existing db.json file.
How To Create
db.json file is a json file as it’s extension tells you.
Routes Setup
To create resource routes you need to create json properties. For example: Routes as –
- URL/students
- URL/posts
- URL/comments
JSON format should be like this – (db.json)
{
	"students": [

	],
	"posts": [

	],
	"comments": [

	]
}
Properties Setup / Fields Setup
To make everything perfect for REST APIs, needs to add an “id” field or property with each object. Rest you can add more fields as per api needs. Other than this you can create multiple objects inside each array.
So db.json will be like this –
{
    "students": [
        {
            "id": 1,
            "name": "Sanjay Kumar",
            "email": "sanjay@gmail.com"
        },
        {
            "id": 2,
            "name": "Vijay Rohila",
            "email": "vijay@gmail.com"
        },
        {
            "id": 3,
            "name": "Dhananjay Negi",
            "email": "dhananjay@gmail.com"
        },
        {
            "id": 4,
            "name": "Ashish Kumar",
            "email": "ashish@gmail.com"
        },
        ...
    ],
    "posts": [
        {
            "id": 1,
            "title": "Sample Post 1",
            "description": "This is sample post 1"
        },
        {
            "id": 2,
            "title": "Sample Post 2",
            "description": "This is sample post 2"
        },
        ...
    ],
    "comments": [
        {
            "id": 1,
            "title": "Sample comment 1",
            "description": "This is sample comment 1"
        },
        {
            "id": 2,
            "title": "Sample comment 2",
            "description": "This is sample comment 2"
        },
        ...
    ]
}
Now, you are able to use routes as –
- URL/students – List all data
- URL/posts
- URL/comments
- URL/students/{studentId} OR URL/students?id={studentId} – List single data
- URL/posts/{postId} OR URL/posts?id={postId}
- URL/comments/{commentId} OR URL/comments?id={commentId}
Available HTTP Methods – GET, POST, PUT / PATCH, DELETE.
Relationship Setup
If you have some data like this –
- A Student have many posts
- A Post have many comments
Inside student “id” will be as a primary key identifier and inside post object “studentId” is the identifier to identify the posts. Similarly inside comments we will have “postId” inside comments object.
Syntax:
{singularResourceName}IdExample:
studentId, postIdSo you need to create db.json file like this –
{
  "students":[
    {
        "id": 1,
        "name": "Sanjay Kumar",
        "email": "sanjay@gmail.com"
    },
    ...
  ],
  "posts":[
    {
        "id": 1,
        "studentId": 1,
        "title": "Sample post 1",
        "description": "This is sample post 1"
    },
    {
        "id": 2,
        "studentId": 1,
        "title": "Sample post 2",
        "description": "This is sample post 2"
    },
    {
        "id": 3,
        "studentId": 2,
        "title": "Sample post 3",
        "description": "This is sample post 3"
    }
    ...
  ],
  "comments":[
    {
        "id": 1,
        "postId": 1,
        "title": "Sample comment 1",
        "description": "This is sample comment 1"
    },
    {
        "id": 2,
        "postId": 1,
        "title": "Sample comment 2",
        "description": "This is sample comment 2"
    },
    ...
  ]
}
Available routes for relational data
- URL/students/{studentId}/posts – List all posts by student id
- URL/students/posts?studentId={studentId}
- URL/posts/{postId}/comments – List all comments by post id
- URL/posts/comments?postId={postId}
Read More: CodeIgniter How To Send Email with Multiple Attachments
Final Words
Inside this codeigniter 4 fake json rest api server, you need to keep these things while creating db.json file. This db.json file is the main file for your fake apis as well as it is decider for ret apis endpoints.
- Routes should be created in plural and they should be the name of property inside object like
{ "students": [], "posts": [], … }- First value of any object should be an “id” field. Rest you can define any number of keys as per apis need.
{ "students": [ { "id": 1, "name": "Sample" }, { "id": 2, "name": "Sample" } ], … }- Relationship between resources as “id” for their tables and {singular}Id as for others to connect. Like “id” inside students, but for posts it will be “studentId” which connects two resources students and posts.
- db.json file should placed inside /public/json folder.
- Resources names should be plural.
- When you execute POST, PUT/PATCH, DELETE request with fake apis, they will execute even they will return a perfect json output but they don’t do anything at server. Means they don’t save, update or delete anything in real.
That’s it.
We hope this article helped you to learn about CodeIgniter 4 How To Create Fake REST APIs Server Example Tutorial in a very detailed way.
If you liked this article, then please subscribe to our YouTube Channel for PHP & it’s framework, WordPress, Node Js video tutorials. You can also find us on Twitter and Facebook.
Read more