Creating personalised validation rules in your CodeIgniter 4 applications is critical for assuring data accuracy and user input integrity. By creating custom rules tailored to your project’s specific needs, you not only improve the precision of your validation process but also streamline the entire operation of your application.
When we create a form in any type of application then we need to validate form input fields. We can’t trust on the values entered by end users. Because sometimes we will receive valid values but 80-90% times we receive invalid too.
Read More: CodeIgniter 4 How to Work with Redirection Tutorial
In this in-depth tutorial, we will negotiate the complexities of CodeIgniter 4’s validation system, delving into the art of implementing custom validation rules in codeigniter 4. We’ll walk you through every step of the process, from laying the groundwork to smoothly integrating these rules into your validation routine.
Let’s get started.
CodeIgniter 4 Installation
To create a CodeIgniter 4 setup run this given command into your shell or terminal. Please make sure composer should be installed.
composer create-project codeigniter4/appstarter codeigniter-4Assuming you have successfully installed application into your local system.
Environment (.env) Setup
When we install CodeIgniter 4, we will have env file at root. To use the environment variables means using variables at global scope we need to do env to .env
Either we can do via renaming file as simple as that. Also we can do by terminal command.
Open project in terminal
cp env .envAbove command will create a copy of env file to .env file. Now we are ready to use environment variables.
Enable Development Mode
CodeIgniter starts up in production mode by default. You need to make it in development mode to see any error if you are working with application.
Open .env file from root.
# CI_ENVIRONMENT = production

 // Do it to

CI_ENVIRONMENT = development
Now application is in development mode.
Register Custom Validation Rule
First you have to create validation file and then register.
Example #1: Create Validation File (Mobile Validation)
Purpose: This validation rule basically checks the pattern of mobile number, length and then validate it.
Open project terminal and run this command,
php spark make:validation Mobile --suffixIt will create a file with name MobileValidation.php inside /app/Validation folder. Validation folder was not available before running above command but when it generated validation file. It also created that folder as well.
Open MobileValidation.php file and write this piece of code into it.
<?php

namespace App\Validation;

class MobileValidation
{
    public function checkMobile($value, string &$error = null): bool
    {
        /*Checking: Number must start from 5-9{Rest Numbers}*/
        if(preg_match( '/^[5-9]{1}[0-9]+/', $value)){

            /*Checking: Mobile number must be of 10 digits*/
            if(!preg_match('/^[0-9]{10}+$/', $value)){

                $error = "Mobile number is not valid";
                return false;
            }
            return true;
        }else{
            return false;
        }
    }
}
Read More: How To Cache Database Query Using CodeIgniter Cache?
Example #2: Create Validation File (Full Name Validation)
Purpose: Full name validation rule checks the name input by user. If name value will be of any from pre-defined list of names then name will not be allowed.
Open project terminal and run this command,
php spark make:validation Name --suffixIt will create a file with name NameValidation.php inside /app/Validation folder. Validation folder was not available before running above command but when it generated validation file. It also created that folder as well.
Open NameValidation.php file and write this piece of code into it.
<?php

namespace App\Validation;

class NameValidation
{
    public function valid_name($value, string &$error = null): bool
    {
        $not_allowed_names = ["sanjay", "dhananjay", "siddharth"];

        $value = strtolower($value); // input value into lowercase

        if(in_array($value, $not_allowed_names)){

            // If "value" exists in list, name will not be allowed for user.
            $error = "Name is already taken, try other name";
            return false;
        }
        return true;
    }
}
Register Custom Validation Class
Load custom validation to application.
Open Validation.php file from /app/Config folder. Inside this you have to register your custom validation rules.
Search for $ruleSets
//...

# Add at header
use \App\Validation\MobileValidation;
use \App\Validation\NameValidation;

/**
* Stores the classes that contain the
* rules that are available.
*
* @var string[]
*/
public array $ruleSets = [
    Rules::class,
    FormatRules::class,
    FileRules::class,
    CreditCardRules::class,
    MobileValidation::class, // custom rule
    NameValidation::class, // custom rule
];

//...
Now,
Concept to Use: Custom Validation Rule
Use Custom added validation rules.
Let’s say we have a form in which we have a input field for mobile number and full name. Next, we need to add form validation rules in code where we are submitting form data.
"mobile" => "required|checkMobile"

"name"   => "required|valid_name"
Here, as we can see we have two different rules for input type mobile.
- required is the predefined validation rule in codeigniter 4
- checkMobile is custom rule added to check a valid mobile number.
- valid_name is also a custom rule added to check the name input fill by user.
Usage: Setup Controller
Next we need to setup application controller.
Loading url Helper
Open BaseController.php from /app/Controllers folder. Search for $helpers, inside this helpers array simply add this url helper.
protected $helpers = [‘url’];
This url helper will provide base_url() and site_url() functions to use.
Also we have the option to load any helper directly to any controller using helper() function.
Back to terminal and run this spark command.
php spark make:controller Member --suffixIt will create MemberController.php inside /app/Controllers folder. Open MemberController.php and write this complete code into it.
<?php

namespace App\Controllers;

class MemberController extends BaseController
{
    public function addMember()
    {
        helper(["url"]);

        if ($this->request->getMethod() == "post") {

            $rules = [
                "name" => "required|valid_name", // custom rule
                "email" => "required|valid_email",
                "mobile" => "required|checkMobile", // custom rule
            ];

            if (!$this->validate($rules)) {

                return view("add-member", [
                    "validation" => $this->validator,
                ]);
            } else {

                $data = [
                    "name" => $this->request->getVar("name"),
                    "email" => $this->request->getVar("email"),
                    "mobile" => $this->request->getVar("mobile"),
                ];

                // Concept to insert into database table

                return redirect()->to('add-member');
            }
        }
        return view("add-member");
    }
}
All available form validation rules for input fields Click here to go.
Read More: How To Create Multilingual Website in CodeIgniter 4
Code Explanation
- if ($this->request->getMethod() == “post”) {} – Checking request method type. Same method we are using for GET and POST.
- $rules = [] – Defining rules for input fields
- if (!$this->validate($rules)) {} – Validating input field with rules and messages. It returns false when input fields not satisfies the defined rules of $rules = []; If it satisfies all conditions then return true value.
- “validation” => $this->validator – Validator returns the form validation error message, we are simply assigning to validation key.
- $this->request->getVar(“name”) – Reading value of input field with “name” attribute.
- return redirect()->to(‘add-member’); – Redirecting to application to /add-member page.
Create Layout File
Let’s create a view file add-member.php inside /app/Views folder.
Open file and write this complete code into it.
<!DOCTYPE html>
<html lang="en">

<head>
    <title>CodeIgniter 4 Form Validation Example Tutorial</title>
    <meta charset="utf-8">
    <meta name="viewport" content="width=device-width, initial-scale=1">
    <link rel="stylesheet" href="https://maxcdn.bootstrapcdn.com/bootstrap/3.4.1/css/bootstrap.min.css">
    <script src="https://ajax.googleapis.com/ajax/libs/jquery/3.6.4/jquery.min.js"></script>
    <script src="https://maxcdn.bootstrapcdn.com/bootstrap/3.4.1/js/bootstrap.min.js"></script>

    <style>
        p.error{
            color:red;
        }
    </style>
</head>

<body>

    <div class="container">
        <h3>Add Member</h3>
        <div class="panel panel-primary">
            <div class="panel-heading">Add Member</div>
            <div class="panel-body">
                <form class="form-horizontal" method="post" action="<?php echo base_url('add-member'); ?>">
                    <div class="form-group">
                        <label class="control-label col-sm-2" for="name">Name:</label>
                        <div class="col-sm-6">
                            <input type="text" class="form-control" id="name" name="name" placeholder="Enter name">
                            <?php
                            if (isset($validation) && $validation->hasError('name')){
                                ?>
                            <p class="error"><?php echo $validation->getError('name'); ?></p>
                            <?php
                            }
                            ?>
                        </div>
                    </div>
                    <div class="form-group">
                        <label class="control-label col-sm-2" for="email">Email:</label>
                        <div class="col-sm-6">
                            <input type="email" class="form-control" id="email" name="email" placeholder="Enter email">
                            <?php
                            if (isset($validation) && $validation->hasError('email')){
                                ?>
                            <p class="error"><?php echo $validation->getError('email'); ?></p>
                            <?php
                            }
                            ?>
                        </div>
                    </div>
                    <div class="form-group">
                        <label class="control-label col-sm-2" for="mobile">Mobile:</label>
                        <div class="col-sm-6">
                            <input type="text" class="form-control" id="mobile" name="mobile"
                                placeholder="Enter mobile">
                            <?php
                            if (isset($validation) && $validation->hasError('mobile')){
                                ?>
                            <p class="error"><?php echo $validation->getError('mobile'); ?></p>
                            <?php
                            }
                            ?>
                        </div>
                    </div>
                    <div class="form-group">
                        <div class="col-sm-offset-2 col-sm-10">
                            <button type="submit" class="btn btn-success">Submit</button>
                        </div>
                    </div>
                </form>
            </div>
        </div>
    </div>

</body>

</html>
Code Explanation
- base_url(‘add-member’) – Site URL with add-member route
- if(isset($validation)){} – Checking validation variable if it contains any error
- $validation->hasError(‘mobile’) – Checking for error message for mobile specific field
- $validation->getError(‘mobile’) – Print the validation error message for mobile field.
Application Testing
Open project terminal and start development server via command:
php spark serveURL: http://localhost:8080/add-member
Form submit with invalid values,
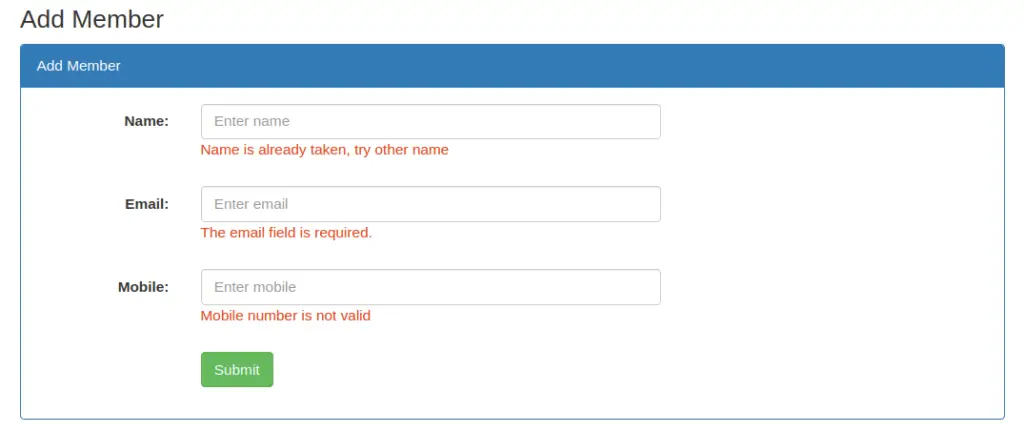
That’s it.
We hope this article helped you to learn about CodeIgniter 4 Create Custom Validation Rule Tutorial in a very detailed way.
If you liked this article, then please subscribe to our YouTube Channel for PHP & it’s framework, WordPress, Node Js video tutorials. You can also find us on Twitter and Facebook.
Read more