Today we see generally sites come with multi language. Inside this article we will see the concept to create Multi language website in Laravel 8. Multi language in laravel is termed as Laravel Localization.
Laravel Multi language Website guide step by step tutorial.
Learn More –
- Concept of Global Middleware in Laravel 8 Tutorial
- Concept of Group Middleware in Laravel 8 Tutorial
- Concept of Route Group in Laravel 8 Tutorial
- Concept of Route Middleware in Laravel 8 Tutorial
Let’s get started the concept of Laravel 8 Localization.
Laravel Installation
We will create laravel project using composer. So, please make sure your system should have composer installed. If not, may be this article will help you to Install composer in system.
Here is the command to create a laravel project-
composer create-project --prefer-dist laravel/laravel blog
To start the development server of Laravel –
php artisan serve
URL: http://127.0.0.1:8000
Assuming laravel already installed inside your system.
Language Localization – Creating Language Files
Language files are those files which stores key value pairs of texts.
As per the language, we need to create language folders in /resources/lang/<language-code>.
We are going to create 2 folders(en – English, es-Spanish) as per the language what we have taken. You can create these folders, as per your selected languages. You can name these folders as per the code of locale. Also these codes we will use into URL redirection in few minutes.
/resources/lang/en, /resources/lang/es
Next, we need to create language file which stores languages keys and respective texts. Creating message.php into all folders. This is user defined file name. It will use to call the keys.
/resources/lang/en/message.php – English Language
<?php
return [
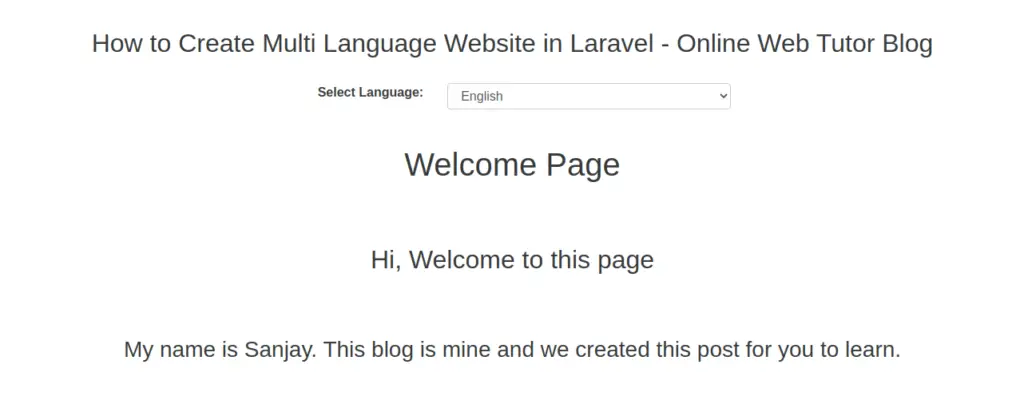
'page_title' => 'Welcome Page',
'welcome_message' => 'Hi, Welcome to this page',
'author_information' => 'My name is Sanjay. This blog is mine and we created this post for you to learn.',
];
/resources/lang/es/message.php– Spanish Language
<?php
return [
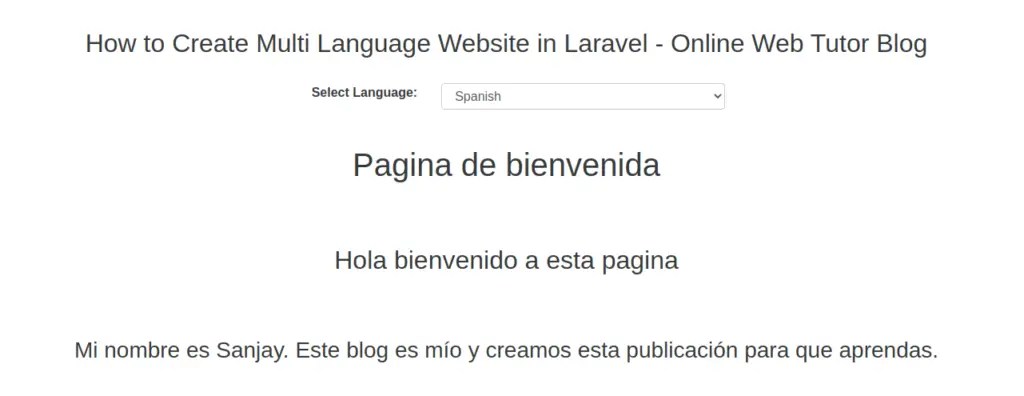
'page_title' => 'Pagina de bienvenida',
'welcome_message' => 'Hola bienvenido a esta pagina',
'author_information' => 'Mi nombre es Sanjay. Este blog es mío y creamos esta publicación para que aprendas.',
];
Successfully, we have configured language files in their respective folders.
Configure Application Routes
Open web.php from /routes folder and write these codes into it.
<?php

use App\Http\Controllers\LocalizationController;
use Illuminate\Support\Facades\Route;

Route::get('/', [LocalizationController::class, "index"]);
Route::get('change/lang', [LocalizationController::class, "lang_change"])->name('LangChange');
Create Application Controller
We need to create a controller for application. We are creating LocalizationController.php file at /app/Http/Controllers/.
$ php artisan make:controller LocalizationController
Open up the file paste the given code into it.
<?php

namespace App\Http\Controllers;
use Illuminate\Http\Request;
use Illuminate\Support\Facades\App;

class LocalizationController extends Controller
{
    public function index()
    {
        return view('language');
    }
    public function lang_change(Request $request)
    {
        App::setLocale($request->lang);
        session()->put('locale', $request->lang);
        return view('language');
    }
}- On changing language with locale code, we are setting it’s value to App as well as we are putting into session. This will be used to detect which locale we are using.
- session()->put() is used to save the locale code.
Blade Template – Layout Settings
Create a file inside /resources/views/. File name language.blade.php
Open up the file from /resources/views/language.blade.php and write the following code.
<!DOCTYPE html>
<html>
<head>
    <title>How to Create Multi Language Website in Laravel - Online Web Tutor Blog</title>
    <meta charset="utf-8">
    <meta http-equiv="X-UA-Compatible" content="IE=edge">
    <meta name="viewport" content="width=device-width, initial-scale=1">
    <link href="https://cdnjs.cloudflare.com/ajax/libs/twitter-bootstrap/4.0.0-alpha/css/bootstrap.css" rel="stylesheet">
    <script src="https://ajax.googleapis.com/ajax/libs/jquery/3.5.1/jquery.min.js"></script>
</head>
<body>
    <div class="container">
        <div class="row" style="text-align: center;margin-top: 40px;">
            <h2>How to Create Multi Language Website in Laravel - Online Web Tutor Blog</h2><br>
            <div class="col-md-2 col-md-offset-3 text-right">
                <strong>Select Language: </strong>
            </div>
            <div class="col-md-4">
                <select class="form-control Langchange">
                    <option value="en" {{ session()->get('locale') == 'en' ? 'selected' : '' }}>English</option>
                    <option value="es" {{ session()->get('locale') == 'es' ? 'selected' : '' }}>Spanish</option>
                </select>
            </div>
            <h1 style="margin-top: 80px;">{{ __('message.page_title') }}</h1>
            <h2 style="margin-top: 80px;">{{ __('message.welcome_message') }}</h2>
            <h3 style="margin-top: 80px;">{{ __('message.author_information') }}</h3>
        </div>
    </div>
</body>

<script type="text/javascript">
    var url = "{{ route('LangChange') }}";
    $(".Langchange").change(function(){
        window.location.href = url + "?lang="+ $(this).val();
    });
</script>
</html>- session()->get(‘locale’) is used to get the locale value saved in session.
- {{ __(‘message.page_title’) }}, here page_title key is read from message.php file so that’s why we have included message.page_title.
- There are also several alternatives to print the translated value into the blade template files. {{ __(‘message.page_title’) }}, {{ trans(‘message.page_title’) }}, @lang(‘message.page_title’)
- On selecting drop down value, we are redirecting page window.location.href = url + “?lang=”+ $(this).val(); On the basis of selected locale it picks the message.php file from either of /en/message.php or /es/message.php
Application Testing
Run this command into project terminal to start development server,
php artisan serveURL- http://127.0.0.1:8000
When we select Spanish language from dropdown, it will add a query string with the language locale code and we will see as
We hope this article helped you to learn about How to Create Multi Language Website in Laravel 8 in a very detailed way.
If you liked this article, then please subscribe to our YouTube Channel for PHP & it’s framework, WordPress, Node Js video tutorials. You can also find us on Twitter and Facebook.
Read more