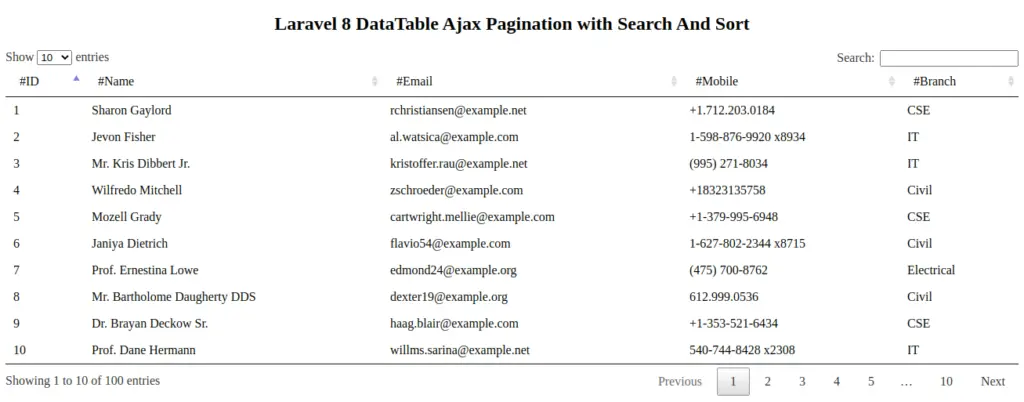
Inside this article we will learn about Laravel 8 DataTable Ajax Pagination with Search and Sort. We will create server side data listing in laravel 8 with all features of searching and sorting. Server side pagination using Ajax in Laravel 8.
Learn More –
- Concept of Route Model Binding in Laravel 8 with Example
- Concept of Trait in Laravel 8 Tutorial with Example
- Create Custom 404 Page in Laravel 8 | Page Not Found
- Create Custom Facade Class in Laravel 8 Tutorial
Let’s get started.
Laravel Installation
We will create laravel project using composer. So, please make sure your system should have composer installed. If not, may be this article will help you to Install composer in system.
Here is the command to create a laravel project-
composer create-project --prefer-dist laravel/laravel blog
To start the development server of Laravel –
php artisan serve
URL: http://127.0.0.1:8000
Assuming laravel already installed inside your system.
Create Database & Connect
To create a database, either we can create via Manual tool of PhpMyadmin or by means of a mysql command.
CREATE DATABASE laravel_app;
To connect database with application, Open .env file from application root. Search for DB_ and update your details.
DB_CONNECTION=mysql
DB_HOST=127.0.0.1
DB_PORT=3306
DB_DATABASE=laravel_app
DB_USERNAME=root
DB_PASSWORD=root
Create Migration To Generate Table
To create migration file for table we need to run few simple php artisan command. Let’s say we need to table called students. Back to terminal, so command will be –
# Migration command to create table

$ php artisan make:migration create_students_table
Open up the migration file and do the following code –
<?php

use Illuminate\Database\Migrations\Migration;
use Illuminate\Database\Schema\Blueprint;
use Illuminate\Support\Facades\Schema;

class CreateStudentsTable extends Migration
{
    /**
     * Run the migrations.
     *
     * @return void
     */
    public function up()
    {
        Schema::create('students', function (Blueprint $table) {
            $table->id();
            $table->string("name", 120);
            $table->string("email", 50)->nullable();
            $table->string("mobile", 50)->nullable();
            $table->enum("branch", ["CSE", "Mechanical", "Civil", "Electrical", "IT"]);
            $table->timestamp("created_at")->useCurrent();
            $table->timestamp("updated_at")->useCurrent();
        });
    }

    /**
     * Reverse the migrations.
     *
     * @return void
     */
    public function down()
    {
        Schema::dropIfExists('students');
    }
}
Next, we need to migrate into database. Back to terminal and type the command –
# Migrate all migrations to database

$ php artisan migrate
It will run all pending migrations & generate tables in database.
Generate Model & Factory Class Files
To generate a model, factory file separately, then we have php artisan command for each. But in case if we need to generate all these by the help of a single command, we also have. Back to terminal
# Command to generate Model& Factory (f)

$ php artisan make:model Student -f
After running this we should have these files and their locations.
- Student.php Model at /app/Models/
- StudentFactory.php at /database/factories/
Application Model Settings
Find Student.php Model at /app/Models/. Open up into editor and paste the given following code.
<?php

namespace App\Models;

use Illuminate\Database\Eloquent\Factories\HasFactory;
use Illuminate\Database\Eloquent\Model;

class Student extends Model
{
    use HasFactory;

    protected $fillable = [
        'name', 'email', 'mobile', 'branch',
    ];
}
Generating Test Data in Laravel
Open StudentFactory.php from /database/factories/
<?php

namespace Database\Factories;

use App\Models\Student;
use Illuminate\Database\Eloquent\Factories\Factory;

class StudentFactory extends Factory
{
    /**
     * The name of the factory's corresponding model.
     *
     * @var string
     */
    protected $model = Student::class;

    /**
     * Define the model's default state.
     *
     * @return array
     */
    public function definition()
    {
        return [
            "name" => $this->faker->name(),
            "email" => $this->faker->safeEmail,
            "mobile" => $this->faker->phoneNumber,
            "branch" => $this->faker->randomElement([
                "CSE", "Mechanical", "Civil", "Electrical", "IT",
            ])
        ];
    }
}
Loading Factory File into DatabaseSeeder
Open up DatabaseSeeder.php from /database/seeders/
<?php

namespace Database\Seeders;

use Illuminate\Database\Seeder;
use Database\Seeders\StudentSeeder;
use App\Models\Student;

class DatabaseSeeder extends Seeder
{
    /**
     * Seed the application's database.
     *
     * @return void
     */
    public function run()
    {
         \App\Models\Student::factory(100)->create();
    }
}
Now, Command to seed data
# Command to Seed Data

$ php artisan db:seed
When we run above command, then 100 test rows will be inserted into Model’s respective Database Table.
Configure Application Routes
Open web.php from /routes folder and write these codes into it.
<?php

use App\Http\Controllers\StudentsController;
use Illuminate\Support\Facades\Route;

Route::get('/', [StudentsController::class, "index"]);
Route::get('students/getStudents/', [StudentsController::class, "getStudents"])->name('students.getStudents');
Create Application Controller
We need to create a controller for application. We are creating StudentsController.php file at /app/Http/Controllers/.
$ php artisan make:controller StudentsController
Open up the file paste the given code into it.
<?php

namespace App\Http\Controllers;

use App\Models\Student;
use Illuminate\Http\Request;

class StudentsController extends Controller
{
    public function index()
    {
        return view('students.index');
    }

    /* Process ajax request */
    public function getStudents(Request $request)
    {
        $draw = $request->get('draw');
        $start = $request->get("start");
        $rowperpage = $request->get("length"); // total number of rows per page

        $columnIndex_arr = $request->get('order');
        $columnName_arr = $request->get('columns');
        $order_arr = $request->get('order');
        $search_arr = $request->get('search');

        $columnIndex = $columnIndex_arr[0]['column']; // Column index
        $columnName = $columnName_arr[$columnIndex]['data']; // Column name
        $columnSortOrder = $order_arr[0]['dir']; // asc or desc
        $searchValue = $search_arr['value']; // Search value

        // Total records
        $totalRecords = Student::select('count(*) as allcount')->count();
        $totalRecordswithFilter = Student::select('count(*) as allcount')->where('name', 'like', '%' . $searchValue . '%')->count();

        // Get records, also we have included search filter as well
        $records = Student::orderBy($columnName, $columnSortOrder)
            ->where('students.name', 'like', '%' . $searchValue . '%')
            ->orWhere('students.email', 'like', '%' . $searchValue . '%')
            ->orWhere('students.branch', 'like', '%' . $searchValue . '%')
            ->select('students.*')
            ->skip($start)
            ->take($rowperpage)
            ->get();

        $data_arr = array();

        foreach ($records as $record) {

            $data_arr[] = array(
                "id" => $record->id,
                "name" => $record->name,
                "email" => $record->email,
                "mobile" => $record->mobile,
                "branch" => $record->branch,
            );
        }

        $response = array(
            "draw" => intval($draw),
            "iTotalRecords" => $totalRecords,
            "iTotalDisplayRecords" => $totalRecordswithFilter,
            "aaData" => $data_arr,
        );

        echo json_encode($response);
    }
}
Blade Template – Layout Settings
Create a folder students at /resources/views/. Inside this folder create file with the name of index.blade.php
Open up the file from /resources/views/students/index.blade.php and write the following code.
<!DOCTYPE html>
<html>
  <head>
    <title>Laravel 8 DataTable Ajax Pagination with Search And Sort</title>

    <!-- Meta -->
    <meta http-equiv="Content-Type" content="text/html; charset=UTF-8">
    <meta charset="utf-8">

    <!-- Datatables CSS CDN -->
    <link rel="stylesheet" type="text/css" href="https://cdn.datatables.net/1.10.21/css/jquery.dataTables.min.css">

    <!-- jQuery CDN -->
    <script src="https://ajax.googleapis.com/ajax/libs/jquery/3.5.1/jquery.min.js"></script>

    <!-- Datatables JS CDN -->
    <script type="text/javascript" src="https://cdn.datatables.net/1.10.21/js/jquery.dataTables.min.js"></script>

  </head>
  <body>
    <h2 style="text-align: center;">Laravel 8 DataTable Ajax Pagination with Search And Sort</h2>
    <table id='studentsTable' width='100%'>
      <thead>
        <tr>
          <td>#ID</td>
          <td>#Name</td>
          <td>#Email</td>
          <td>#Mobile</td>
          <td>#Branch</td>
        </tr>
      </thead>
    </table>

    <!-- Script -->
    <script type="text/javascript">
    $(document).ready(function(){

      // DataTable
      $('#studentsTable').DataTable({
         processing: true,
         serverSide: true,
         ajax: "{{route('students.getStudents')}}",
         columns: [
            { data: 'id' },
            { data: 'name' },
            { data: 'email' },
            { data: 'mobile' },
            { data: 'branch' },
         ]
      });

    });
    </script>
  </body>
</html>
Application Testing
Run this command into project terminal to start development server,
php artisan serveURL- http://127.0.0.1:8000

We hope this article helped you to learn about Laravel 8 DataTable Ajax Pagination with Search And Sort in a very detailed way.
If you liked this article, then please subscribe to our YouTube Channel for PHP & it’s framework, WordPress, Node Js video tutorials. You can also find us on Twitter and Facebook.
