Inside this article we will see how to insert data into wordpress database on plugin activation. Article contains very classified information about inserting dynamic table data on plugin activation.
After this article you will be sure how to create your own database tables for wordpress setup for your own custom plugin as well as how to insert data on runtime. We usually create own tables in wordpress database when we need more data to be stored for custom plugin functions.
Apart from creating tables also we can add more functions which we want should be executed at the time of activation.
WordPress works on the basis of filters and hooks. WordPress also provides a activation hook. We will see here into complete detail.
Learn More –
- Delete Page From WordPress Database on Plugin Deactivation
- Drop Table From WordPress Database on Plugin Deactivation
- How To Access WordPress Database Details in Plugin Tutorial
- Create Page in WordPress Database on Plugin Activation
Let’s get started.
Plugin Activation Hook
WordPress provide a hook for activation. We use this activation to attach all functions that we need on plugin activation or theme activation.
register_activation_hook(__FILE__, callback);callback function contains all code which will be executed when plugin/theme activates. We will add our dynamic table generation code into this.
Code To Generate Table
Here, is the steps to generate dynamic table.
- Add Activation hook
- Callback function
- Insert data into table
register_activation_hook(__FILE__, 'mytable_activation_function');

// callback function to create table
function mytable_activation_function()
{
    global $wpdb;

    $mytable = 'QUERY TO GENERATE TABLE';

    require_once(ABSPATH . 'wp-admin/includes/upgrade.php');
    dbDelta($mytable);

    // Insert data into table
}
Plugin Setup
We will see dynamic table generation using a plugin. So, we will create a custom plugin here.
Create a folder mytable inside /wp-content/plugins folder. Inside this mytable folder, create plugin entry file mytable.php.
Open mytable.php and write this code into it.
<?php

/**
 * Plugin Name:       OWT MyTable
 * Plugin URI:        https://sample-plugin.com
 * Description:       This plugin when activates, create a table inside database.
 * Version:           1.0
 * Author:            Online Web Tutor
 * Author URI:        https://onlinewebtutorblog.com/
 */

// plugin activation hook
register_activation_hook(__FILE__, 'mytable_activation_function');

// callback function to create table
function mytable_activation_function()
{
    global $wpdb;

    if ($wpdb->get_var("show tables like '" . owt_create_my_table() . "'") != owt_create_my_table()) {

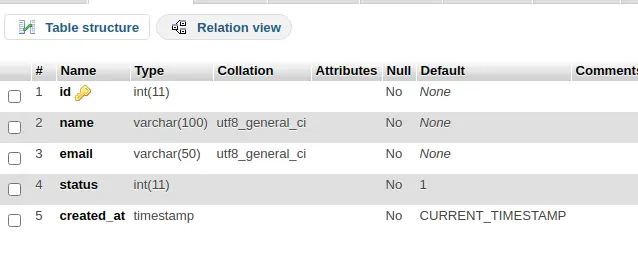
        $mytable = 'CREATE TABLE `' . owt_create_my_table() . '` (
                            `id` int(11) NOT NULL AUTO_INCREMENT,
                            `name` varchar(100) NOT NULL,
                            `email` varchar(50) NOT NULL,
                            `status` int(11) NOT NULL DEFAULT "1",
                            `created_at` timestamp NOT NULL DEFAULT CURRENT_TIMESTAMP,
                            PRIMARY KEY (`id`)
                          ) ENGINE=InnoDB AUTO_INCREMENT=1 DEFAULT CHARSET=utf8;';

        require_once(ABSPATH . 'wp-admin/includes/upgrade.php');
        dbDelta($mytable);

        // Insert data into table
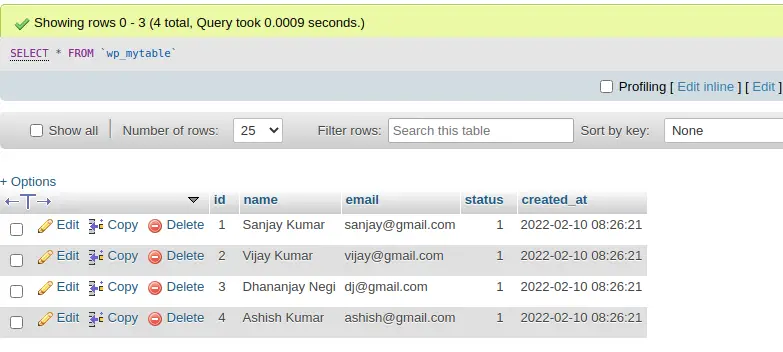
        $sqlInsertData = "INSERT INTO `" . owt_create_my_table() . "` (`name`, `email`)VALUES
                                ('Sanjay Kumar', 'sanjay@gmail.com'),
                                ('Vijay Kumar' ,'vijay@gmail.com'),
                                ('Dhananjay Negi' ,'dj@gmail.com'),
                                ('Ashish Kumar', 'ashish@gmail.com');";
            $wpdb->query(
                    $sqlInsertData
            );
    }
}

// returns table name
function owt_create_my_table()
{
    global $wpdb;
    return $wpdb->prefix . "mytable";
}
Concept to Insert data
// Insert data into table
$sqlInsertData = "INSERT INTO `" . owt_create_my_table() . "` (`name`, `email`)VALUES
                        ('Sanjay Kumar', 'sanjay@gmail.com'),
                        ('Vijay Kumar' ,'vijay@gmail.com'),
                        ('Dhananjay Negi' ,'dj@gmail.com'),
                        ('Ashish Kumar', 'ashish@gmail.com');";
$wpdb->query(
        $sqlInsertData
);
Once plugin will setup inside wordpress, you should see inside Plugins >> Installed Plugins

Click on Activate
Plugin activation will create table with data into wordpress database.


Successfully we have created a table with data for custom plugin.
We hope this article helped you to learn Insert Data Into WordPress Database on Plugin Activation Tutorial in a very detailed way.
If you liked this article, then please subscribe to our YouTube Channel for PHP & it’s framework, WordPress, Node Js video tutorials. You can also find us on Twitter and Facebook.
Read more