
Developing a CRUD (Create, Read, Update, Delete) application is an important stage in web development because it allows you to interact with and manage data in a systematic manner. Laravel, a powerful PHP framework, gives developers the tools and capabilities they need to create CRUD apps quickly.
In this article, we will walk you through the process of constructing a CRUD application in Laravel 10 using Bootstrap. You will have a fully functional web application that can execute CRUD operations on a database by the conclusion of this lesson.
Throughout this tutorial, we’ll look at how to set up a Laravel application, how to create routes, views, and controllers, and how to integrate Bootstrap for a responsive and user-friendly interface.
Read More: How To Use DomPDF To Generate PDFs in Laravel 10
Let’s get started.
Laravel Installation
Open terminal and run this command to create a laravel project.
composer create-project laravel/laravel myblogIt will create a project folder with name myblog inside your local system.
To start the development server of laravel –
php artisan serveURL: http://127.0.0.1:8000
Assuming laravel already installed inside your system.
Create Database & Connect
To create a database, either we can create via Manual tool of PhpMyadmin or by means of a mysql command.
CREATE DATABASE laravel_app;
To connect database with application, Open .env file from application root. Search for DB_ and update your details.
DB_CONNECTION=mysql
DB_HOST=127.0.0.1
DB_PORT=3306
DB_DATABASE=laravel_app
DB_USERNAME=root
DB_PASSWORD=root
How To Setup Migration for Table?
Open project terminal and run this command,
php artisan make:migration create_products_tableIt will create xxx_create_products_table.php file inside /database/migrations folder.
Read More: Laravel 10 Create Seeder for Database Seeding Tutorial
Open file and write this following code into it,
<?php

use Illuminate\Database\Migrations\Migration;
use Illuminate\Database\Schema\Blueprint;
use Illuminate\Support\Facades\Schema;

return new class extends Migration
{
    /**
     * Run the migrations.
     *
     * @return void
     */
    public function up(): void
    {
        Schema::create('products', function (Blueprint $table) {
            $table->id();
            $table->string('name', 50);
            $table->text('detail')->nullable();
            $table->string('image', 155);
            $table->timestamps();
        });
    }

    /**
     * Reverse the migrations.
     *
     * @return void
     */
    public function down(): void
    {
        Schema::dropIfExists('products');
    }
};
The code is all about for the schema of products table.
Run Migration
Back to terminal and run this command.
php artisan migrateIt will create products table inside database.
Next,
Create Laravel Model to work with Table
We will create a model.
Back to project terminal and run this command,
php artisan make:model ProductIt will create model file Product.php inside /app/Models folder.
Open file and write this code into it,
<?php

namespace App\Models;

use Illuminate\Database\Eloquent\Factories\HasFactory;
use Illuminate\Database\Eloquent\Model;

class Product extends Model
{
    use HasFactory;

    /**
     * The attributes that are mass assignable.
     *
     * @var array<int, string>
     */
    protected $fillable = [
        'name', 'detail', 'image'
    ];
}
Create CRUD Controller
Open project into terminal and run this command into it.
php artisan make:controller ProductController --resource --model=ProductWe have added two flags for above command –resource and –model.
It will create ProductController.php file inside /app/Http/Controllers folder.
Read More: Laravel 10 Mailable Email Template Components Tutorial
Open controller file and write this code into it,
<?php

namespace App\Http\Controllers;

use App\Models\Product;
use Illuminate\Http\Request;

class ProductController extends Controller
{
    /**
     * Display a listing of the resource.
     *
     * @return \Illuminate\Http\Response
     */
    public function index()
    {
        $products = Product::latest()->paginate(5);

        return view('product.index', compact('products'))
            ->with('i', (request()->input('page', 1) - 1) * 5);
    }

    /**
     * Show the form for creating a new resource.
     *
     * @return \Illuminate\Http\Response
     */
    public function create()
    {
        return view('product.create');
    }

    /**
     * Store a newly created resource in storage.
     *
     * @param  \Illuminate\Http\Request  $request
     * @return \Illuminate\Http\Response
     */
    public function store(Request $request)
    {
        $request->validate([
            'name' => 'required',
            'detail' => 'required',
            'image' => 'required|image|mimes:jpeg,png,jpg,gif,svg|max:2048',
        ]);

        $input = $request->all();

        if ($image = $request->file('image')) {
            $destinationPath = 'images/';
            $profileImage = date('YmdHis') . "." . $image->getClientOriginalExtension();
            $image->move($destinationPath, $profileImage);
            $input['image'] = "$profileImage";
        }

        Product::create($input);

        return redirect()->route('products.index')
            ->with('success', 'Product created successfully.');
    }

    /**
     * Display the specified resource.
     *
     * @param  \App\Product  $product
     * @return \Illuminate\Http\Response
     */
    public function show(Product $product)
    {
        return view('product.show', compact('product'));
    }

    /**
     * Show the form for editing the specified resource.
     *
     * @param  \App\Product  $product
     * @return \Illuminate\Http\Response
     */
    public function edit(Product $product)
    {
        return view('product.edit', compact('product'));
    }

    /**
     * Update the specified resource in storage.
     *
     * @param  \Illuminate\Http\Request  $request
     * @param  \App\Product  $product
     * @return \Illuminate\Http\Response
     */
    public function update(Request $request, Product $product)
    {
        $request->validate([
            'name' => 'required',
            'detail' => 'required'
        ]);

        $input = $request->all();

        if ($image = $request->file('image')) {
            $destinationPath = 'images/';
            $profileImage = date('YmdHis') . "." . $image->getClientOriginalExtension();
            $image->move($destinationPath, $profileImage);
            $input['image'] = "$profileImage";
        } else {
            unset($input['image']);
        }

        $product->update($input);

        return redirect()->route('products.index')
            ->with('success', 'Product updated successfully');
    }

    /**
     * Remove the specified resource from storage.
     *
     * @param  \App\Product  $product
     * @return \Illuminate\Http\Response
     */
    public function destroy(Product $product)
    {
        $product->delete();

        return redirect()->route('products.index')
            ->with('success', 'Product deleted successfully');
    }
}
Inside above code, we have these methods –
- index() List all products into index layout.
- create() Used to show add new product layout.
- store() This method is used to save product data into database table.
- show() This will display the single product information.
- edit() It will open edit layout with existing product information on the basis of product id of URL.
- update() It will save the updated information to database table.
- destroy() Delete the specific product by product id.
Next,
Create CRUD Blade Templates
Create product named folder inside /resources/views folder.
We will create all CRUD based template files inside it.
- layout.blade.php
- index.blade.php
- create.blade.php
- edit.blade.php
- show.blade.php
Let’s add one by one template code inside each above files.
Creating Main Layout
Open layout.blade.php and write this code into it.
<!DOCTYPE html>
<html>

<head>
    <title>Laravel 10 Create CRUD Application with Bootstrap</title>
    <link href="https://cdn.jsdelivr.net/npm/bootstrap@5.0.2/dist/css/bootstrap.min.css" rel="stylesheet">
</head>

<body>

    <div class="container">
        @yield('content')
    </div>

</body>

</html>
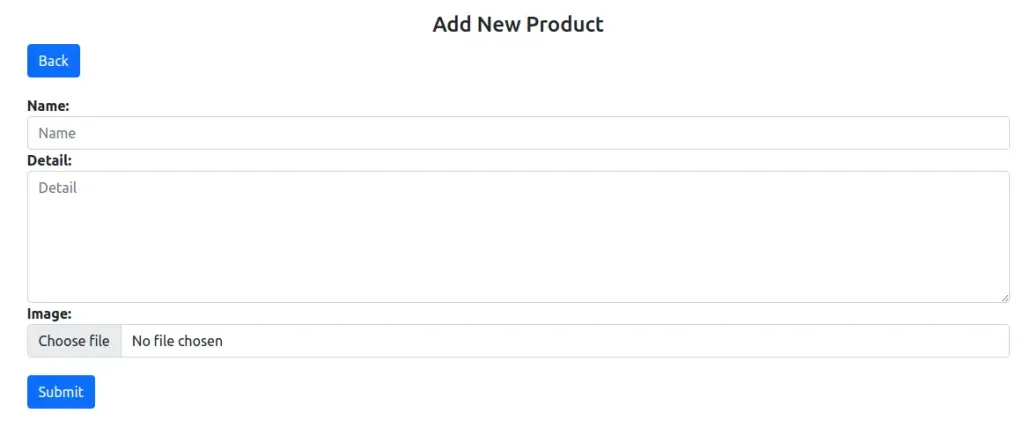
Create Add Product Template
This template will display a form where user inputs form data for product.
Open create.blade.php and write this code into it,
@extends('product.layout')

@section('content')
    <div class="row" style="margin-top: 20px;">
        <div class="col-lg-12 margin-tb">
            <div style="text-align: center;">
                <h4>Add New Product</h4>
            </div>
            <div class="pull-right">
                <a class="btn btn-primary" href="{{ route('products.index') }}"> Back</a>
            </div>
        </div>
    </div>

    @if ($errors->any())
        <div class="alert alert-danger">
            <strong>Whoops!</strong> There were some problems with your input.<br><br>
            <ul>
                @foreach ($errors->all() as $error)
                    <li>{{ $error }}</li>
                @endforeach
            </ul>
        </div>
    @endif

    <form action="{{ route('products.store') }}" method="POST" enctype="multipart/form-data"  style="margin-top: 20px;">
        @csrf

        <div class="row">
            <div class="col-xs-12 col-sm-12 col-md-12">
                <div class="form-group">
                    <strong>Name:</strong>
                    <input type="text" name="name" class="form-control" placeholder="Name">
                </div>
            </div>
            <div class="col-xs-12 col-sm-12 col-md-12">
                <div class="form-group">
                    <strong>Detail:</strong>
                    <textarea class="form-control" style="height:150px" name="detail" placeholder="Detail"></textarea>
                </div>
            </div>
            <div class="col-xs-12 col-sm-12 col-md-12">
                <div class="form-group">
                    <strong>Image:</strong>
                    <input type="file" name="image" class="form-control" placeholder="image">
                </div>
            </div>
            <div class="col-xs-12 col-sm-12 col-md-12" style="margin-top: 20px;">
                <button type="submit" class="btn btn-primary">Submit</button>
            </div>
        </div>

    </form>
@endsection
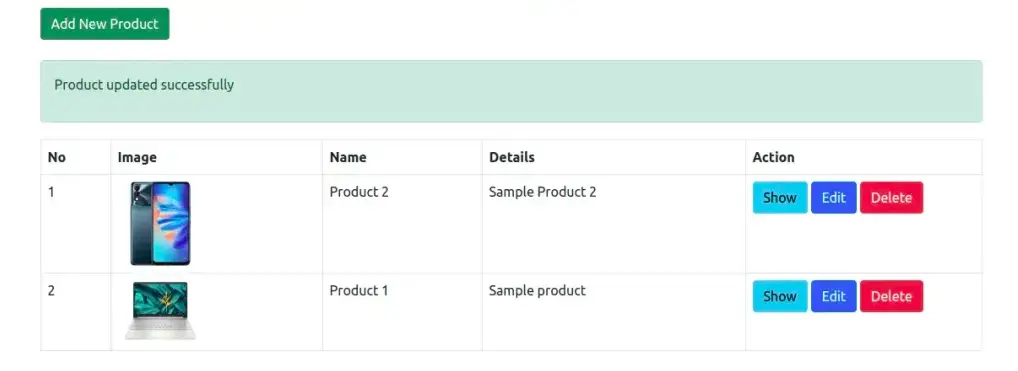
Create List Product Template
This template will display a table where all saved products will be listed.
Open index.blade.php and write this code into it.
@extends('product.layout')

@section('content')
    <div class="row" style="margin-top: 20px;">
        <div class="col-lg-12 margin-tb">
            <div style="text-align: center;">
                <h4>How To Create Laravel 10 CRUD Application with Bootstrap</h4>
            </div>
            <div class="pull-right">
                <a class="btn btn-success" href="{{ route('products.create') }}">
                    Add New Product
                </a>
            </div>
        </div>
    </div>

    <br>
    @if ($message = Session::get('success'))
        <div class="alert alert-success">
            <p>{{ $message }}</p>
        </div>
    @endif

    <table class="table table-bordered" style="margin-top: 20px;">
        <tr>
            <th>No</th>
            <th>Image</th>
            <th>Name</th>
            <th>Details</th>
            <th width="280px">Action</th>
        </tr>
        @foreach ($products as $product)
            <tr>
                <td>{{ ++$i }}</td>
                <td><img src="/images/{{ $product->image }}" width="100px"></td>
                <td>{{ $product->name }}</td>
                <td>{{ $product->detail }}</td>
                <td>
                    <form action="{{ route('products.destroy', $product->id) }}" method="POST">

                        <a class="btn btn-info" href="{{ route('products.show', $product->id) }}">Show</a>

                        <a class="btn btn-primary" href="{{ route('products.edit', $product->id) }}">Edit</a>

                        @csrf
                        @method('DELETE')

                        <button type="submit" class="btn btn-danger">Delete</button>
                    </form>
                </td>
            </tr>
        @endforeach
    </table>

    {!! $products->links() !!}

@endsection
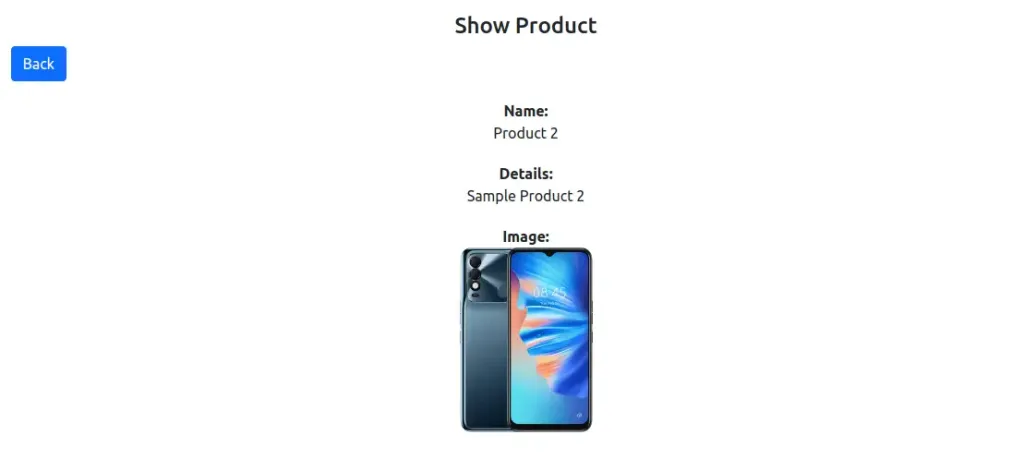
Create Show Single Product Template
This template will display a specific product information.
Open show.blade.php and write this code into it.
@extends('product.layout')

@section('content')
    <div class="row" style="margin-top: 20px;">
        <div class="col-lg-12 margin-tb">
            <div style="text-align: center;">
                <h4>Show Product</h4>
            </div>
            <div class="pull-right">
                <a class="btn btn-primary" href="{{ route('products.index') }}"> Back</a>
            </div>
        </div>
    </div>

    <div class="row" style="margin-top: 20px;text-align: center;">
        <div class="col-xs-12 col-sm-12 col-md-12">
            <div class="form-group">
                <strong>Name:</strong><br>
                {{ $product->name }}
            </div>
        </div>
        <div class="col-xs-12 col-sm-12 col-md-12" style="margin-top: 20px;">
            <div class="form-group">
                <strong>Details:</strong><br>
                {{ $product->detail }}
            </div>
        </div>
        <div class="col-xs-12 col-sm-12 col-md-12" style="margin-top: 20px;">
            <div class="form-group">
                <strong>Image:</strong><br>
                <img src="/images/{{ $product->image }}" width="200px">
            </div>
        </div>
    </div>
@endsection
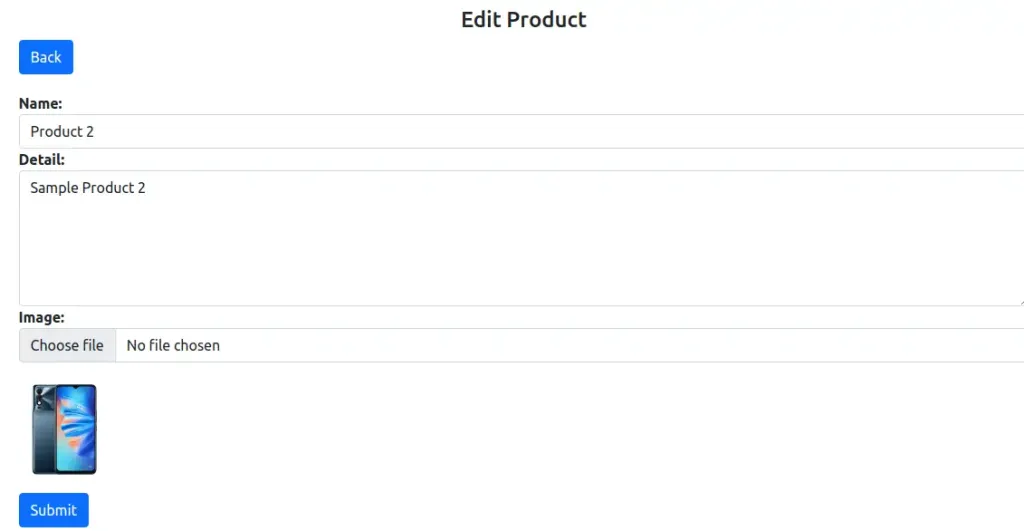
Create Edit Product Template
This template will display a form with specific product information. We will update the existing product information from here.
Read More: How To Create a Custom 404 Page in Laravel 10 Tutorial
Open edit.blade.php and write this code into it.
@extends('product.layout')

@section('content')
    <div class="row" style="margin-top: 20px;">
        <div class="col-lg-12 margin-tb">
            <div style="text-align: center;">
                <h4>Edit Product</h4>
            </div>
            <div class="pull-right">
                <a class="btn btn-primary" href="{{ route('products.index') }}"> Back</a>
            </div>
        </div>
    </div>

    @if ($errors->any())
        <div class="alert alert-danger">
            <strong>Whoops!</strong> There were some problems with your input.<br><br>
            <ul>
                @foreach ($errors->all() as $error)
                    <li>{{ $error }}</li>
                @endforeach
            </ul>
        </div>
    @endif

    <form action="{{ route('products.update', $product->id) }}" method="POST" enctype="multipart/form-data"
        style="margin-top: 20px;">
        @csrf
        @method('PUT')

        <div class="row">
            <div class="col-xs-12 col-sm-12 col-md-12">
                <div class="form-group">
                    <strong>Name:</strong>
                    <input type="text" name="name" value="{{ $product->name }}" class="form-control" placeholder="Name">
                </div>
            </div>
            <div class="col-xs-12 col-sm-12 col-md-12">
                <div class="form-group">
                    <strong>Detail:</strong>
                    <textarea class="form-control" style="height:150px" name="detail"
                        placeholder="Detail">{{ $product->detail }}</textarea>
                </div>
            </div>
            <div class="col-xs-12 col-sm-12 col-md-12">
                <div class="form-group">
                    <strong>Image:</strong>
                    <input type="file" name="image" class="form-control" placeholder="image">
                    <br>
                    <img src="/images/{{ $product->image }}" width="100px">
                </div>
            </div>
            <div class="col-xs-12 col-sm-12 col-md-12" style="margin-top: 20px;">
                <button type="submit" class="btn btn-primary">Submit</button>
            </div>
        </div>

    </form>
@endsection
Add CRUD Routes
Open web.php file from /routes folder. Add this route into it.
//...

use App\Http\Controllers\ProductController;

//...

Route::resource('products', ProductController::class);

//...
To see all CRUD based routes for this resource controller. Run this command into your project terminal,
php artisan route:listIt will show you all your resource routes for ProductController.

Application Testing
Run this command into project terminal to start development server,
php artisan serveList Product
URL: http://127.0.0.1:8000/products
Add Product
URL: http://127.0.0.1:8000/products/create
Edit Product
URL: http://127.0.0.1:8000/products/1/edit
Show Product
URL: http://127.0.0.1:8000/products/1
Delete Product
Click on Delete button and delete any product from table.
That’s it.
We hope this article helped you to learn about Laravel 10 Create CRUD Application with Bootstrap in a very detailed way.
If you liked this article, then please subscribe to our YouTube Channel for PHP & it’s framework, WordPress, Node Js video tutorials. You can also find us on Twitter and Facebook.
Read more