
Custom validation rules in Laravel 10 provide a powerful approach to validate incoming data depending on your individual application requirements. While Laravel has a number of built-in validation rules, there may be times when you need to construct your own custom validation rules to deal with unusual data validation cases.
In this detailed article, we will walk you through the process of setting custom validation rules in Laravel 10. We’ll go over how to create custom rules, register them in your application, and use them in your validation logic.
Read More: PeopleTools Att – Benefits and Everything You Need to Know
Let’s get started.
Laravel Installation
Open terminal and run this command to create a laravel project.
composer create-project laravel/laravel myblogIt will create a project folder with name myblog inside your local system.
To start the development server of laravel –
php artisan serveURL: http://127.0.0.1:8000
Assuming laravel already installed inside your system.
Register Custom Validation Rule
In this step, we will construct a new “BirthYearRule” validation rule that will validate the user’s birth year. So, use the following command to update the rule validation file.
$ php artisan make:rule BirthYearRuleIt will create a file titled BirthYearRule.php inside /app/Rules folder. Open file and write this complete code into it.
<?php

namespace App\Rules;

use Closure;
use Illuminate\Contracts\Validation\ValidationRule;

class BirthYearRule implements ValidationRule
{
    /**
     * Run the validation rule.
     *
     * @param  \Closure(string): \Illuminate\Translation\PotentiallyTranslatedString  $fail
     */
    public function validate(string $attribute, mixed $value, Closure $fail): void
    {
        if(!($value >= 1980 && $value <= date('Y'))){

            $fail('The :attribute must be between 1980 to '.date('Y').'.');
        }
    }
}
Create Application Controller
Open project into terminal and run this command.
$ php artisan make:controller CustomValidationIt will create a CustomValidation.php file inside /app/Http/Controllers folder.
Read More: Unblocked Games 911: Everything You Need To Know!
Open CustomValidation.php and write this complete code into it.
<?php

namespace App\Http\Controllers;

use Illuminate\Http\Request;
use Illuminate\View\View;
use Illuminate\Http\RedirectResponse;
use App\Rules\BirthYearRule;

class CustomValidation extends Controller
{
    /**
     * Show the application dashboard.
     *
     * @return \Illuminate\Http\Response
     */
    public function create(): View
    {
        return view('forms');
    }

    /**
     * Show the application dashboard.
     *
     * @return \Illuminate\Http\Response
     */
    public function store(Request $request): RedirectResponse
    {
        $validatedData = $request->validate([
                'name' => 'required',
                'birth_year' => [
                    'required',
                    new BirthYearRule()
                ]
            ]);

        return back()->with('success', 'User created successfully.');
    }
}
Create Blade Template
Create a blade view file forms.blade.php inside /resources/views folder.
Open file and write this code into it.
<!DOCTYPE html>
<html>
<head>
    <title>Laravel 10 Custom Validation Rule Tutorial</title>
    <meta charset="utf-8">
    <meta http-equiv="X-UA-Compatible" content="IE=edge">
    <meta name="viewport" content="width=device-width, initial-scale=1">
    <link href="https://cdn.jsdelivr.net/npm/bootstrap@5.0.2/dist/css/bootstrap.min.css" rel="stylesheet">
</head>
<body>
    <div class="container">

        <h3>Laravel 10 Custom Validation Rule Tutorial</h3>

        <form method="POST" action="{{ route('custom.validation.post') }}">

            {{ csrf_field() }}

            <div class="mb-3">
                <label class="form-label" for="inputName">Name:</label>
                <input
                    type="text"
                    name="name"
                    id="inputName"
                    class="form-control @error('name') is-invalid @enderror"
                    placeholder="Name">

                @error('name')
                    <span class="text-danger">{{ $message }}</span>
                @enderror
            </div>

            <div class="mb-3">
                <label class="form-label" for="inputEmail">Birth Year:</label>
                <input
                    type="text"
                    name="birth_year"
                    id="inputEmail"
                    class="form-control @error('birth_year') is-invalid @enderror"
                    placeholder="Birth Year">

                @error('birth_year')
                    <span class="text-danger">{{ $message }}</span>
                @endif
            </div>

            <div class="mb-3">
                <button class="btn btn-success btn-submit">Submit</button>
            </div>
        </form>
    </div>
</body>
</html>
Read More: Character AI: A Comprehensive Tutorial
Add Routes
Open web.php from /routes folder. Add these routes into it.
use App\Http\Controllers\CustomValidation;

//...

Route::get('custom-validation', [CustomValidation::class, 'create']);
Route::post('custom-validation', [CustomValidation::class, 'store'])->name('custom.validation.post');
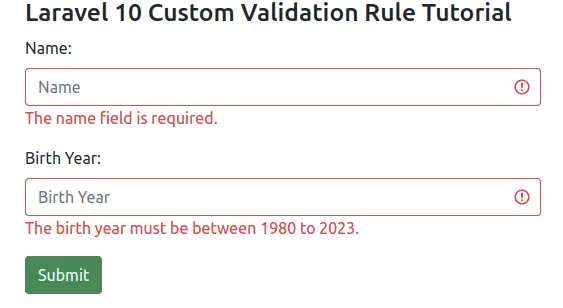
Application Testing
Run this command into project terminal to start development server,
php artisan serveURL: http://127.0.0.1:8000/custom-validation
When you submit form without having any data or invalid input value.
We hope this article helped you to Learn Laravel 10 Custom Validation Rule Tutorial in a very detailed way.
If you liked this article, then please subscribe to our YouTube Channel for PHP & it’s framework, WordPress, Node Js video tutorials. You can also find us on Twitter and Facebook.
Read more