Establishing links between database tables is a crucial idea in web application development. The one-to-one relationship is one of the most prevalent forms of relationships, in which one record in one database is related with one record in another table. Using its Eloquent ORM, Laravel, a strong PHP framework, simplifies the creation of such associations.
In Laravel, a one-to-one relationship is a type of relationship between two database tables, where one record in the first table (the “parent” table) is associated with one and only one record in the second table (the “child” table).
In this tutorial, we will walk you through the process of creating a one-to-one Eloquent connection in Laravel 10, allowing you to manage and retrieve related data from your database more effectively.
Read More: Laravel 10 Call MySQL Stored Procedure Example Tutorial
Let’s get started.
Laravel Installation
Open terminal and run this command to create a laravel project.
composer create-project laravel/laravel myblogIt will create a project folder with name myblog inside your local system.
To start the development server of laravel –
php artisan serveURL: http://127.0.0.1:8000
Assuming laravel already installed inside your system.
Create Database & Connect
To create a database, either we can create via Manual tool of PhpMyadmin or by means of a mysql command.
CREATE DATABASE laravel_app;
To connect database with application, Open .env file from application root. Search for DB_ and update your details.
DB_CONNECTION=mysql
DB_HOST=127.0.0.1
DB_PORT=3306
DB_DATABASE=laravel_app
DB_USERNAME=root
DB_PASSWORD=root
Setup Migrations for One To One Relation
To see a real analysis of One to One relationship. We’ll consider a case here.
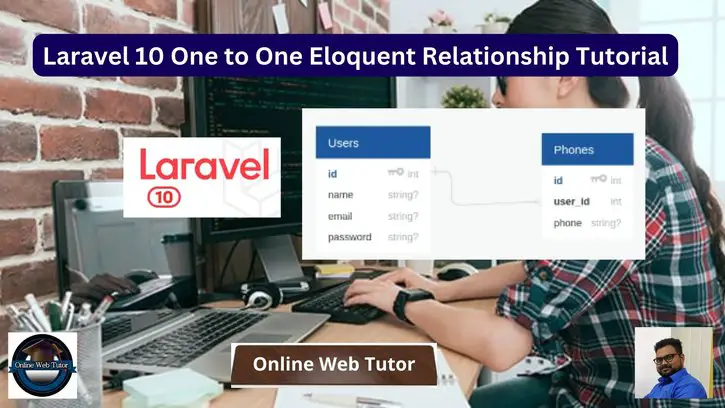
We need two migration files. One is for Users table and other is for Phones table. By default when you install laravel you get migration for users table.
You will find migration xxx_create_users_table.php of users inside /database/migrations folder.
Next,
Open project terminal and run this command to create migration for phones table.
php artisan make:migration CreatePhonesTableIt will create a file xxx_create_phones_table.php inside /database/migrations folder.
Open file and write this complete code into it.
<?php

use Illuminate\Database\Migrations\Migration;
use Illuminate\Database\Schema\Blueprint;
use Illuminate\Support\Facades\Schema;

return new class extends Migration
{
    /**
     * Run the migrations.
     *
     * @return void
     */
    public function up(): void
    {
        Schema::create('phones', function (Blueprint $table) {
            $table->id();
            $table->foreignId('user_id')->constrained('users');
            $table->string('phone');
            $table->timestamps();
        });
    }

    /**
     * Reverse the migrations.
     *
     * @return void
     */
    public function down(): void
    {
        Schema::dropIfExists('phones');
    }
};
Run Migrations
Migrate migrations to create tables
php artisan migrateRead More: Laravel 10 FullCalendar Ajax CRUD Tutorial Example
Add & Update Model with One-to-One Relation
Laravel default model User.php you can see inside /app/Models folder.
Update
Open that file and update with this code,
<?php

namespace App\Models;

// use Illuminate\Contracts\Auth\MustVerifyEmail;
use Illuminate\Database\Eloquent\Factories\HasFactory;
use Illuminate\Foundation\Auth\User as Authenticatable;
use Illuminate\Notifications\Notifiable;
use Laravel\Sanctum\HasApiTokens;
use Illuminate\Database\Eloquent\Relations\HasOne;
use App\Models\Phone;

class User extends Authenticatable
{
    use HasApiTokens, HasFactory, Notifiable;

    /**
     * The attributes that are mass assignable.
     *
     * @var array<int, string>
     */
    protected $fillable = [
        'name',
        'email',
        'password',
    ];

    /**
     * The attributes that should be hidden for serialization.
     *
     * @var array<int, string>
     */
    protected $hidden = [
        'password',
        'remember_token',
    ];

    /**
     * The attributes that should be cast.
     *
     * @var array<string, string>
     */
    protected $casts = [
        'email_verified_at' => 'datetime',
        'password' => 'hashed',
    ];

    /**
     * Get the phone associated with the user.
     */
    public function phone(): HasOne
    {
        return $this->hasOne(Phone::class);
    }
}
hasOne() method is used to get associated phone number of user. This is one to one relationship where each user has been associated to a specific mobile number.
Usage
$phone = User::find(1)->phone;Defining The Inverse Of The Relationship
Next, you need model file for phones table.
Run this command to create model,
php artisan make:model PhoneIt will create Phone.php file inside /app/Models folder.
Open file and write this code.
<?php

namespace App\Models;

use Illuminate\Database\Eloquent\Factories\HasFactory;
use Illuminate\Database\Eloquent\Relations\BelongsTo;
use Illuminate\Database\Eloquent\Model;
use App\Models\User;

class Phone extends Model
{
    use HasFactory;

    public $timestamps = false;

    /**
     * The attributes that are mass assignable.
     *
     * @var array<int, string>
     */
    protected $fillable = [
        'user_id',
        'phone'
    ];

    /**
     * Get the user that owns the phone.
     */
    public function user(): BelongsTo
    {
        return $this->belongsTo(User::class);
    }
}
belongsTo() method is implementing inverse relationship of one to one relationship in laravel.
Usage
Phone::find($phone_id)->user;Use One-to-One Relational Data in Controllers
Open any controller say DataController.php file from /app/Http/Controllers folder.
Read More: Laravel 10 How To Add Google reCaptcha v3 Validation
Here, you can see two methods in which we used model methods as a property.
<?php

namespace App\Http\Controllers;

use Illuminate\Http\Request;
use App\Models\User;
use App\Models\Phone;

class DataController extends Controller
{
    public function getPhone($user_id)
    {
        // Passing user id into find()
        return User::find($user_id)->phone;
    }

    public function getUser($phone_id)
    {
        // Passing phone id into find()
        return Phone::find($phone_id)->user;
    }
}
- User::find($user_id)->phone; It will find phone details value by user id. One to One
- Phone::find($phone_id)->user; It will find user details by phone id. Inverse of One to One / Belongs To
Create Routes
Open web.php from /routes folder and add these routes into it,
//...

use App\Http\Controllers\DataController;

Route::get('get-phone/{id}', [DataController::class, 'getPhone']);
Route::get('get-user/{id}', [DataController::class, 'getUser']);

//...
Application Testing
Run this command into project terminal to start development server,
php artisan serveURLs
Get <strong>Phone</strong> <strong>details</strong>: http://127.0.0.1:8000/get-phone/1

Get <strong>User</strong> <strong>details</strong>: http://127.0.0.1:8000/get-user/1
That’s it.
We hope this article helped you to learn about Laravel 10 One to One Eloquent Relationship Tutorial in a very detailed way.
If you liked this article, then please subscribe to our YouTube Channel for PHP & it’s framework, WordPress, Node Js video tutorials. You can also find us on Twitter and Facebook.
Read more