Creating RESTful APIs with safe authentication is a must for modern online applications. Laravel, a sophisticated PHP framework, provides a strong solution for developing RESTful APIs with Passport authentication, making it easy to create secure and user-friendly APIs.
We will walk you through the process of creating RESTful APIs with Passport authentication in Laravel 10, allowing you to construct APIs that can securely authenticate and authorise users.
By the end of this tutorial, you’ll have the skills and expertise to design secure and user-friendly RESTful APIs in Laravel 10, ensuring that your APIs are both functional and secure.
Video course: Looking for Complete Course of RESTful APIs in Laravel 10?
We’ll create APIs for these,
- User Register API
- Login API
- Profile API
- Logout API
Let’s get started.
What is Passport Authentication?
Passport is a Laravel package that provides a comprehensive OAuth2 server implementation for enabling API authentication in Laravel applications.
It makes it easier to authenticate users and clients in your application while complying to the OAuth2 protocol, making it an effective tool for securing API endpoints.
Laravel Installation
Open terminal and run this command to create a laravel project.
composer create-project laravel/laravel myblogIt will create a project folder with name myblog inside your local system.
To start the development server of laravel –
php artisan serveURL: http://127.0.0.1:8000
Assuming laravel already installed inside your system.
Create Database & Connect
To create a database, either we can create via Manual tool of PhpMyadmin or by means of a mysql command.
CREATE DATABASE laravel_app;
To connect database with application, Open .env file from application root. Search for DB_ and update your details.
DB_CONNECTION=mysql
DB_HOST=127.0.0.1
DB_PORT=3306
DB_DATABASE=laravel_app
DB_USERNAME=root
DB_PASSWORD=root
How To Setup Passport Authentication in Laravel?
You need to follow few steps to do a successful installation of Passport package in laravel,
Step #1
Run composer command,
composer require laravel/passportStep #2
Above command also generates few migrations of passport.
Run migration,
php artisan migrateStep #3
Generate personal access oauth tokens,
php artisan passport:installStep #4
Open auth.php file from /config folder.
Search for “guards“. Add these lines of code into it,
'guards' => [
    //...
    '<strong>api</strong>' => [
        'driver' => 'passport',
        'provider' => 'users',
    ],
],
And also search for “providers“. Code should be like this,
'providers' => [
    'users' => [
        'driver' => 'eloquent',
        'model' => App\Models\User::class,
    ],
]
Step #5
Update User.php model class file of /app/Models folder.
Read More: Laravel 10 RESTful APIs with JWT Authentication Tutorial
Here, is the complete updated code.
<?php

namespace App\Models;

// use Illuminate\Contracts\Auth\MustVerifyEmail;
use Illuminate\Database\Eloquent\Factories\HasFactory;
use Illuminate\Foundation\Auth\User as Authenticatable;
use Illuminate\Notifications\Notifiable;
use Laravel\Passport\HasApiTokens;

class User extends Authenticatable
{
    use HasApiTokens, HasFactory, Notifiable;

    /**
     * The attributes that are mass assignable.
     *
     * @var array<int, string>
     */
    protected $fillable = [
        'name',
        'email',
        'password',
    ];

    /**
     * The attributes that should be hidden for serialization.
     *
     * @var array<int, string>
     */
    protected $hidden = [
        'password',
        'remember_token',
    ];

    /**
     * The attributes that should be cast.
     *
     * @var array<string, string>
     */
    protected $casts = [
        'email_verified_at' => 'datetime',
        'password' => 'hashed',
    ];
}
Successfully, you have setup Passport auth package into application.
Now, you have a middleware which you can use to protect api routes i.e “auth:api”.
API Controller Settings
Run this command to create API controller class,
php artisan make:controller Api/ApiControllerIt will create a file named ApiController.php inside /app/Http/Controllers folder.
Open file and write this complete code into it,
<?php

namespace App\Http\Controllers\Api;

use App\Http\Controllers\Controller;
use Illuminate\Http\Request;
use App\Models\User;
use Illuminate\Support\Facades\Hash;
use Illuminate\Support\Facades\Auth;

class ApiController extends Controller
{
    // Register API (POST, formdata)
    public function register(Request $request){

        // data validation
        $request->validate([
            "name" => "required",
            "email" => "required|email|unique:users",
            "password" => "required|confirmed"
        ]);

        // Author model
        User::create([
            "name" => $request->name,
            "email" => $request->email,
            "password" => Hash::make($request->password)
        ]);

        // Response
        return response()->json([
            "status" => true,
            "message" => "User created successfully"
        ]);
    }

    // Login API (POST, formdata)
    public function login(Request $request){

        // Data validation
        $request->validate([
            "email" => "required|email",
            "password" => "required"
        ]);

        // Auth Facade
        if(Auth::attempt([
            "email" => $request->email,
            "password" => $request->password
        ])){

            $user = Auth::user();

            $token = $user->createToken("myToken")->accessToken;

            return response()->json([
                "status" => true,
                "message" => "Login successful",
                "access_token" => $token
            ]);
        }

        return response()->json([
            "status" => false,
            "message" => "Invalid credentials"
        ]);
    }

    // Profile API (GET)
    public function profile(){

        $userdata = Auth::user();

        return response()->json([
            "status" => true,
            "message" => "Profile data",
            "data" => $userdata
        ]);
    }

    // Logout API (GET)
    public function logout(){

        auth()->user()->token()->revoke();

        return response()->json([
            "status" => true,
            "message" => "User logged out"
        ]);
    }
}
ApiController class contains the api methods for,
- Register
- Login
- Profile
- Logout
Read More: Laravel 10 How To get Browser Details Example Tutorial
Setup API Routes
Open api.php file from /routes folder. Add these routes into it,
//...
use App\Http\Controllers\Api\ApiController;

Route::post("register", [ApiController::class, "register"]);
Route::post("login", [ApiController::class, "login"]);

Route::group([
    "middleware" => ["auth:api"]
], function(){

    Route::get("profile", [ApiController::class, "profile"]);
    Route::get("logout", [ApiController::class, "logout"]);
});
Application Testing
Run this command into project terminal to start development server,
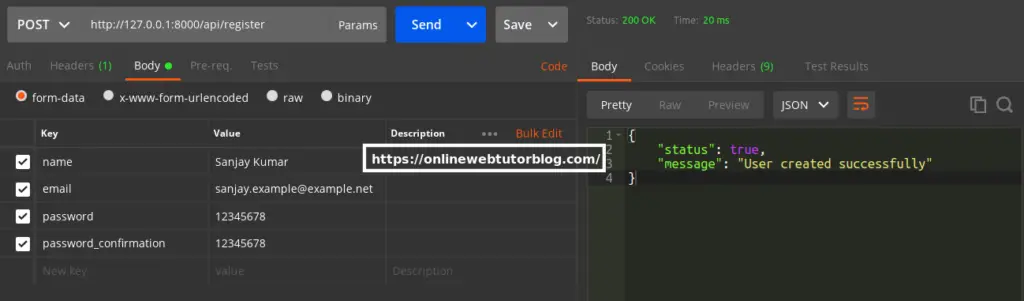
php artisan serveRegister API
URL – http://127.0.0.1:8000/api/register
Method – POST
Header –
Accept:application/jsonForm data –
{
   "name": "Sanjay Kumar",
   "email": "sanjay.example@example.net",
   "password": 12345678
   "password_confirmation": 12345678
}
Screenshot –
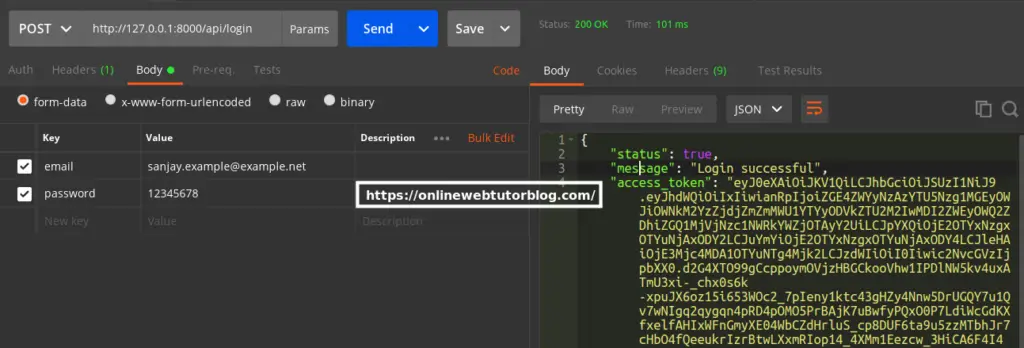
Login API
URL – http://127.0.0.1:8000/api/login
Method – POST
Header –
Accept:application/jsonForm data –
{
   "email": "sanjay.example@example.net",
   "password": 12345678
}
Screenshot –
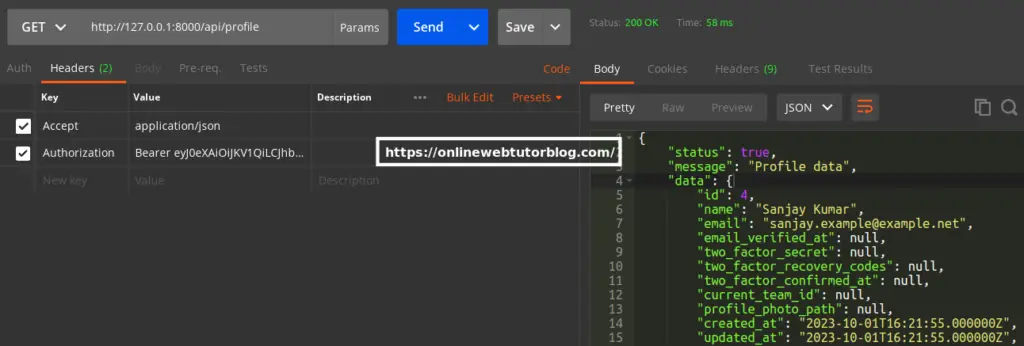
Profile API
URL – http://127.0.0.1:8000/api/profile
Method – GET
Header –
Accept:application/json
Authorization:Bearer <token>
Screenshot –
Read More: Laravel 10 Add Custom Search Filter To YajraBox Datatable
Logout API
URL – http://127.0.0.1:8000/api/logout
Method – GET
Header –
Accept:application/json
Authorization:Bearer <token>
That’s it.
We hope this article helped you to learn about Laravel 10 RESTful APIs with Passport Authentication Tutorial in a very detailed way.
If you liked this article, then please subscribe to our YouTube Channel for PHP & it’s framework, WordPress, Node Js video tutorials. You can also find us on Twitter and Facebook.
Read more