Creating secure and efficient REST APIs is a crucial skill in the fast-paced world of web development. Laravel 10, the most recent version of this popular PHP framework, provides a solid foundation for easily constructing RESTful APIs.
JSON Web Tokens (JWT) authentication stands out as an effective method for safeguarding these APIs. This tutorial will guide you through the process of establishing REST APIs with JWT authentication in Laravel 10.
We start by setting the scenario, outlining why REST APIs are essential for modern web development and why JWT authentication is critical for data security and user access management. As we get into the heart of this article, you will learn the entire process of establishing REST APIs with JWT authentication in Laravel 10.
Video course: Looking for Complete Course of RESTful APIs in Laravel 10?
We’ll create APIs for these,
- User Register API
- Login API
- Profile API
- Refresh Token API
- Logout API
Let’s get started.
Laravel Installation
Open terminal and run this command to create a laravel project.
composer create-project laravel/laravel myblogIt will create a project folder with name myblog inside your local system.
To start the development server of laravel –
php artisan serveURL: http://127.0.0.1:8000
Assuming laravel already installed inside your system.
Create Database & Connect
To create a database, either we can create via Manual tool of PhpMyadmin or by means of a mysql command.
CREATE DATABASE laravel_app;
To connect database with application, Open .env file from application root. Search for DB_ and update your details.
DB_CONNECTION=mysql
DB_HOST=127.0.0.1
DB_PORT=3306
DB_DATABASE=laravel_app
DB_USERNAME=root
DB_PASSWORD=root
How To Setup JWT (JSON Web Token) in Laravel?
You need to follow few steps to do a successful installation of JWT package in laravel,
Step #1
Run composer command,
composer require tymon/jwt-authStep #2
Open app.php file from /config folder.
Search for “providers“, add this line of code into it.
'providers' => ServiceProvider::defaultProviders()->merge([
    //...
    <strong>Tymon\JWTAuth\Providers\LaravelServiceProvider::class,</strong>
])->toArray(),
Search for “aliases“, add these lines of code into it.
'aliases' => Facade::defaultAliases()->merge([
   //...
   <strong>'Jwt' => Tymon\JWTAuth\Providers\LaravelServiceProvider::class,
   'JWTFactory' => Tymon\JWTAuth\Facades\JWTFactory::class,
   'JWTAuth' => Tymon\JWTAuth\Facades\JWTAuth::class,</strong>
])->toArray(),
Step #3
Publish jwt.php (jwt settings) file. Run this command to terminal,
php artisan vendor:publish --provider="Tymon\JWTAuth\Providers\LaravelServiceProvider"It will copy a file jwt.php inside /config folder.
Read More: How to Get Current Route Name in Laravel 10 Tutorial
Step #4
Run migration
php artisan migrateIt will migrate all pending migrations of application.
Step #5
Generate jwt secret token value,
php artisan jwt:secretIt updates .env file with jwt secret key.
Step #6
Open auth.php file from /config folder.
Search for “guards“. Add these lines of code into it,
'guards' => [
    //...
    '<strong>api</strong>' => [
        'driver' => 'jwt',
        'provider' => 'users',
    ],
],
Step #7
Update User.php (User model class file).
Open User.php file from /app/Models folder.
<?php

namespace App\Models;

// use Illuminate\Contracts\Auth\MustVerifyEmail;
use Illuminate\Database\Eloquent\Factories\HasFactory;
use Illuminate\Foundation\Auth\User as Authenticatable;
use Illuminate\Notifications\Notifiable;
use Laravel\Sanctum\HasApiTokens;
use Tymon\JWTAuth\Contracts\JWTSubject;

class User extends Authenticatable implements JWTSubject
{
    use HasApiTokens, HasFactory, Notifiable;

    /**
     * The attributes that are mass assignable.
     *
     * @var array<int, string>
     */
    protected $fillable = [
        'name',
        'email',
        'password',
    ];

    /**
     * The attributes that should be hidden for serialization.
     *
     * @var array<int, string>
     */
    protected $hidden = [
        'password',
        'remember_token',
    ];

    /**
     * The attributes that should be cast.
     *
     * @var array<string, string>
     */
    protected $casts = [
        'email_verified_at' => 'datetime',
        'password' => 'hashed',
    ];

    public function getJWTIdentifier()
    {
      return $this->getKey();
    }

    public function getJWTCustomClaims()
    {
      return [];
    }
}
Successfully, you have setup JWT auth package into application.
Now, you have a middleware which you can use to protect api routes i.e “auth:api”
API Controller Settings
Run this command to create API controller class,
php artisan make:controller Api/ApiControllerIt will create a file named ApiController.php inside /app/Http/Controllers folder.
Read More: How To Upload File with Progress Bar in Laravel 10 Tutorial
Open file and write this complete code into it,
<?php

namespace App\Http\Controllers\Api;

use App\Http\Controllers\Controller;
use Illuminate\Http\Request;
use App\Models\User;
use Illuminate\Support\Facades\Hash;
use Tymon\JWTAuth\Facades\JWTAuth;

class ApiController extends Controller
{
    // User Register (POST, formdata)
    public function register(Request $request){

        // data validation
        $request->validate([
            "name" => "required",
            "email" => "required|email|unique:users",
            "password" => "required|confirmed"
        ]);

        // User Model
        User::create([
            "name" => $request->name,
            "email" => $request->email,
            "password" => Hash::make($request->password)
        ]);

        // Response
        return response()->json([
            "status" => true,
            "message" => "User registered successfully"
        ]);
    }

    // User Login (POST, formdata)
    public function login(Request $request){

        // data validation
        $request->validate([
            "email" => "required|email",
            "password" => "required"
        ]);

        // JWTAuth
        $token = JWTAuth::attempt([
            "email" => $request->email,
            "password" => $request->password
        ]);

        if(!empty($token)){

            return response()->json([
                "status" => true,
                "message" => "User logged in succcessfully",
                "token" => $token
            ]);
        }

        return response()->json([
            "status" => false,
            "message" => "Invalid details"
        ]);
    }

    // User Profile (GET)
    public function profile(){

        $userdata = auth()->user();

        return response()->json([
            "status" => true,
            "message" => "Profile data",
            "data" => $userdata
        ]);
    }

    // To generate refresh token value
    public function refreshToken(){

        $newToken = auth()->refresh();

        return response()->json([
            "status" => true,
            "message" => "New access token",
            "token" => $newToken
        ]);
    }

    // User Logout (GET)
    public function logout(){

        auth()->logout();

        return response()->json([
            "status" => true,
            "message" => "User logged out successfully"
        ]);
    }
}
ApiController class contains the api methods for,
- Register
- Login
- Profile
- Refresh Token
- Logout
Setup API Routes
Open api.php file from /routes folder. Add these routes into it,
//...
use App\Http\Controllers\Api\ApiController;

Route::post("register", [ApiController::class, "register"]);
Route::post("login", [ApiController::class, "login"]);

Route::group([
    "middleware" => ["auth:api"]
], function(){

    Route::get("profile", [ApiController::class, "profile"]);
    Route::get("refresh", [ApiController::class, "refreshToken"]);
    Route::get("logout", [ApiController::class, "logout"]);
});
Application Testing
Run this command into project terminal to start development server,
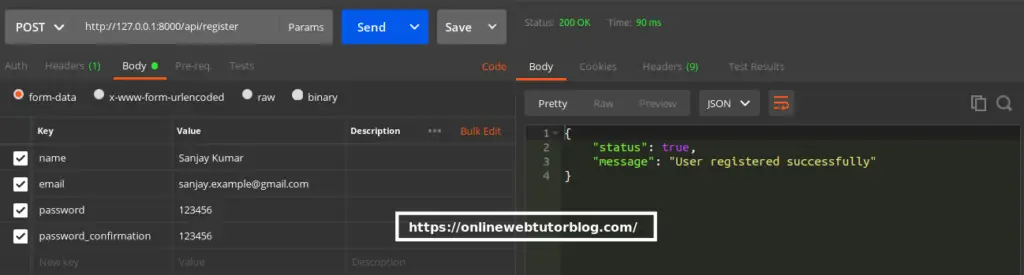
php artisan serveRegister API
URL – http://127.0.0.1:8000/api/register
Method – POST
Header –
Accept:application/jsonForm data –
{
   "name": "Sanjay Kumar",
   "email": "sanjay.example@gmail.com",
   "password": 123456
   "password_confirmation": 123456
}
Screenshot –
Read More: How To Handle Exception in Laravel 10 Example Tutorial
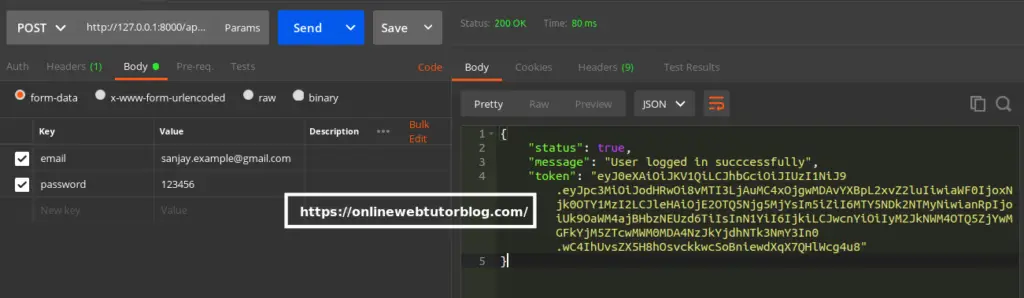
Login API
URL – http://127.0.0.1:8000/api/login
Method – POST
Header –
Accept:application/jsonForm data –
{
   "email": "sanjay.example@gmail.com",
   "password": 123456
}
Screenshot –
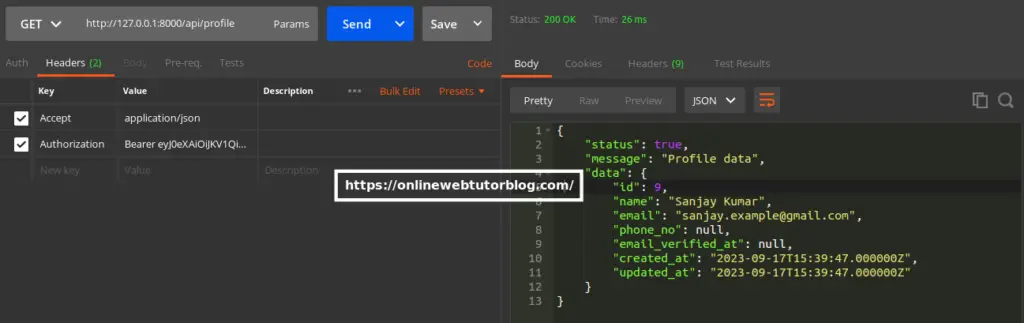
Profile API
URL – http://127.0.0.1:8000/api/profile
Method – GET
Header –
Accept:application/json
Authorization:Bearer <token>
Screenshot –
Refresh Token API
URL – http://127.0.0.1:8000/api/refresh
Method – GET
Header –
Accept:application/json
Authorization:Bearer <token>
Screenshot –

Logout API
URL – http://127.0.0.1:8000/api/logout
Method – GET
Header –
Accept:application/json
Authorization:Bearer <token>
That’s it.
We hope this article helped you to learn about Laravel 10 RESTful APIs with JWT Authentication Tutorial in a very detailed way.
If you liked this article, then please subscribe to our YouTube Channel for PHP & it’s framework, WordPress, Node Js video tutorials. You can also find us on Twitter and Facebook.
Read more