Uploading files with a progress bar is a useful feature for web applications since it improves transparency and user experience during file uploads. Laravel 10, in conjunction with JavaScript and certain extra tools, enables you to efficiently implement this feature. We will walk you through the stages of uploading files with a progress bar in Laravel 10 in this article.
Users of modern web applications frequently need to upload files, whether they are photographs, documents, or other media. A progress bar displayed during the file upload process can increase customer satisfaction and assist them understand the status of their uploads.
Read More: How To Handle Exception in Laravel 10 Example Tutorial
Let’s get started.
Laravel Installation
Open terminal and run this command to create a laravel project.
composer create-project laravel/laravel myblogIt will create a project folder with name myblog inside your local system.
To start the development server of laravel –
php artisan serveURL: http://127.0.0.1:8000
Assuming laravel already installed inside your system.
Setup File Controller
Back to project terminal and run this command,
$ php artisan make:controller FileControllerIt will create FileController.php file inside /app/Http/Controllers folder.
Open file and write this code into it.
<?php

namespace App\Http\Controllers;

use Illuminate\Http\Request;

class FileController extends Controller
{
    public function index()
    {
        return view('file-upload');
    }

    public function store(Request $request)
    {
        $request->validate([
            'file' => 'required',
        ]);

        $fileName = time() . '.' . request()->file->getClientOriginalExtension();

        request()->file->move(public_path('files'), $fileName);

        return response()->json(['success' => 'You have successfully uploaded file.']);
    }
}
You will find all uploaded files in /public/files folder.
Here, is the logical added into controller.
request()->file->move(public_path('files'), $fileName);You can also use the concept to save data into database table.
Next, you need to create blade template file from where file will be uploaded.
Create Blade Template
Create file-upload.blade.php file inside /resources/views folder.
Read More: Laravel 10 Livewire Multistep Form Wizard Tutorial
Open file and write this complete code into it.
<!DOCTYPE html>
<html lang="{{ str_replace('_', '-', app()->getLocale()) }}">

<head>
    <meta charset="utf-8">
    <meta name="viewport" content="width=device-width, initial-scale=1">
    <title>How To Upload File with Progress Bar in Laravel 10 Tutorial - Online Web Tutor</title>
    <link href="https://cdn.jsdelivr.net/npm/bootstrap@5.0.1/dist/css/bootstrap.min.css" rel="stylesheet">
</head>

<body>
    <div class="container mt-5" style="max-width: 900px">

        <div class="alert alert-primary mb-4 text-center">
            <h4 style="font-size: 18px;">How To Upload File with Progress Bar in Laravel 10 Tutorial - Online Web Tutor
            </h4>
        </div>
        <form id="fileUploadForm" method="POST" action="{{ route('file.upload') }}" enctype="multipart/form-data">
            @csrf
            <div class="form-group mb-3">
                <input name="file" type="file" class="form-control">
            </div>
            <div class="form-group">
                <div class="progress">
                    <div class="progress-bar progress-bar-striped progress-bar-animated bg-success" role="progressbar"
                        aria-valuenow="0" aria-valuemin="0" aria-valuemax="100" style="width: 0%"></div>
                </div>
            </div>
            <div class="d-grid mt-4">
                <input type="submit" value="Submit" class="btn btn-primary">
            </div>
        </form>
    </div>
    <script src="https://ajax.googleapis.com/ajax/libs/jquery/3.3.1/jquery.min.js"></script>
    <script src="https://cdnjs.cloudflare.com/ajax/libs/jquery.form/4.3.0/jquery.form.min.js"></script>
    <script>
    $(function() {
        $(document).ready(function() {
            $('#fileUploadForm').ajaxForm({
                beforeSend: function() {
                    var percentage = '0';
                },
                uploadProgress: function(event, position, total, percentComplete) {
                    var percentage = percentComplete;
                    $('.progress .progress-bar').css("width", percentage + '%', function() {
                        return $(this).attr("aria-valuenow", percentage) + "%";
                    })
                },
                complete: function(xhr) {
                    console.log('File has uploaded');
                }
            });
        });
    });
    </script>
</body>

</html>
Concept
Here, is the jQuery concept that used to show progress bar when file uploads.
$('#fileUploadForm').ajaxForm({
    beforeSend: function () {
        var percentage = '0';
    },
    uploadProgress: function (event, position, total, percentComplete) {
        var percentage = percentComplete;
        $('.progress .progress-bar').css("width", percentage+'%', function() {
          return $(this).attr("aria-valuenow", percentage) + "%";
        })
    },
    complete: function (xhr) {
        console.log('File has uploaded');
    }
});
Add Route
Open web.php file from /routes folder. Add this route into it.
//...

use App\Http\Controllers\FileController;

Route::controller(FileController::class)->group(function(){

    Route::get('file-upload', 'index');

    Route::post('file-upload', 'store')->name('file.upload');
});
Application Testing
Run this command into project terminal to start development server,
php artisan serveURL: http://127.0.0.1:8000/file-upload
Read More: How To Get Set Delete Cookie in laravel 10 Tutorial
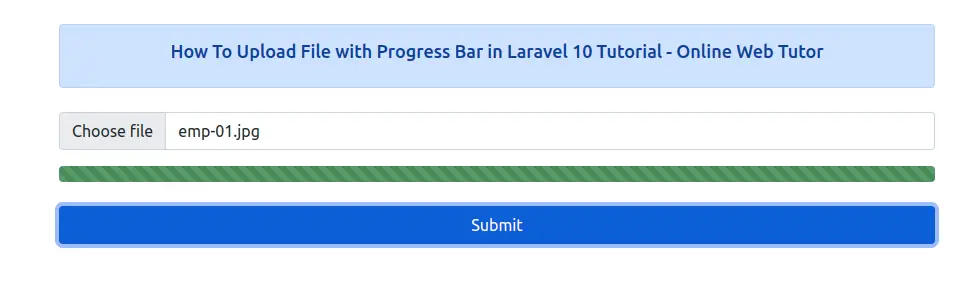
Upload form,

When file uploads,
That’s it.
We hope this article helped you to learn about How To Upload File with Progress Bar in Laravel 10 Tutorial in a very detailed way.
If you liked this article, then please subscribe to our YouTube Channel for PHP & it’s framework, WordPress, Node Js video tutorials. You can also find us on Twitter and Facebook.
Read more