
Developing a multilingual website is critical for reaching a broad global audience and offering an inclusive user experience. Laravel, a strong PHP framework, provides robust support for constructing multi-language websites, making it easier to cater to consumers from varied linguistic backgrounds.
In this tutorial, we will walk you through the process of developing a multi-language website in Laravel 10, allowing you to create dynamic and user-friendly online apps that can be viewed in various languages.
Before we get into the specifics, it’s crucial to grasp the relevance of multilingual websites. They aid with the removal of language barriers, which can lead to higher user engagement, broader market reach, and improved accessibility for multinational audiences.
Read More: Laravel 10 Language Translation Methods Tutorial
In this example, we will setup with three languages i.e English, Spanish and French website with translation.
Let’s get started.
Laravel Installation
Open terminal and run this command to create a laravel project.
composer create-project laravel/laravel myblogIt will create a project folder with name myblog inside your local system.
To start the development server of laravel –
php artisan serveURL: http://127.0.0.1:8000
Assuming laravel already installed inside your system.
What is Multi Language Website?
A multi-language website, often known as a multilingual website, is one that offers content in more than one language, allowing users from various linguistic backgrounds to access and comprehend it.
A multi-language website’s principal purpose is to reach a larger and more diversified audience by providing information in many languages.

Here, you will see some advantages of multi-language website:
Creating a multilingual website has various benefits for both businesses and users. Here are some of the primary advantages and significance of having a multilingual website:
- Increased Global Reach: By making material available to people who speak different languages, a multi-language website allows businesses to reach a global audience. This may result in higher international visibility and a larger consumer base.
- User Experience Enhancement: Providing material in users’ local languages improves the overall user experience. Visitors are more likely to interact with and comprehend the material, resulting in higher user satisfaction and longer site visits.
- Improved Accessibility: Having a website in multiple languages increases accessibility and diversity. It ensures that visitors who are not fluent in the default language of the website may nevertheless access information, products, and services.
- Competitive Advantage: In competitive markets, offering material in different languages can help a company stand out. It displays a dedication to serving a varied consumer base.
How to Setup Multi-Language files in Laravel?
To create language files, you need a lang folder in your application. Initially with fresh installation, you don’t find this folder.
Now,
To setup lang folder, run this command into project terminal:
php artisan lang:publishIt will create lang folder into your application root. Next, you need to add language files into it.
By default you will find it contains /en folder in it. This folder is for English language.
Now, you need 2 more folders in it i.e sp (for Spanish) and fr (for French) languages.
Language files Settings
Create language keys file with name messages.php inside these folders.
Folders and file be like,
- /lang/sp/messages.php
- /lang/fr/messages.php
- /lang/en/messages.php
Read More: How To Integrate Google Translator with Laravel 10 Tutorial
Add Spanish Language Keys
Open messages.php file from /lang/sp folder and add this language key into it,
<?php
return [
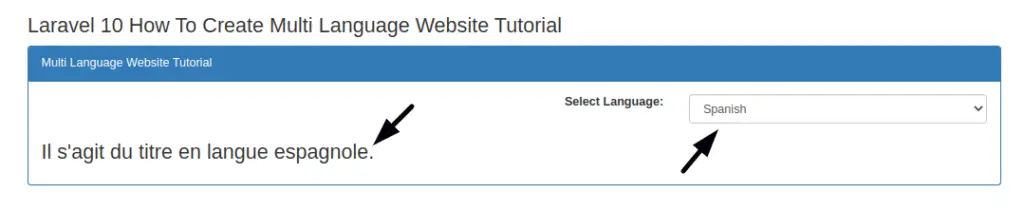
"title" => "Il s'agit du titre en langue espagnole.",
];
Add French Language Keys
Open messages.php file from /lang/fr folder and add this language key into it,
<?php
return [
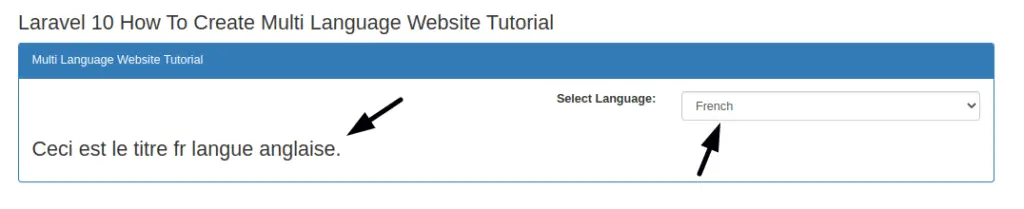
"title" => "Ceci est le titre fr langue anglaise.",
];
Add English Language Keys
Open messages.php file from /lang/en folder and add this language key into it,
<?php
return [
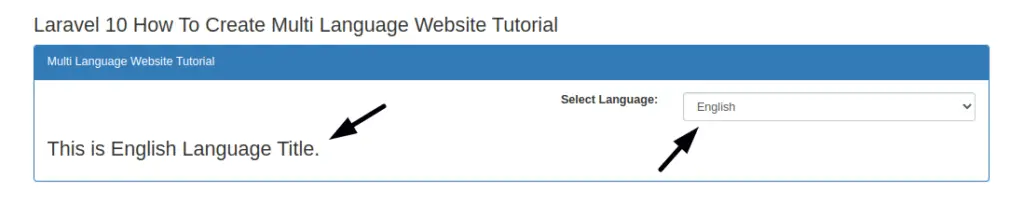
"title" => "This is English Language Title.",
];
Successfully, you have created all language keys.
Setup Language Controller
Open project terminal and run this command,
php artisan make:controller LanguageControllerIt will create a LanguageController.php file inside /app/Http/Controllers folder.
Open file and write this code into it,
<?php

namespace App\Http\Controllers;

use Illuminate\Http\Request;
use Illuminate\View\View;
use Illuminate\Support\Facades\App;
use Illuminate\Http\RedirectResponse;

class LanguageController extends Controller
{
    public function index(): View
    {
        return view('lang');
    }

    public function change(Request $request): RedirectResponse
    {
        App::setLocale($request->lang);
        session()->put('locale', $request->lang);

        return redirect()->back();
    }
}
Read More: Laravel 10 How To Create PDF Files Using TCPDF Library
Create Blade Template
Go to /resources/views folder and create a file with name lang.blade.php
Open file and write this complete code into it,
<!DOCTYPE html>
<html lang="en">

<head>
    <title>Laravel 10 How To Create Multi Language Website Tutorial</title>
    <meta charset="utf-8">
    <meta name="viewport" content="width=device-width, initial-scale=1">
    <link rel="stylesheet" href="https://maxcdn.bootstrapcdn.com/bootstrap/3.4.1/css/bootstrap.min.css">
    <script src="https://ajax.googleapis.com/ajax/libs/jquery/3.6.4/jquery.min.js"></script>
    <script src="https://maxcdn.bootstrapcdn.com/bootstrap/3.4.1/js/bootstrap.min.js"></script>
</head>

<body>

    <div class="container">
        <h3>Laravel 10 How To Create Multi Language Website Tutorial</h3>
        <div class="panel panel-primary">
            <div class="panel-heading">Multi Language Website Tutorial</div>
            <div class="panel-body">
                <div class="row">
                    <div class="col-md-2 col-md-offset-6 text-right">
                        <strong>Select Language: </strong>
                    </div>
                    <div class="col-md-4">
                        <select class="form-control changeLang">
                            <option value="en" {{ session()->get('locale') == 'en' ? 'selected' : '' }}>English</option>
                            <option value="fr" {{ session()->get('locale') == 'fr' ? 'selected' : '' }}>French</option>
                            <option value="sp" {{ session()->get('locale') == 'sp' ? 'selected' : '' }}>Spanish</option>
                        </select>
                    </div>
                </div>

                <h3>{{ __('messages.title') }}</h3>
            </div>
        </div>
    </div>

    <script type="text/javascript">
    $(function() {
        var url = "{{ route('changeLang') }}";

        $(".changeLang").change(function() {
            window.location.href = url + "?lang=" + $(this).val();
        });
    });
    </script>

</body>

</html>
Next,
Settings of Language Middleware
Open project terminal and run this command,
php artisan make:middleware LanguageManagerIt will create a file LanguageManager.php inside /app/Http/Middleware folder.
Open file and write this code into it.
<?php

namespace App\Http\Middleware;

use Closure;
use Illuminate\Http\Request;
use Symfony\Component\HttpFoundation\Response;
use Illuminate\Support\Facades\App;

class LanguageManager
{
    /**
     * Handle an incoming request.
     *
     * @param  \Closure(\Illuminate\Http\Request): (\Symfony\Component\HttpFoundation\Response)  $next
     */
    public function handle(Request $request, Closure $next): Response
    {
        if (session()->has('locale')) {

            App::setLocale(session()->get('locale'));
        }

        return $next($request);
    }
}
Register Language Middleware via Kernel.php
Open Kernel.php file from /app/Http folder.
Search for $middlewareGroups and go inside web,
/**
 * The application's route middleware groups.
 *
 * @var array<string, array<int, class-string|string>>
 */
protected $middlewareGroups = [
    'web' => [

        //...

        \App\Http\Middleware\LanguageManager::class,
    ],

    'api' => [

        //...
    ],
];
Add Route
Open web.php from /routes folder and add these route into it.
//...
use App\Http\Controllers\LanguageController;

//...

Route::get('lang/home', [LanguageController::class, 'index']);
Route::get('lang/change', [LanguageController::class, 'change'])->name('changeLang');
Application Testing
Run this command into project terminal to start development server,
php artisan serveURL: http://127.0.0.1:8000/lang/home
When English language will be selected,
When Spanish language will be selected,
When French language will be selected,
That’s it.
We hope this article helped you to learn Laravel 10 How To Create Multi Language Website Tutorial in a very detailed way.
If you liked this article, then please subscribe to our YouTube Channel for PHP & it’s framework, WordPress, Node Js video tutorials. You can also find us on Twitter and Facebook.
Read more