
Making your web application available to a global audience requires you to create a multi-language website. Laravel, a sophisticated PHP framework, provides extensive tools for easily constructing such websites.
This tutorial will walk you through the process of building a multi-language website in Laravel 10, allowing you to efficiently reach and engage users in many languages.
By the end of this tutorial, you’ll have the skills and knowledge necessary to create a multi-language website in Laravel 10. It ensures that your web application can effectively communicate with users in different languages, thereby expanding your reach and making your application more accessible to a global audience.
Read More: Laravel 10 Generate Custom Validation Error Messages
Let’s get started.
What is a Multi Language Website?
A multi-language website, often known as a multilingual website, is one that provides material in multiple languages. A multi-language website’s principal goal is to cater to a varied audience, which includes visitors from various linguistic origins and geographies.

Such websites strive to improve user experience, accessibility, and reach a larger worldwide audience by delivering material in various languages.
Creating a multilingual website has several big advantages,
- Global Reach
- Improved User Experience
- Increased Conversions
- Competitive Advantage
- International Market Expansion
Now, you will see how to setup a multi-language website.
Laravel Installation
Open terminal and run this command to create a laravel project.
composer create-project laravel/laravel myblogIt will create a project folder with name myblog inside your local system.
To start the development server of laravel –
php artisan serveURL: http://127.0.0.1:8000
Assuming laravel already installed inside your system.
How To Install Google Translator Package in Laravel?
To install Google Translator Package, open the project prompt and enter this command. This package will assist you in using the google-translator-language working functions.
composer require stichoza/google-translate-phpYou will see installation like this:
Next,
Settings of Google Translator Package
We need to configure this “google translator package” inside application.
Open app.php file from /config folder. Search for “aliases” and add this line of code into it.
/*
|--------------------------------------------------------------------------
| Class Aliases
|--------------------------------------------------------------------------
|
| This array of class aliases will be registered when this application
| is started. However, feel free to register as many as you wish as
| the aliases are "lazy" loaded so they don't hinder performance.
|
*/

'aliases' => Facade::defaultAliases()->merge([
    // 'Example' => App\Facades\Example::class,
    'GoogleTranslate' => Stichoza\GoogleTranslate\GoogleTranslate::class
])->toArray(),
Setup Language Controller
You need to create a language controller file,
php artisan make:controller LangControllerIt will create LangController.php file inside /app/Http/Controllers folder.
Read More: How To Get env Variable inside Laravel Blade Templates
Open file and write this following code into it.
<?php

namespace App\Http\Controllers;

use Illuminate\Contracts\View\View;
use Illuminate\Http\Request;
use Illuminate\Support\Facades\App;

class LangController extends Controller
{
    public function index(): View
    {
        return view('lang');
    }

    public function change(Request $request)
    {
        App::setLocale($request->lang);

        session()->put('locale', $request->lang);

        return redirect()->back();
    }
}
Create Blade Template File
Go inside /resources/views folder, create a file with name lang.blade.php
Open file and write this complete code into it.
<!DOCTYPE html>
<html lang="en">

<head>
    <meta charset="UTF-8">
    <meta name="viewport" content="width=device-width, initial-scale=1.0">
    <title>Laravel 10 Create Multi Language Website Tutorial</title>
    <link rel="stylesheet" href="https://cdn.jsdelivr.net/npm/bootstrap@4.6.1/dist/css/bootstrap.min.css">
    <script src="https://cdnjs.cloudflare.com/ajax/libs/jquery/3.5.1/jquery.min.js"></script>
</head>

<body>
    <div class="container mt-5">
        <div class="row">
            <div class="col-md-12">
                <div class="card w-75 m-auto">
                    <div class="card-header text-center bg-primary text-white">
                        <h4 style="font-size: 17px;">Laravel 10 Create Multi Language Website Tutorial</h4>
                    </div>
                    <div class="card-body">
                        <div class="row">
                            <div class="col-md-4">
                                <strong>Select Language: </strong>
                            </div>
                            <div class="col-md-4">
                                <select class="form-select changeLang">
                                    <option value="en" {{ session()->get('locale') == 'en' ? 'selected' : '' }}>
                                        English
                                    </option>
                                    <option value="fr" {{ session()->get('locale') == 'fr' ? 'selected' : '' }}>
                                        French
                                    </option>
                                    <option value="ar" {{ session()->get('locale') == 'ar' ? 'selected' : '' }}>
                                        Arabic
                                    </option>
                                    <option value="hi" {{ session()->get('locale') == 'hi' ? 'selected' : '' }}>
                                        Hindi
                                    </option>
                                </select>
                            </div>
                        </div>

                        <div style="margin-top: 20px;">
                            <p>{{ GoogleTranslate::trans('Welcome to Online Web Tutor', app()->getLocale()) }}</p>
                            <p>{{ GoogleTranslate::trans('It is a passionate and innovative Web Development Community dedicated to empowering aspiring web developers with the latest tools and techniques. Our platform offers a comprehensive range of web development courses, including PHP and its frameworks, Node.js, MySQL, Javascript and WordPress.', app()->getLocale()) }}
                            </p>
                        </div>
                    </div>
                </div>
            </div>
        </div>
    </div>

    <!--- Language Change event from Dropdown --->
    <script type="text/javascript">
    var url = "{{ route('changeLang') }}";

    $(".changeLang").change(function() {
        window.location.href = url + "?lang=" + $(this).val();
    });
    </script>

</body>

</html>
Next,
Settings of Language Middleware
Open project terminal and run this command,
php artisan make:middleware LanguageManagerIt will create a file LanguageManager.php inside /app/Http/Middleware folder.
Open file and write this code into it.
<?php

namespace App\Http\Middleware;

use Closure;
use Illuminate\Http\Request;
use Symfony\Component\HttpFoundation\Response;
use Illuminate\Support\Facades\App;

class LanguageManager
{
    /**
     * Handle an incoming request.
     *
     * @param  \Closure(\Illuminate\Http\Request): (\Symfony\Component\HttpFoundation\Response)  $next
     */
    public function handle(Request $request, Closure $next): Response
    {
        if (session()->has('locale')) {

            App::setLocale(session()->get('locale'));
        }

        return $next($request);
    }
}
Register Language Middleware via Kernel.php
Open Kernel.php file from /app/Http folder.
Read More: Laravel 10 How To Update Data by Ajax Request Tutorial
Search for $middlewareGroups and go inside web,
/**
 * The application's route middleware groups.
 *
 * @var array<string, array<int, class-string|string>>
 */
protected $middlewareGroups = [
    'web' => [

        //...

        \App\Http\Middleware\LanguageManager::class,
    ],

    'api' => [

        //...
    ],
];
Add Route
Open web.php from /routes folder and add these route into it.
//...
use App\Http\Controllers\LangController;

//...

Route::get('lang/home', [LangController::class, 'index']);
Route::get('lang/change', [LangController::class, 'change'])->name('changeLang');
Application Testing
Run this command into project terminal to start development server,
php artisan serveURL: http://127.0.0.1:8000/lang/home
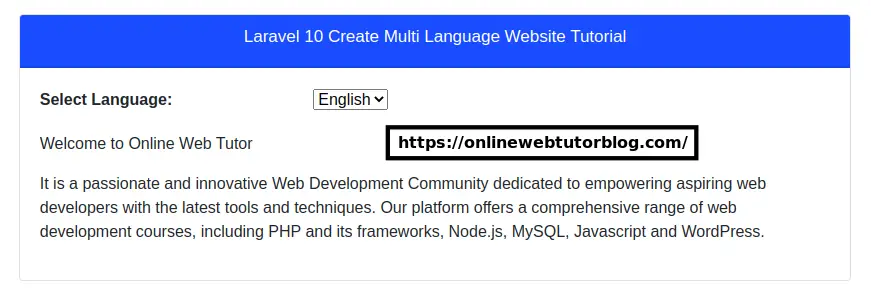
When English language will be selected,
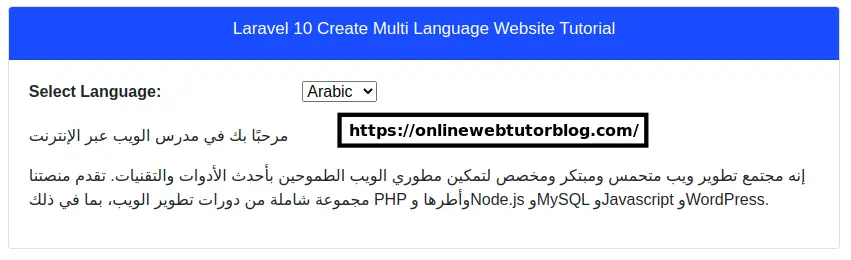
When Arabic language will be selected,
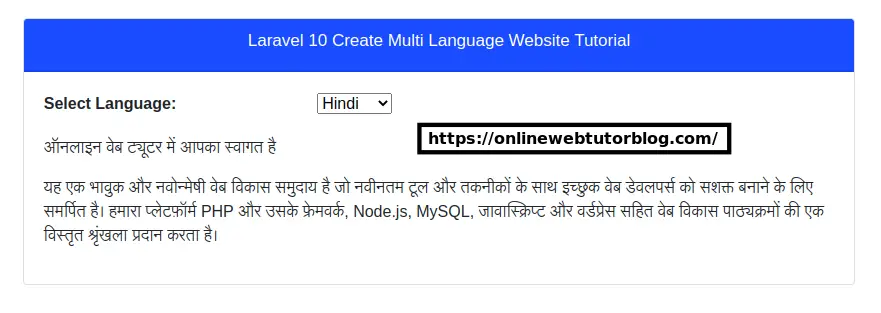
When Hindi language will be selected,
For more languages, you can find the complete language and it’s code guide here.
That’s it.
We hope this article helped you to Learn about How To Integrate Google Translator with Laravel 10 Tutorial in a very detailed way.
If you liked this article, then please subscribe to our YouTube Channel for PHP & it’s framework, WordPress, Node Js video tutorials. You can also find us on Twitter and Facebook.
Read more