
Validation is an important part of web application development since it ensures that user inputs meet particular criteria and comply to the standards of your programme. While Laravel has many built-in validation rules, customising validation error messages is critical for providing clear and user-friendly feedback.
In this lesson, we’ll look at how to create custom validation error messages in Laravel 10, which will allow you to design more informative and user-centric error answers.
We will look at methods and techniques for customising validation error messages in Laravel 10 throughout this article. We’ll look at real-world examples and best practises to ensure that you can develop error messages that not only express the problem but also successfully help users through its resolution.
Read More: How To Get env Variable inside Laravel Blade Templates
Let’s get started.
Laravel Installation
Open terminal and run this command to create a laravel project.
composer create-project laravel/laravel myblogIt will create a project folder with name myblog inside your local system.
To start the development server of laravel –
php artisan serveURL: http://127.0.0.1:8000
Assuming laravel already installed inside your system.
Setup Data Controller
Open project terminal and run this command,
php artisan make:controller FormControllerIt will create a file FormController.php inside /app/Http/Controllers folder.
Open file and write this code into it.
<?php

namespace App\Http\Controllers;

use Illuminate\Http\Request;
use Illuminate\View\View;

class FormController extends Controller
{
    public function index(): View
    {
        return view('form');
    }

    public function store(Request $request)
    {
        $request->validate(
            [
                'name' => 'required',
                'password' => 'required',
                'email' => 'required'
            ],
            [
                'name' => [
                    'required' => 'Name field is required'
                ],
                'password' => [
                    'required' => 'Password field is required'
                ],
                'email' => [
                    'required' => 'Email field is required'
                ]
            ]
        );

        // Your Next Logic with form data
        $input = $request->all();

        return back()->with('success', 'User created successfully.');
    }
}
Concept of Data Validation
The $request->validate() method in Laravel is used to validate incoming HTTP request data, generally via user-submitted forms. This function allows you to set validation criteria for request data and provides an easy approach to validate data.
Read More: Laravel 10 How To Update Data by Ajax Request Tutorial
Syntax
Here’s the syntax of the $request->validate() method:
$request->validate(
    array $rules,
    array $messages = [],
    array $customAttributes = []
);
Example of validation rules:
$rules = [
    'name' => 'required|string|max:255',
    'email' => 'required|email|unique:users,email',
    'password' => 'required|string|min:8|confirmed',
];
Example of custom error messages:
$messages = [
    'name.required' => 'The name field is required.',
    'email.required' => 'Please provide an email address.',
];
OR
$messages = [
    'name' => [
        'required' => 'Name field is required',
        'string' => 'Name should be of String type',
        'max' => 'Maximum character for name field should be 255'
    ],
    'password' => [
        'required' => 'Password field is required'
    ],
    'email' => [
        'required' => 'Email field is required'
    ]
]
Example of custom attributes:
$customAttributes = [
    'name' => 'Full Name',
    'email' => 'Email Address',
];
In alternate, you can use Validator facade to implement form validation with rules and messages.
use Illuminate\Support\Facades\Validator;

$data = [
    'name' => 'John Doe',
    'email' => 'johndoe@example.com',
];

$rules = [
    'name' => 'required|string|max:255',
    'email' => 'required|email|unique:users,email',
];

$validator = Validator::make($data, $rules);
Next,
Setup Blade Template File
Create a fie form.blade.php inside /resources/views folder.
Open file and write this code into it.
<!DOCTYPE html>
<html>

<head>
    <title>Laravel 10 Generate Custom Validation Error Messages</title>
    <meta charset="utf-8">
    <meta http-equiv="X-UA-Compatible" content="IE=edge">
    <meta name="viewport" content="width=device-width, initial-scale=1">
    <link href="https://cdn.jsdelivr.net/npm/bootstrap@5.0.2/dist/css/bootstrap.min.css" rel="stylesheet">
</head>

<body>
    <div class="container">
        <div class="row">
            <div class="col-md-12 mt-5">
                <div class="row">
                    <h4 class="col-md-7 ps-2 m-0">Laravel 10 Generate Custom Validation Error Messages</h4>
                    <form method="POST" action="{{ route('store') }}" class="border rounded p-5 mt-5"
                        autocomplete='off'>
                        @csrf
                        <div class="col-md-12">
                            <div class="row">
                                @if(Session::has('success'))
                                <div class="alert alert-success">
                                    {{ Session::get('success') }}
                                    @php
                                    Session::forget('success');
                                    @endphp
                                </div>
                                @endif
                            </div>
                        </div>
                        <div class="col-md-12 mt-2">
                            <label for="name" class="form-label mb-0">Name:</label>
                            <input type="text" name="name" class="form-control" placeholder="Name">
                            @if ($errors->has('name'))
                            <span class="text-danger">{{ $errors->first('name') }}</span>
                            @endif
                        </div>
                        <div class="col-md-12 mt-2">
                            <label for="email" class="form-label mb-0">Email:</label>
                            <input type="text" name="email" class="form-control" placeholder="Email">
                            @if ($errors->has('email'))
                            <span class="text-danger">{{ $errors->first('email') }}</span>
                            @endif
                        </div>
                        <div class="col-md-12 mt-2">
                            <label for="password" class="form-label mb-0">Password:</label>
                            <input type="password" name="password" class="form-control" placeholder="Password">
                            @if ($errors->has('password'))
                            <span class="text-danger">{{ $errors->first('password') }}</span>
                            @endif
                        </div>
                        <div class="col-md-12">
                            <button class="col-md-12 btn btn-success btn-submit mt-3">Submit</button>
                        </div>
                    </form>
                </div>
            </div>
        </div>
    </div>
</body>

</html>
Add Route
Open web.php from /routes folder. Add these routes into it.
//...

use App\Http\Controllers\FormController;

Route::get('form', [FormController::class, 'index'])->name('form');
Route::post('store', [FormController::class, 'store'])->name('store');
//...
Application Testing
Run this command into project terminal to start development server,
php artisan serveURL: http://127.0.0.1:8000/form
Read More: Laravel 10 Re-Usable Component Class Example Tutorial
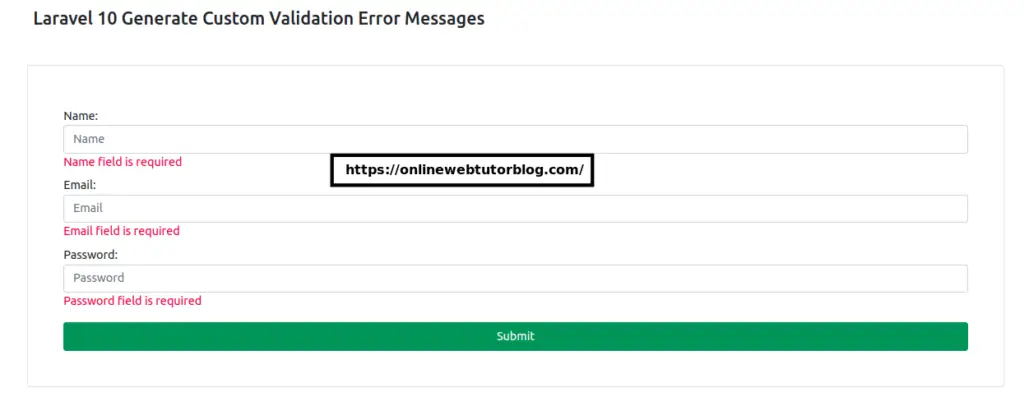
Whenever you submit form without any value,
Once, you submit form with all input data then form will be submitted with success message.
That’s it.
We hope this article helped you to learn about Laravel 10 Generate Custom Validation Error Messages in a very detailed way.
If you liked this article, then please subscribe to our YouTube Channel for PHP & it’s framework, WordPress, Node Js video tutorials. You can also find us on Twitter and Facebook.
Read more