In the ever-changing web development landscape, designing custom components is a skill that allows developers to build modular and reusable code.
Laravel 10, recognised for its developer-friendly environment and rich capabilities, makes creating custom component classes simple. This tutorial will walk you through the process of effectively designing new component classes in Laravel 10.
Throughout this article, we’ll go over the processes needed to develop reusable component classes in Laravel 10 and show how they can be used in practise with real-world applications. By the end of this course, you’ll be able to create custom components for your Laravel 10 projects that improve code organisation, reusability, and maintainability.
Read More: Laravel 10 How To Delete Data by Ajax Request Tutorial
Let’s get started.
What is Component in laravel?
A component in Laravel is a reusable and self-contained bit of code that encapsulates a single piece of functionality, as well as its accompanying view and, in certain cases, logic.
Components are used in web applications to generate modular and maintainable views. Laravel 7 introduces the component system, which is built on top of the Blade templating engine.
Here are the key components of a Laravel component:
- View: A Blade view file that describes the component’s HTML structure and presentation logic. Blade directives, HTML, and even JavaScript or CSS particular to that component can be included.
- Class: The component is represented by a PHP class. This class may provide data-handling methods and logic relevant to the component. Laravel automatically associates a component’s view and class.
- Attributes: When a component is included in a Blade template, it can be supplied parameters or data. These characteristics are used to modify the component’s behaviour or appearance.
- Slots (optional): Slots enable you to transmit content from the parent view into particular areas of the component’s view. Components with slots are more adaptable and customizable.
Next, you will see how to create component class with data from users table. Load user data by using component class.
Laravel Installation
Open terminal and run this command to create a laravel project.
composer create-project laravel/laravel myblogIt will create a project folder with name myblog inside your local system.
To start the development server of laravel –
php artisan serveURL: http://127.0.0.1:8000
Assuming laravel already installed inside your system.
Create Database & Connect
To create a database, either we can create via Manual tool of PhpMyadmin or by means of a mysql command.
CREATE DATABASE laravel_app;
To connect database with application, Open .env file from application root. Search for DB_ and update your details.
DB_CONNECTION=mysql
DB_HOST=127.0.0.1
DB_PORT=3306
DB_DATABASE=laravel_app
DB_USERNAME=root
DB_PASSWORD=root
Read More: Laravel 10 How To Add Pagination Links Example Tutorial
How To Generate Fake Data in Laravel?
To generate fake data in a very easier way, you can use the concept of Factory.
Once you install laravel setup, you should see these files –
- User.php a model file inside /app/Models folder.
- UserFactory.php a factory file inside /database/factories folder.
You can use concept of factory to seed dummy data to this application.
But first you need to migrate your application’s migration to create users table into your database.
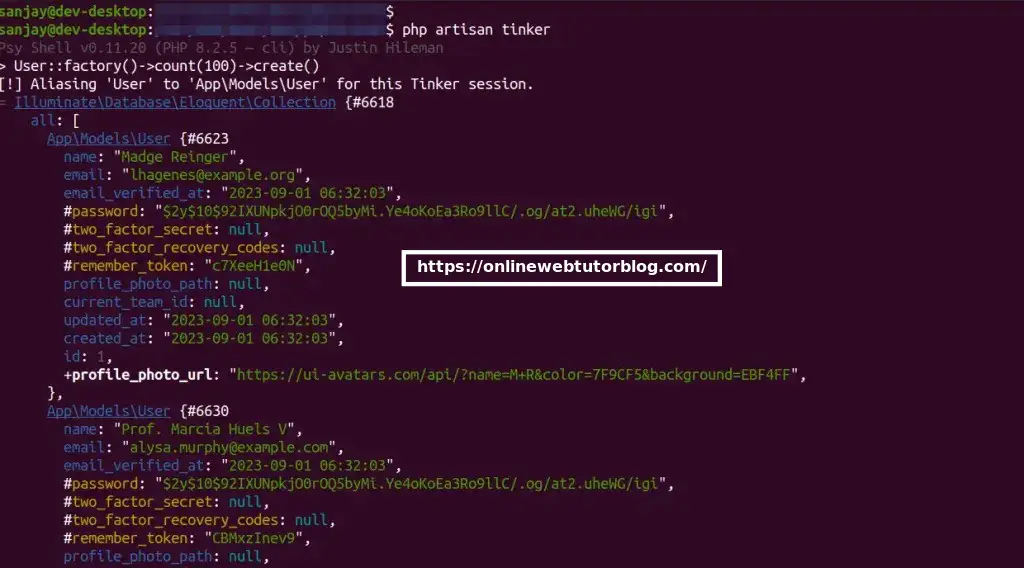
Go to tinker shell,
$ php artisan tinkerIt will open tinker shell to execute commands. Copy and paste this command and execute to create test data.
>>> User::factory()->count(100)->create()It will generate 100 fake rows of users into table.
Tinker shell,
Next,
Database table,

Step #1: How To Create Component Class in Laravel?
To create a new component, you can use the artisan command-line tool. For example, to create a component named User, you can run:
$ php artisan make:component UserThis command will generate two files in your application,
- Component class User.php inside /app/View/Components folder.
- Blade view file user.blade.php inside /resources/views/components folder.
Step #2: Defining the Component Class
Open component class User.php from /app/View/Components folder.
Write this complete code into it.
<?php

namespace App\View\Components;

use Closure;
use Illuminate\Contracts\View\View;
use Illuminate\View\Component;

class User extends Component
{
    public $user;
    /**
     * Create a new component instance.
     */
    public function __construct($user)
    {
        $this->user = $user;
    }

    /**
     * Get the view / contents that represent the component.
     */
    public function render(): View|Closure|string
    {
        return view('components.user');
    }
}
Step #3: Defining the Component View
Open component class user.blade.php from /resources/views/components folder.
Write this complete code into it.
<tr>
    <td>{{ $user->id }}</td>
    <td>{{ $user->name }}</td>
    <td>{{ $user->email }}</td>
    <td>
        <a href="javascript:void(0)"
           data-url="{{ route('users.show', $user->id) }}"
           class="btn btn-info show-user">
           Show
        </a>
    </td>
</tr>
Step #4: How To Call Component in Application
To call component class,
Here, we are accepting data inside component so it will be,
<x-user :user="$user" />We will test component class with test users data.
Read More: Laravel 10 How To Get Data by Ajax Request Tutorial
Setup Controller Class
First, create a controller class,
$ php artisan make:controller DataControllerIt will create a file DataController.php inside /app/Http/Controllers folder.
Open file and write this complete code into it.
<?php

namespace App\Http\Controllers;

use Illuminate\Http\Request;
use App\Models\User;
use Illuminate\View\View;

class DataController extends Controller
{
    public function index(): View
    {
        $users = User::paginate(10);

        return view('data', compact('users'));
    }

    public function show($id)
    {
        $user = User::find($id);

        return response()->json($user);
    }
}
Setup Blade Layout File
Go to /resources/views folder and create a file with name data.blade.php
Open file and write this complete code into it,
<!DOCTYPE html>
<html>

<head>
    <title>Laravel 10 Custom Component Class Example Tutorial</title>
    <link href="https://cdnjs.cloudflare.com/ajax/libs/twitter-bootstrap/5.0.1/css/bootstrap.min.css" rel="stylesheet">
    <script src="https://cdnjs.cloudflare.com/ajax/libs/jquery/3.6.0/jquery.min.js"></script>
    <script src="https://cdn.jsdelivr.net/npm/bootstrap@5.0.2/dist/js/bootstrap.bundle.min.js"></script>
</head>

<body>

    <div class="container" style="margin-top: 10px;">

        <h3 style="text-align: center;">Laravel 10 Custom Component Class Example Tutorial</h3>

        <table class="table table-bordered data-table" style="margin-top: 30px;">
            <thead>
                <tr>
                    <th>ID</th>
                    <th>Name</th>
                    <th>Email</th>
                    <th>Action</th>
                </tr>
            </thead>
            <tbody>
                @foreach ($users as $user)
                    <x-user :user="$user" />
                @endforeach
            </tbody>
        </table>
        {!! $users->withQueryString()->links('pagination::bootstrap-5') !!}

    </div>

    <!-- Modal -->

    <div class="modal fade" id="userShowModal" tabindex="-1" aria-labelledby="exampleModalLabel" aria-hidden="true">
        <div class="modal-dialog">
            <div class="modal-content">

                <div class="modal-header">
                    <h5 class="modal-title" id="exampleModalLabel">User details</h5>
                    <button type="button" class="btn-close" data-bs-dismiss="modal" aria-label="Close"></button>

                </div>

                <div class="modal-body">
                    <p><strong>ID:</strong> <span id="user-id"></span></p>
                    <p><strong>Name:</strong> <span id="user-name"></span></p>
                    <p><strong>Email:</strong> <span id="user-email"></span></p>
                </div>

                <div class="modal-footer">
                    <button type="button" class="btn btn-secondary" data-bs-dismiss="modal">Close</button>
                </div>
            </div>
        </div>
    </div>

</body>

<script type="text/javascript">
    $(document).ready(function() {

        /*------------------------------------------
        --------------------------------------------
        When click user on Show Button
        --------------------------------------------
        --------------------------------------------*/
        $(document).on('click', '.show-user', function() {

            var userURL = $(this).data('url');

            $.ajax({
                url: userURL,
                type: 'GET',
                dataType: 'json',
                success: function(data) {
                    $('#userShowModal').modal('show');
                    $('#user-id').text(data.id);
                    $('#user-name').text(data.name);
                    $('#user-email').text(data.email);
                }
            });

        });

    });

</script>

</html>
Concept
Calling component view file for each row data binding.
@foreach ($users as $user)

           <x-user :user="$user" />

@endforeach
Add Route
Open web.php from /routes folder and add these route into it.
//...
use App\Http\Controllers\DataController;

//...

Route::get('users', [DataController::class, 'index']);
Route::get('users/{id}', [DataController::class, 'show'])->name('users.show');
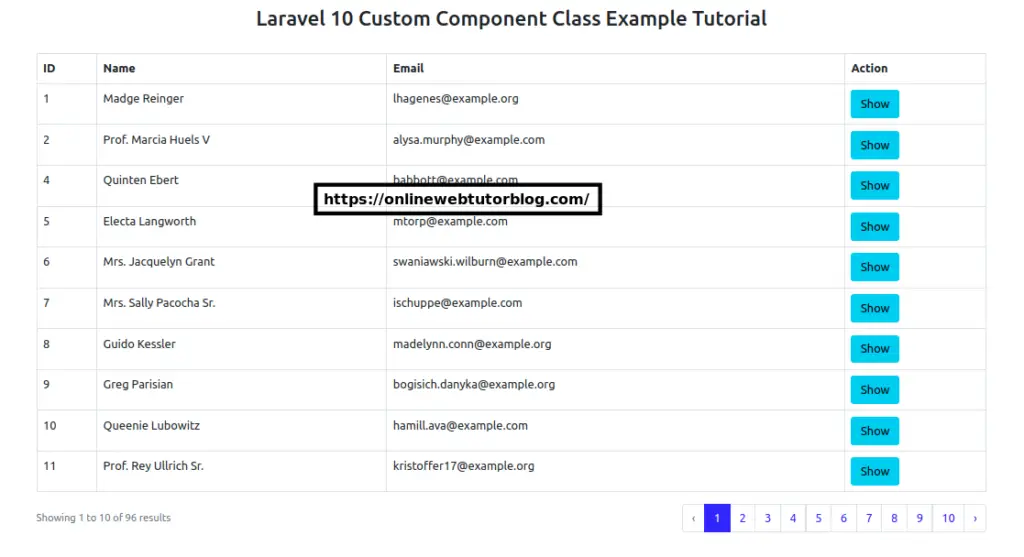
Application Testing
Run this command into project terminal to start development server,
php artisan serveURL: http://127.0.0.1:8000/users
Read More: Laravel 10 RESTful APIs with JWT Authentication Tutorial
You can see, users data loaded using component view file.
That’s it.
We hope this article helped you to Laravel 10 Re-Usable Component Class Example Tutorial in a very detailed way.
If you liked this article, then please subscribe to our YouTube Channel for PHP & it’s framework, WordPress, Node Js video tutorials. You can also find us on Twitter and Facebook.
Read more