In most of the web applications, there are role wise dashboard access which means there are some user levels according to which application access will be maintained.
Inside this article we will see Laravel 8 multi authentication i.e role based access control.
This will be very easy guide followed to develop an application where we have two types of users – Admin and Normal user which will logs into application.
For this tutorial we will use the concept of middleware, auth scaffold etc. This is totally step by step laravel role wise authentication tutorial using laravel/ui.
Let’s get started.
Laravel Installation
We will create laravel project using composer. So, please make sure your system should have composer installed. If not, may be this article will help you to Install composer in system.
Here is the command to create a laravel project-
composer create-project --prefer-dist laravel/laravel blog
To start the development server of Laravel –
php artisan serve
URL: http://127.0.0.1:8000
Assuming laravel already installed inside your system.
Create Database & Connect
To create a database, either we can create via Manual tool of PhpMyadmin or by means of a mysql command.
CREATE DATABASE laravel_app;
To connect database with application, Open .env file from application root. Search for DB_ and update your details.
DB_CONNECTION=mysql
DB_HOST=127.0.0.1
DB_PORT=3306
DB_DATABASE=laravel_app
DB_USERNAME=root
DB_PASSWORD=root
Update Migration
Open 2014_10_12_000000_create_users_table.php file from /database/migrations folder. This is by default user table migration file which you will get while laravel setup installation.
Open file and update with this complete code.
<?php

use Illuminate\Database\Migrations\Migration;
use Illuminate\Database\Schema\Blueprint;
use Illuminate\Support\Facades\Schema;

class CreateUsersTable extends Migration
{
    /**
     * Run the migrations.
     *
     * @return void
     */
    public function up()
    {
        Schema::create('users', function (Blueprint $table) {
            $table->id();
            $table->string('name');
            $table->string('email')->unique();
            $table->boolean('is_admin')->nullable(); // adding this
            $table->timestamp('email_verified_at')->nullable();
            $table->string('password');
            $table->rememberToken();
            $table->timestamps();
        });
    }

    /**
     * Reverse the migrations.
     *
     * @return void
     */
    public function down()
    {
        Schema::dropIfExists('users');
    }
}
Run Migrate
Open project into terminal and run this artisan command to migrate.
$ php artisan migrate
It will create users table into database.
Create Seeder File
We need few test users into our database. We will create one Admin user and other is normal user.
Open project into terminal and run this command.
$ php artisan make:seeder CreateUsersSeeder
It will create a file CreateUsersSeeder.php at location /database/seeders. Open file and write this complete code into it,
<?php

namespace Database\Seeders;

use Illuminate\Database\Seeder;
use App\Models\User;

class CreateUsersSeeder extends Seeder
{
    /**
     * Run the database seeds.
     *
     * @return void
     */
    public function run()
    {
        $user = [
            [
                'name' => 'Admin',
                'email' => 'admin@onlinewebtutorblog.com',
                'is_admin' => '1',
                'password' => bcrypt('123456'),
            ],
            [
                'name' => 'User',
                'email' => 'normal@onlinewebtutorblog.com',
                'is_admin' => '0',
                'password' => bcrypt('123456'),
            ],
        ];

        foreach ($user as $key => $value) {
            User::create($value);
        }
    }
}
Seed Data
Run this command to terminal.
$ php artisan db:seed --class=CreateUsersSeeder
Update Model
Open User.php from /app/Models folder. This is also the by default created model file by laravel installation.
Open User.php and update by this complete code.
<?php

namespace App\Models;

use Illuminate\Contracts\Auth\MustVerifyEmail;
use Illuminate\Database\Eloquent\Factories\HasFactory;
use Illuminate\Foundation\Auth\User as Authenticatable;
use Illuminate\Notifications\Notifiable;

class User extends Authenticatable
{
    use HasFactory, Notifiable;

    /**
     * The attributes that are mass assignable.
     *
     * @var array
     */
    protected $fillable = [
        'name',
        'email',
        'password',
        'is_admin' // adding this
    ];

    /**
     * The attributes that should be hidden for arrays.
     *
     * @var array
     */
    protected $hidden = [
        'password',
        'remember_token',
    ];

    /**
     * The attributes that should be cast to native types.
     *
     * @var array
     */
    protected $casts = [
        'email_verified_at' => 'datetime',
    ];
}
Create Auth Scaffold Using Laravel UI
We will use laravel/ui package to create auth scaffolding like login, registration etc.
Open project into terminal and run this command into it. We have to run series of command for complete features.
$ composer require laravel/ui

$ php artisan ui bootstrap --auth

$ npm install && npm run dev
Create Middleware
We need a middleware which allows the protected routes access only for admin.
$ php artisan make:middleware IsAdmin
This command will create a file IsAdmin.php at /app/Http/Middleware folder.
Open IsAdmin.php file and write this following code into it.
<?php

namespace App\Http\Middleware;

use Closure;

class IsAdmin
{
    /**
     * Handle an incoming request.
     *
     * @param  \Illuminate\Http\Request  $request
     * @param  \Closure  $next
     * @return mixed
     */
    public function handle($request, Closure $next)
    {
        if(auth()->user()->is_admin == 1){
            return $next($request);
        }

        return redirect('home')->with('error',"You don't have admin access.");
    }
}
Register Middleware to Application
Open Kernel.php file from /app/Http folder. Add the above created middleware into that file. Search for $routeMiddleware
protected $routeMiddleware = [
      //…
      'is_admin' => \App\Http\Middleware\IsAdmin::class,
];
Create Route
Open web.php file from /routes folder and write this code into it.
<?php

use Illuminate\Support\Facades\Route;
use App\Http\Controllers\HomeController;


//.. Other routes

Auth::routes();

Route::get('admin/home', [HomeController::class, 'adminHome'])->name('admin.home')->middleware('is_admin');
Route::get('home', [HomeController::class, 'index'])->name('home');
Update LoginController File
Open LoginController.php file from /app/Http/Controllers/Auth. This is the file we get when we install laravel/ui package.
Write this complete code into that file.
<?php

namespace App\Http\Controllers\Auth;

use App\Http\Controllers\Controller;
use Illuminate\Foundation\Auth\AuthenticatesUsers;
use Illuminate\Http\Request;

class LoginController extends Controller
{
    /*
    |--------------------------------------------------------------------------
    | Login Controller
    |--------------------------------------------------------------------------
    |
    | This controller handles authenticating users for the application and
    | redirecting them to your home screen. The controller uses a trait
    | to conveniently provide its functionality to your applications.
    |
    */

    use AuthenticatesUsers;

    /**
     * Where to redirect users after login.
     *
     * @var string
     */
    protected $redirectTo = '/home';

    /**
     * Create a new controller instance.
     *
     * @return void
     */
    public function __construct()
    {
        $this->middleware('guest')->except('logout');
    }

    public function login(Request $request)
    {
        $input = $request->all();

        $this->validate($request, [
            'email' => 'required|email',
            'password' => 'required',
        ]);

        if(auth()->attempt(array('email' => $input['email'], 'password' => $input['password'])))
        {
            if (auth()->user()->is_admin == 1) {
                return redirect()->route('admin.home');
            }else{
                return redirect()->route('home');
            }
        }else{
            return redirect()->route('login')
                ->with('error','Email-Address And Password Are Wrong.');
        }

    }
}
Add Method To Controller
Open HomeController.php file from /app/Http/Controllers folder. This is also the by default created at the time of laravel installation.
Open HomeController.php and write this complete code.
<?php

namespace App\Http\Controllers;

use Illuminate\Http\Request;

class HomeController extends Controller
{
    /**
     * Create a new controller instance.
     *
     * @return void
     */
    public function __construct()
    {
        $this->middleware('auth');
    }

    /**
     * Show the application dashboard.
     *
     * @return \Illuminate\Contracts\Support\Renderable
     */
    public function index()
    {
        return view('home');
    }

    /**
     * Show the application dashboard.
     *
     * @return \Illuminate\Contracts\Support\Renderable
     */
    public function adminHome()
    {
        return view('admin-home');
    }

}
Create Layout Files
Views files are located into /resources/views folder. We need two layout files – home.blade.php and admin-home.blade.php
home.blade.php should be present by default in setup. Open home.blade.php and write this code into it.
@extends('layouts.app')
@section('content')
<div class="container">
<div class="row justify-content-center">
<div class="col-md-8">
<div class="card">
<div class="card-header">{{ __('Dashboard') }}</div>
<div class="card-body">
@if (session('status'))
<div class="alert alert-success" role="alert">
{{ session('status') }}
</div>
@endif
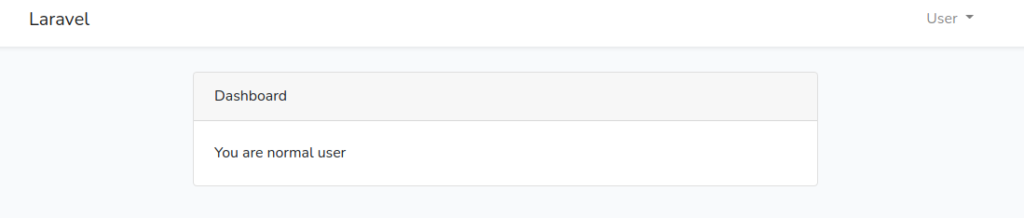
{{ __('You are normal user') }}
</div>
</div>
</div>
</div>
</div>
@endsectionCreate a new file admin-home.blade.php into /resources/views folder. Open admin-home.blade.php and write this code into it,
@extends('layouts.app')
@section('content')
<div class="container">
<div class="row justify-content-center">
<div class="col-md-8">
<div class="card">
<div class="card-header">{{ __('Dashboard') }}</div>
<div class="card-body">
@if (session('status'))
<div class="alert alert-success" role="alert">
{{ session('status') }}
</div>
@endif
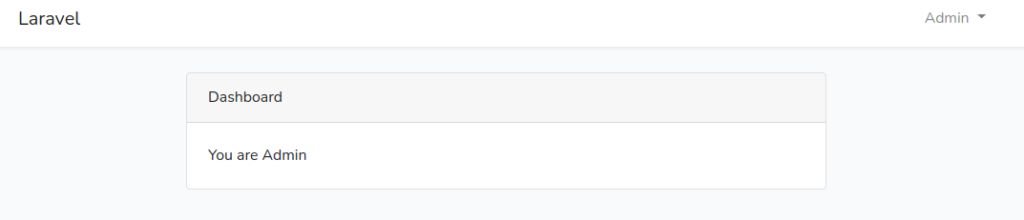
{{ __('You are Admin') }}
</div>
</div>
</div>
</div>
</div>
@endsectionApplication Testing
Run this command into project terminal to start development server,
php artisan serveURL – http://127.0.0.1:8000/login
Admin
Email: admin@onlinewebtutorblog.com
Password: 123456
Normal User
Email: normal@onlinewebtutorblog.com
Password: 123456
We hope this article helped you to learn about Laravel 8 Multi Authentication – Role Based Login Tutorial in a very detailed way.
If you liked this article, then please subscribe to our YouTube Channel for PHP & it’s framework, WordPress, Node Js video tutorials. You can also find us on Twitter and Facebook.
Read more